Posts

Showing posts from June, 2018

Using Fusion 360 to Design and then Print a Box Insert for Better Organization

Image
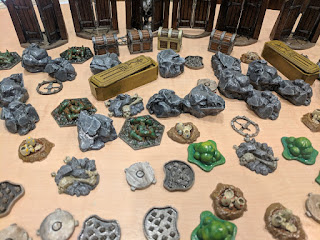
I've made a lot of terrain pieces for Gloomhaven since I got my 3D printer, and I recently crossed that critical threshold where I can't just keep them all in a single box anymore.  I was spending too much time rooting around in the box for the pieces that I wanted, so I figured that it was time to upgrade to some kind of tackle box or craft storage box or something.  Just as I came to this realization, I noticed a post on the Gloomhaven subreddit about a craft store running a big discount on storage boxes.  When there's food on my plate, you don't have to tell me to eat! After picking up a few storage boxes, I went about sorting my pieces.  I decided to put them into a fairly large box that had removable dividers along the rows, which worked out pretty well... except that I ended up using almost every cell in the box.  I had to remove a bunch of dividers for the doors and the boulders and the cave stone pillars (which aren't even in that picture!), but the cells

Why Use Trapezoids as Keys When Cutting a Model?

Image
In my model cutting for 3d printing post, I mentioned that I like to use trapezoids for alignment keys.  Why is that?  6 axial alignment, bro. Ok, that phrase is a bit ridiculous, but when I took notes on my concept for this post, that's all I wrote down... and it's kindof true.  An isosceles trapezoid gives you keying on all 6 axes, whereas most other simple shapes (like squares, rectangles or circles) generally only provide absolute positions on 5 of them.  What am I talking about, when I mention 5 vs. 6 axes? Do you remember when the PS3 came out with its new Sixaxis controller?  At the time, I scoffed, thinking that we live in a 3 dimensional world and so there are only 3 axes, commonly called X, Y, and Z.  Therefore, this whole "six axis" thing was obviously just a marketing gimmick meant to make it sound more high tech.  Well, younger me was certainly wrong about that! I was  right that there are only 3 axes, but what I didn't think about is that ther

Save Time and Filament - Always Preview your Print!

Image
All of the major slicing programs offer some sort of print preview feature, where you can examine the individual layers of the print.  This is a crucial functionality - I can't even count the number of catastrophic errors that I've caught by looking at that preview.  For example, today I downloaded some tree stumps off of thingiverse.  They looked great and would be super easy to print (nice big footprint, no meaningful overhangs, relatively short), so I loaded one up in Slic3r, sliced them, then transferred the gcode to my 3d printer to get things going. While my printer was heating up, I decided to check out the preview... and a major problem pretty immediately jumped out at me.  Unbeknownst to me, these tree stumps had tiny little protrusions reaching a few fractions of a millimeter downwards.  I didn't notice them when I was looking at the model, but it caused Slic3r to "hover" the bulk of each stump about .2 mm above the printer bed. So, I stopped the pri

Prusa MK3 Stringing at .05 mm Layer Height Resolved!

Image
I've had a Prusa MK3 for several weeks and have printed nearly a kilogram of upgrades for my boardgames.  Most of that has been terrain features, which have printed beautifully at 0.1 mm layer height (check out the things I've made for some examples).  Sure, the print lines are visible (especially after applying a wash), but I'm still very happy with the results.  I haven't been so happy with attempts at printing miniatures at 0.05 mm layer height. I was vexed to find that 0.05 mm layer height prints on my brand new printer looked like garbage.  They were so covered with strings that I couldn't even remove the support material.  Admittedly, they'd be pretty awesome if I exclusively played campaigns in the Mirkwood, but that's really not what I'm going for. I tried all sorts of things to resolve the situation, and some certainly helped.  I lowered my nozzle temperature from 210 to 200 degrees.  I adjusted my printing speeds so that they'd max

Getting Started with 3D Printed Minis, Part 4: Cutting Basics

Image
One of my coworkers asked me to print a Naruto styled Kunai for a shadow box for his son.  We hit up Thingiverse and found that model, which he liked, so I told him that it would be no problem to print.  And it wasn't, because I have the tools to cut the model to make it no problem to print. First, let's think about what I'd get if I decided to print that kunai as-is.  It's got that nice rounded handle and a tapered blade, so there's barely any contact with the print bed.  If I just tried to print it, I'd get a few mm2 of well adhered plastic on the bed, then a fair amount of spaghetti to either side of it as the printer tries to print in thin air. Obviously, that won't work, but we can set up supports and even rafting!  The raft will cause the printer to print the kunai's silhouette on the bed, then print up from there.  That'll give me great bed adhesion, and then it'll print support material as needed to print the curved and tapered p

Getting Started with 3D Printed Minis, Part 3: Downloading Models

So, you've got your 3D printer set up and understand the basics of preparing a file to print, so now you just need some thing  to print.  If you're like me, you're pretty intimidated by the idea of buying a bunch (like the 30-100 needed to run a tabletop campaign) of $3-$20 miniatures and then promptly ruining them with a terrible paint job.  That's why I 3D print - so that I can ruin a $0.50 piece of plastic that I can just print again! So, how do you get your model to print?  Well, there's a few options.  I'd recommend starting with Hero Forge , which has a nice interface that allows you to build your own hero from a huge library of parts.  It's really fun to play around with, looking at the options and seeing how nicely everything fits together.  I just have two complaints: the models can be challenging to print and they're expensive. The models that you make on Hero Forge look gorgeous, but it's up to us and our creativity to figure out how t

Getting Started with 3D Printed Minis, Part 2: Printing Software

After you've made (or downloaded) a model, you need to do some work to get it ready to 3D print.  The most important thing that you'll need to do is slice the model.  Slicing is the process of converting the triangles that make up the 3D model into gcode, which is the actual list of instructions for how your printer needs to move its parts to deposit the plastic and make that model. There are many slicing tools out there, but I generally use Slic3r .  I like the mix of user friendly functions (such as viewing your 3D print layer-by-layer to ensure success) and fine tuning tweaking options (like setting a specific printing speed for printing bridges vs. other types of printing).  Also, Prusa provides a Slic3r version specifically tuned for my printer, so that makes things easy for me.  But, using Slic3r to generate gcode is actually the last step before printing! Before I even bother generating gcode, I need to figure out how  I'm going to print the object.  This is one

Getting Started with 3D Printed Minis, Part 1: Modeling Software

I just got a 3D printer (I ended up choosing a Prusa MK3 kit because I'm a nerd), mainly to make upgraded components for my tabletop games.  As such, it was pretty important to me that I be able to print minis, so I was a little hesitant to go the FDM printer route.  In the end, I decided to go that way because I didn't want to mess around with the resin from an SLA printer (I've got young kids in the house), and the Printed Minis subreddit had some pretty good looking FDM prints, so I figured that I'd give it a try. How do you get started with 3D printed minis?  Well, firstly, there's some software that you need to know about.  I'd say that there are two general categories of software that you'll use in 3D printing: software for making 3D models, and software for getting ready to print 3D models.  Of course, there is some overlap where a piece of software can do both, but 3D printing generally requires software to do those two things.  Today, I'm go