Posts

Showing posts from August, 2018

New Thing: Harrower Infester for Gloomhaven!

Image
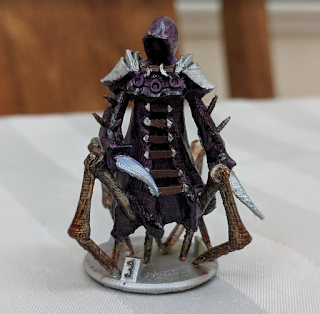
I've made a new thing - a Harrower Infester model for Gloomhaven !  I think that this is my best creation, yet!  I feel like I'm really homing in on a balance between parametric design and sculpting that's working well for me.  When I made this model, I used the "extruded cube" method to make the shape of the main robe, with completely separate extruded cubes for the arms.  I then made the cowel, pauldrons, knives, legs, spikes, and all of the little details as separate meshes, which I arranged on the main robe.  When I didn't like where something was or how it looked, I moved that something around to get it into a better place.  To that end, I want to talk specifically about the insect legs that I made for this guy. Those legs are remarkably parametric.  I went over the robe pretty heavily with Blender's sculpting tools, in order to add the folds and creases in the fabric... but those legs are pure parameterized geometry!  Here's a screenshot of som

New Things: City Archer, City Guard, and Hound!

Image
I've uploaded three new Gloomhaven remix models recently: the City Archer , the City Guard , and the Hound !  The word of the day was definitely armature , because I didn't make any of those models myself.  All I did was make some slight model changes and, in the case of the Hound and the Archer, change their poses.  I love how thoroughly the 3D printing community has embraced the Creative Commons! So, here's some notes about armatures.  I started the same way as I did for the Forest Imp 's armature, except that I'm now using Blender 2.79 and Rigify 0.5 so the options have slightly changed (to the benefit of those wolves, above!).  Also, this time I was laying out my Armature over an existing model, instead of drawing a model over an existing Armature!  For the Archer, I added a basic human armature and scaled it up to fit MZ4250's model, then used Edit mode to line the armature up with the existing model.  To do that, I just grabbed each individual armature

Getting Started with 3D Printed Minis, Part 5: Cutting and Supporting a Mini

Image
When I'm generating supports for a relatively simple shape, such as something like a shelf that juts out to the side, I'll use the default Slic3r support material  When making something complicated, like a miniature, those supports just don't quite cut it.  Literally, in this sense, as the times when I've used those supports, I've ended up with a solid block of material and I gave up part-way through the task of cutting my model out of it.  So, I guess that technically, I couldn't cut it... but the point stands. I like to use Meshmixer to generate support for my miniatures.  I like it so much, that I wrote a guide specifically about how to generate support material with Meshmixer , which covers many of the details that I'd originally planned on putting in this post! One thing that I didn't discuss there was cutting a model.  I usually prefer using support material to print the bits of my minis that could otherwise not be printed... but sometimes, I h

How Much Filament Do I Have Left

Image
As I approached the end of another roll of filament, I asked myself, "how much filament do I have left?"  I was getting ready to leave for work and didn't want the printer sitting idle all day with a half-finished print sitting on the bed, but I also didn't want to just put on a new roll and waste a bunch of perfectly good filament.  What to do?  Well, the answer was obvious, hit Google! Unfortunately, no answer was readily available.  Filament spools do not have standard sizes, so there's no rule-of-thumb like, "the last layer has 10 meters of filament" or the like.  Annoyed at my lack of results, I thought more about the problem and eventually reframed it for myself.  What I had here wasn't a 3D printing problem, one that might require the epic expertise of a Joel , an Angus , or a Thomas ... what I had here was a simple applied math problem.  I got out my calipers and went to work. My filament spool has those helpful little cutouts on the sid

Making Meshmixer Supports

Image
I've written tidbits of this information across a few other support-related posts, but I figured that I should put it all in one place.  I've been printing a lot of minis lately, which has meant that I've had to learn a lot about supports and 3D printing.  I use a Prusa MK3, so this post is focused on FDM supports.  I tried a lot of different support structures across several different programs and my favorite ones were tree supports in Meshmixer.  I know many others have had excellent results with other supports, but I've been happy with my results and so that's what I'm going to write about :P Generating tree supports via Meshmixer is a 2 phase process.  First, you've got to figure out your print's orientation, and second, you've got to figure out your actual supports.  For minis, that first step can be a difficult balancing act, as you probably don't want supports to connect to the most detailed parts of the mini (like its face).  You also h

Thingiverse Best of the Week: Deep Terror

One of my models was selected as part of the 8/12 - 8/18 Best of the Week collection !  This time, it was the Gloomhaven Deep Terror model , which is another one that I'm particularly proud of.  The modelling techniques that I favor seem to lend themselves well to snakey, tentacly monsters!  Thank you to KryptonicLoser for the acknowledgement, it means a lot to me!

New Thing: Deep Terror for Gloomhaven

Image
I made a Deep Terror model for Gloomhaven !  This model was also pretty fun to make, as I used the same techniques as I did when making my Living Bones model, and so it was all very dynamic to get the pose and general form down.  Like the individual bones in the Living Bones model, I made a bunch of lines by making a plane and deleting 2 of the vertices from it.  Then, I selected one of the remaining vertices and used ctrl-click  to extrude another vertex, and another, and another until the general form of each tentacle was in place. Of course, that left me with really boxy tentacles, but the Subdivision Surface and Skin modifiers were able to round them out nicely.  I then turned on proportional edit (by pressing o ), ensured that it was set to manipulate points by connected , then selected one end of each tentacle and used ctrl-a  to adjust its thickness.  Because proportional edit was enabled, it also adjusted the thickness of the other connected vertices in a proportional way. 

Cleaning Up Strings on Minis

Image
I've been printing a lot of minis lately, and although I've greatly reduced the stringing on my Prusa MK3 , I haven't been able to eliminate it entirely.  I kindof think that, depending on the nature of the object being printed, some amount of stringing is inevitable.  So I've recently been focusing my efforts on how to gracefully clean up those strings that remain. At this point, I'm only seeing very fine strings, and mostly between very thin parts.  I printed a few copies of RobagoN's incredible Gloomhaven Earth Demon , which you can see has those big spikes jutting up off of the shoulders.  Even with my printer optimizations, I had some stringing between those things (and a bit of loose material at his chin, which I just need to support better).  As you can see, those are exceptionally fine strings (except for the one that goes straight up, where the nozzle lifted after completing the print), but those fine strings are actually difficult to clean up, in the

Thingiverse Best of Week!

I'm proud to say that my Giant Viper model was selected as part of the Thingiverse  Best of Week for 8/4 - 8/11 (I noticed it when that model suddenly started getting a *lot* of attention)!  I'm awfully proud of that model, so a big thank you to all the people out there who liked it too!

New Thing: Gloomhaven Forest Imp

Image
I recently released my Gloomhaven Forest Imp model on Thingiverse, and wow, did I ever push the boundaries of my ability while making that one!  I didn't really understand what I was getting myself into when I said that I'd take a stab at this model on the Gloomhaven Thingiverse group, but I'm pretty happy with the way it's turned out: When I started the project, I was imagining that I'd use a mostly parameterized design process, like I did for my Living Bones model .  Well, that process works really well for a monster with many distinct parts that have visible borders between them (aka: a skeleton), but not so well for a living creature that has smooth transitions between its joints (aka: anything else that I'm going to want to model).  So, I had to rethink my approach. I considered my givens: I don't have an artistic background, so need the ability to play with the model a bunch to get the basic human form in place.  I need the ability to work on my

New Thing: Giant Viper

Image
I made a Giant Viper Gloomhaven monster , and it was really fun!  This was a great chance to take the skills that I learned while making my Living Bones model , add to them, and then apply them!  But first, here's a picture of my version 1 print: Here's the crazy thing about that model - it was really easy to make.  Of course, I had no idea that it would be easy when I started, so the first thing that I did was a bunch of research about how to draw scales with Blender.  It was a bit of a challenging search because the scale function is so important while making 3D models, but I eventually came across the idea to use the Array and Curve modifiers, then found a great video about how to use them.  Thank goodness that I found that video, because they are not easy to use because of how sensitive they are to each object's position relative to its origin.  But, more on that later. Once I knew that I was going to try and make this snake as parametricly as possible, it was t