Posts

Showing posts from January, 2019

New Thing: Drakes!

Image
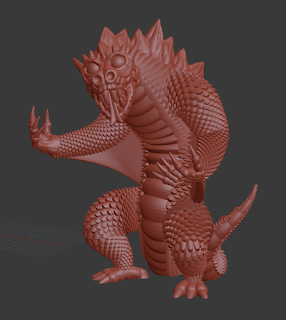
I released a pair of new things recently, a Spitting Drake and a Rending Drake !  You may recognize the basic technique that I used to create these guys from my Giant Viper post, and that's because I used the same basic technique here as I did there!  I've decided to write about it though, because I've learned a lot about how to use Blender since I made the Giant Viper, and so my workflow has become more elegant (which allowed me to make more complex models and preserve a lot of flexibility, allowing me to change the model around to go from the Spitting Drake to the Rending Drake). I started this process in pretty much the same way as before - I designed a single scale.  Just like before, I made a very basic scale shape and used a subdivision surface modifier to smooth it out a bit, but since I knew that I'd end up with a lot  of these scales (and that each one was going to be fairly small), I didn't make them too smooth.  That done, I put an Array  modifier on

Err:EXTR. FAN ERROR

Well, I just resolved one of those quick and not-so-bad but still worrying-while-they're-happening problems that happen every so often with 3D printing.  My Prusa's Extruder Fan (the one on the side that blows air across the heat break) wasn't spinning.  How'd that happen? Well, I had decided to print one of those fun little optical illusion arrows, the ones that always point in the same direction no matter how you spin them.  I figured it would be fun for the kids.  I loaded it up in Slic3r and, since the shape is actually quite sophisticated, it didn't have a flat surface on the bottom. No problem, I thought, as I turned on Slic3r's supports.  Since this shape didn't have arms sticking out or anything crazy like that, I figured that Slic3r's supports would work great.  In fact, the crossing pattern that it uses would probably work better than my usual Meshmixer tree supports, I thought. So, I fired off the print, running it at .05 mm to try and g

Saving Print Time and Filament when making Trays

Image
I love 3D printing, but I find myself using it to basically make two categories of things: game pieces or storage solutions (which naturally includes storage solutions for game pieces !).  Today I want to talk a about how I make those storage solutions, because it's evolved a bit over time. When I'm making a tray for some kind of storage solution (like the aforementioned mini storage tray), I always try to punch a bunch of holes into the flat pieces, like the bottom.  I figure that there's no need to waste the time and plastic printing a solid sheet, so I make some simple geometric shapes and use them to make a bunch of holes and save a bunch of plastic.  Well, I definitely accomplish one of those goals, but the other one not so much. Let's look at just the base of my mini storage solution.  Here's the base with all of the cutouts, as I made it: It's a fairly large tray that's going to use about 11 meters of plastic and take about 8 hours to print (at

Making Keys to Connect a Cut Print

I just recently made my Gloomhaven Cave Bear model , which needs to be printed in two pieces because of the details around the bear's teeth.  When I was cutting the model to be printed, I realized that I was going to need a post to help guide the head into place (otherwise it was really difficult to line up the fur), which got me thinking about the whole post-and-slot design for situations like this. When I've done similar cuts in the past, I put the post directly on one half and cut the cavity into the other half... and that worked great, as long as I got my tolerances correct.  When I failed to get them right, I was stuck either reprinting the part with the post (after making the post slightly smaller) or the part with the cavity (after making it slightly larger).  Either way, I had to reprint a fair amount of the model.  I noticed this problem even more when I was printing a model that someone else had pre-cut.  He had cut it with a 5% tolerance, which sounds like a lot,