Using Fusion 360 to Design and then Print a Box Insert for Better Organization
 I've made a lot of terrain pieces for Gloomhaven since I got my 3D printer, and I recently crossed that critical threshold where I can't just keep them all in a single box anymore. I was spending too much time rooting around in the box for the pieces that I wanted, so I figured that it was time to upgrade to some kind of tackle box or craft storage box or something. Just as I came to this realization, I noticed a post on the Gloomhaven subreddit about a craft store running a big discount on storage boxes. When there's food on my plate, you don't have to tell me to eat!
After picking up a few storage boxes, I went about sorting my pieces. I decided to put them into a fairly large box that had removable dividers along the rows, which worked out pretty well... except that I ended up using almost every cell in the box. I had to remove a bunch of dividers for the doors and the boulders and the cave stone pillars (which aren't even in that picture!), but the cells were too big for many of the other objects (such as the various traps, the nests, the pressure plates, and even the treasure chests).
Because I'm a huge nerd, when I saw that, I thought to myself, "if I subdivide these cells along the vertical axis, I can multiply my storage capacity!" If I was a normal human being, I'd probably just think, "I could fit a few layers of stuff in this box!" but that phrasing only occured to me later.
The first step in this process was to measure everything. Since this box had removable dividers, there were little nubs that protruded into the rows (to keep the dividers in place), so I had to measure the distance between the inside of those nubs, the depth of them, as well as the height of the cells, the distance between the sets of guide nubs, and the total length that I wanted to use for my subdivided sections. I decided that I wanted my subdivision to be 3 cells wide (so would interface with 2 pairs of guide nubs), but I wanted it to fit inside a pair of the standard dividers (so that the cells to either side of my insert wouldn't be compromised if/when I lift my insert out).
I pulled out my calipers and captured all of those measurements, grabbing them at multiple points along each length (so that I'd know my shortest, or worst case scenario, distances). When measuring the width of my rows, I failed to measure at the bottom though, which caused me a bit of trouble later (it was really hard to get the calipers down to the bottom of that channel).
 I began my design by opening Fusion 360 (CAD software that is free for a hobbyist like me), then sketching my shape from the top. I drew a box with sides as measured, then pressed O and created a 1.5 mm offset inwards (to later become the outer wall of my container).
Next, I drew a pair of long thing rectangles, starting slightly above my box and ending slightly below the bottom. These would eventually become the interfaces for the nubs (and the dividers that would replace the ones that the box came with for this section). When drawing these rectangles, the exact sizes and placement didn't really matter, as dimensioning the pieces would straighten that out for me later.
 Dimensioning my pieces was the next step (by pressing D to enter dimensioning mode). I set the exact length of vertical rectangles as 3 mm longer than the side of the main box, and set the length between the top of my nub interface and the edge of the box at 1.5 mm. Next, I set the width of my nub interface box at 1.5 mm and set its left edge to be exactly 49.2 mm from the left side of the box. I repeated the process on the second set of nub interfaces, but rather than typing in distances, I set each length to be a function equal to the analogous parts on the first one. Similarly, I set the cell widths on cells 2 and 3 to be functions equal to the first.
Once I was here, I decided that it was time to print a prototype, so I extruded the outer-most perimeter and divider walls by 1 mm, exported the STL and printed it. I slid it into my case and noticed a problem - while it fit great at the top of the row, it squeezed and got caught mid-way down when I tried to push it to the bottom. The guides for the dividers were apparently tapered slightly, so were wider at the base. Fortunately, this was easy to fix in Fusion 360; I literally changed that one dimension measurement down to 62 mm and was good to go.
At this point, I figured that the box was basically ready to extrude and then print. So, I modified my previous test extrusion, ensuring that I had selected the outer wall, the divider walls and the nubs, then extruded them upwards 25.5 mm. I then selected the 3 floor sections and extruded them upwards by 1 mm, ensuring that the Join option was selected on the extrude.

Since the walls and floor were already so thin, the best way to remove material seemed to me to make cutouts. Instead of boxes, I needed baskets. I figured that roughly 2 mm wide bars (with similarly sized gaps) would be a good design, since my terrain pieces were generally larger than that. I knew that I wanted a solid border around the edges of each panel for strength (so, no gaps at the edges), so I drew in a guide line (draw a normal line, then select it and press X) on the floor of my cell and dimensioned it to be 2 mm away from their respective edges.
 Next, it was time for some math. I knew how long the section that I wanted to have cutouts in was, and while I knew that I wanted them to be roughly 2 mm wide, I actually had some flex room there. On the other hand, I wanted there to be exactly an odd number of those slats, so that the first and last slat would be the same (solid, in this case). So, I pulled out a calculator and divided my total length by 25 slats to see if I liked the resulting per-slat width. It was ugly, so I tried 27, and 23, and kept trying odd numbers until I found the least ugly, closest to 2 mm value for an odd number of slats across that distance. Now that I had my slat width (2.034 mm each for 29 slats), I calculated the length to be just long enough to fall 2 mm short of the cell division lines (leaving my solid border on that face of the bottom panel).
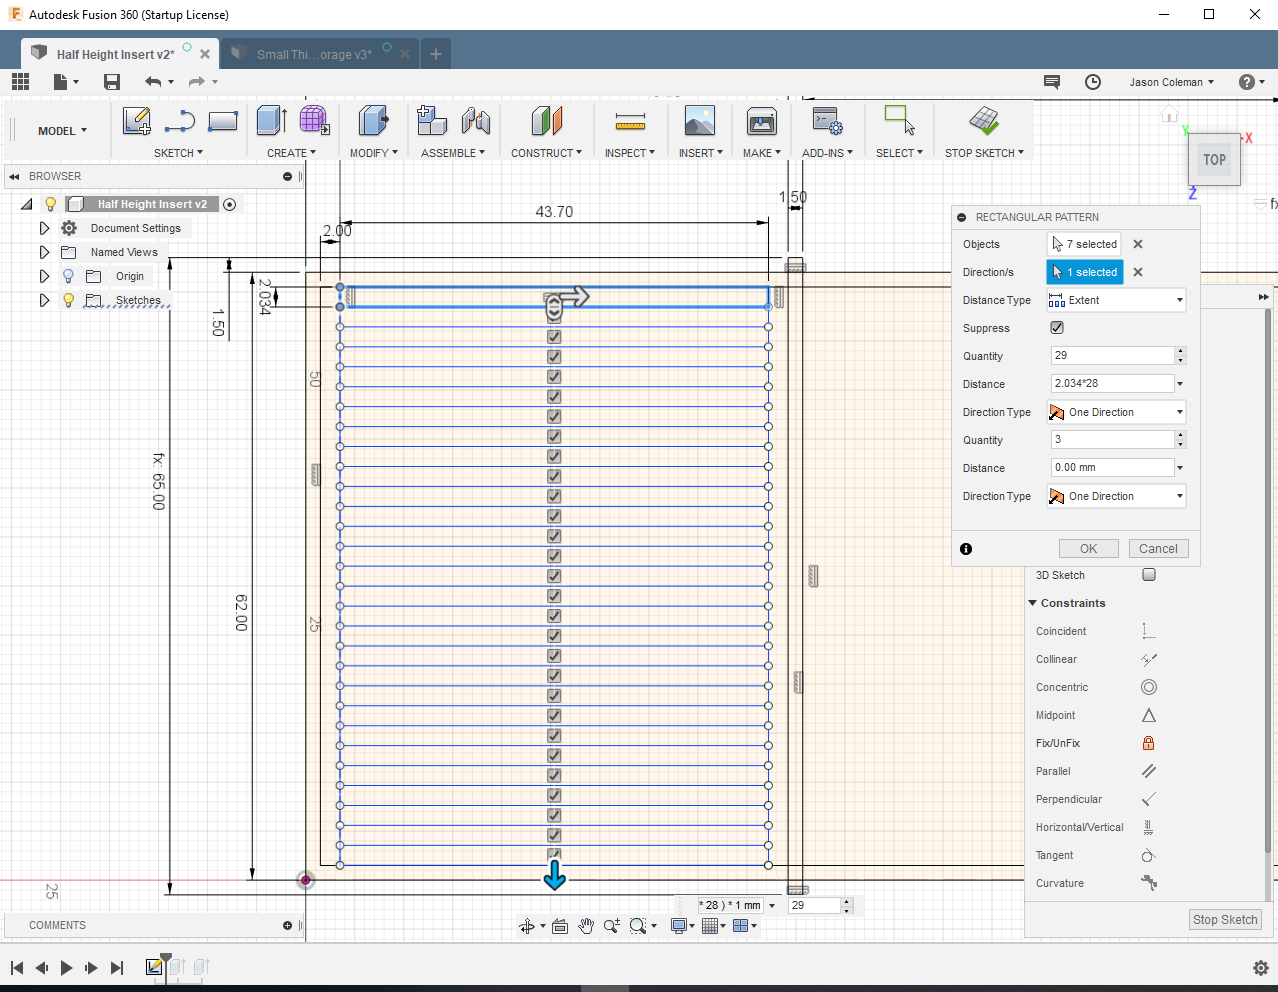 At this point, if I really liked drawing rectangles, I could've gotten my fill! I don't like drawing rectangles, so I went to Sketch and selected Rectangular Pattern from the bottom. I selected my rectangular slat as the object and the Y-Axis side of the basket as the direction. I set the length of my pattern to be the length that I wanted to cover, minus 1 slat, and the number to the number of slats that I wanted it to create. Presto, I had all of my slats drawn in the bottom of one cell! Next, I selected all of those slats and used this same process to pattern those slats into the other two cells of my sketch (I just used the drag bar, because the middle cell's borders will be slightly larger than the other two).
 Now that I had the bars drawn, I went back and edited the "floor extrusion" feature of my shape and changed it to only select every other slat (which removed almost half of the material from the floor!). Fusion recalculated the overall shape and the floor was done. Now, it was time to go on to the slats on the walls.
Since the walls were a solid extrusion upwards, I couldn't draw the slats into the initial sketch. Instead, I decided to make them in new sketches, one from the front and one from the side, which I could then extrude out and cut the holes in the extruded walls. To make this more easily printable, I decided that I'd use vertical bars on the walls (instead of horizontal), which might leave me with a bit of stringing to clean up but would only require bridging at the very top of the slats (and even then, only across the roughly 2 mm gaps, which is nothing to worry about).
 I started a sketch from the side and drew a rectangle that matched the extruded wall. Then, I did the whole guide line, simple math, draw boxes, rectangular pattern process to draw similar slats along the side. With the slats drawn, I closed my drawing and extruded the shapes through the main basket. It automatically changed to a cut extrusion, which I accepted and got my series of bars. I then repeated that process again with a new sketch for the front bars, which completed the shape.
When all was said and done, I exported my new shape as an STL and Slic3r came back with a 7 meter estimate. It's still a lot of plastic when you're used to working with miniatures and props for miniatures, but it was a lot better than the original design! So, I printed out 2 of them, and they fit perfectly, one on top of the other, in the row of my storage box.
If anyone wants a look at my files, I've uploaded my subdivider basket files. That said, if you're at all interested in learning to model, I recommend making them yourself, as they aren't that complex but offer a really good chance to learn how to use CAD.


Comments
Post a Comment