Posts

Showing posts with the label Tips

Using Blender to Cut and Combine Models

Image
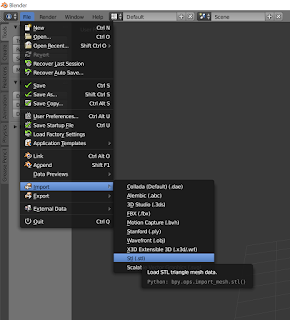
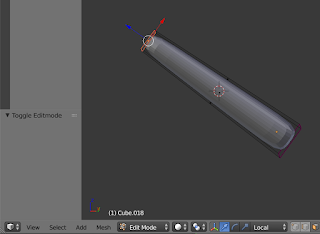
A fellow Gloomhaven fan on Reddit asked me for some help combining a couple of Thingiverse models, and after a bit of discussion, we decided that it would be best if I put together a tutorial so that he could make the changes himself!  Also, this particular change will serve as a really good introduction to Blender, so I figured that it'd be a nice post to make in general (since Blender intros are helpful for a lot of people!). So, what was our situation?  Well, this fellow really liked the hitpoint dials on these Summon models  and wanted to use them with all of the models in this collection .  So, the overall goal is twofold: 1) Cut the HP Dial off of the bottom of the first model, and 2) Put the new models on top of it.  I'm going to try and write this tutorial for a Blender newbie, so please pardon me if I'm covering all of the little steps in excessive detail.  Also, please let me know if I failed to cover anything in sufficient detail, as I'm sure t...

Blender Tip: Moving along the Local vs. Global Axes

Image
When I'm roughing out the shape for a new model, I like to make separate meshes for each of the major body parts (so there's a forearm mesh that is separate from the upper-arm mesh which is separate from the chest which is separate from the abdomen...).  That makes it really easy for me to move them around and get the pose that I want; it also makes it easy for me to sculpt on details, as I can focus on just getting one part to look good at a time. When I'm making body parts this way, each individual part is almost always an elongated cube with the Subdivision Surface  modifier applied to it.  I like to stretch them out along the Z axis, then rotate the thing in Object  mode.  That preserves the "z stretch" which makes it nice and easy for me to select an end face of my "cube" and drag it out further or move it in a bit.  I've almost always done this by the handles that show up when you select a face, but I literally just learned that there's a...

Getting Started with 3D Printed Minis, Part 6: Slicing a Mini

Image
There are many different slicing programs out there, but my printer came with Slic3r Prusa Edition, so that's the one that I learned to use.  When printing a mini, the rule of thumb is "low and slow".  You want the lowest layer height and nozzle size that you can reliably manage and to print it as slowly as you can tolerate ;) In my case, I've had pretty good results with .05 mm layers and a .25 mm nozzle, printing no faster than 25 mm/sec.  That's a pretty conservative speed, so I could probably get away with faster movements for much of the print on my models... but minis tend to have a lot of really tricky parts, like overhangs, thin sections, and bridges, that benefit from slower print speeds. Why do you want lower layer heights?  Two reasons: they have less visible layer lines and they show more details on the model.  As you can see from the below Slic3r previews, the smaller layers are able to represent much more subtle details along the Z axis.  ...

Making Meshmixer Supports, Part 2

Image
I hadn't really planned on making my Meshmixer supports post into a series, but I got a few really good questions about the technical process of drawing the actual supports, rather than the theory of how to design supports.  That post is already gargantuan, so I figured that it was time for a sequel!  I'm already off the rails, so who knows, maybe this will even become a trilogy (ok, probably not)! The act of drawing supports in Meshmixer is not super intuitive.  What is is, however, is consistent.  When you're drawing supports, you're drawing a 3D object using a 2D interface.  Meshmixer does its best to help you, but it can still be a bit tough.  There are a few ways to draw additional supports, and I use them all at various times while designing supports for a model! The easiest way to draw additional supports is to just click on a red highlighted part of the model and let Meshmixer try to determine a viable path for the support tree.  Often thi...

Changing Your Perspective in Blender

Image
The more that I use Blender, the more impressed I am with how powerful it is.  One skill that is crucial to my use of Blender is my ability to change my perspective on an object as I'm working on it.  Fortunately, there are a whole bunch of shortcuts that allow me to do exactly that! Numpad 1 : "Front" view, looking directly along the Y Axis Numpad 3 : "Right" view, looking directly along the X Axis Numpad 7 : "Top" view, looking directly along the Z Axis Numpad 2,4,6,8 : Orbit your view by 15 degrees in the direction implied by the key (2 is downwards, 6 is to the right, etc.). Numpad 9 : Orbit your view 180 degrees. Numpad 5 : Toggle Orthographic view, which renders things "flat" making them easier to line up.  I do most of my modelling with this view enabled I use those shortcuts constantly, flipping between the perspectives when I want to move things around or when I want to rotate something.  When I'm setting up the rough po...

How Much Filament Do I Have Left

Image
As I approached the end of another roll of filament, I asked myself, "how much filament do I have left?"  I was getting ready to leave for work and didn't want the printer sitting idle all day with a half-finished print sitting on the bed, but I also didn't want to just put on a new roll and waste a bunch of perfectly good filament.  What to do?  Well, the answer was obvious, hit Google! Unfortunately, no answer was readily available.  Filament spools do not have standard sizes, so there's no rule-of-thumb like, "the last layer has 10 meters of filament" or the like.  Annoyed at my lack of results, I thought more about the problem and eventually reframed it for myself.  What I had here wasn't a 3D printing problem, one that might require the epic expertise of a Joel , an Angus , or a Thomas ... what I had here was a simple applied math problem.  I got out my calipers and went to work. My filament spool has those helpful little cutouts on the sid...

New Thing: Deep Terror for Gloomhaven

Image
I made a Deep Terror model for Gloomhaven !  This model was also pretty fun to make, as I used the same techniques as I did when making my Living Bones model, and so it was all very dynamic to get the pose and general form down.  Like the individual bones in the Living Bones model, I made a bunch of lines by making a plane and deleting 2 of the vertices from it.  Then, I selected one of the remaining vertices and used ctrl-click  to extrude another vertex, and another, and another until the general form of each tentacle was in place. Of course, that left me with really boxy tentacles, but the Subdivision Surface and Skin modifiers were able to round them out nicely.  I then turned on proportional edit (by pressing o ), ensured that it was set to manipulate points by connected , then selected one end of each tentacle and used ctrl-a  to adjust its thickness.  Because proportional edit was enabled, it also adjusted the thickness of the other connected...

Cleaning Up Strings on Minis

Image
I've been printing a lot of minis lately, and although I've greatly reduced the stringing on my Prusa MK3 , I haven't been able to eliminate it entirely.  I kindof think that, depending on the nature of the object being printed, some amount of stringing is inevitable.  So I've recently been focusing my efforts on how to gracefully clean up those strings that remain. At this point, I'm only seeing very fine strings, and mostly between very thin parts.  I printed a few copies of RobagoN's incredible Gloomhaven Earth Demon , which you can see has those big spikes jutting up off of the shoulders.  Even with my printer optimizations, I had some stringing between those things (and a bit of loose material at his chin, which I just need to support better).  As you can see, those are exceptionally fine strings (except for the one that goes straight up, where the nozzle lifted after completing the print), but those fine strings are actually difficult to clean up, in the...

Sculpting Details onto a Model

Image
I wrote a series about how I used semi-parametric design in Blender to make the Living Bones model from Gloomhaven .  Here's the final product that you can download from Thingiverse: The bulk of the model was crafted semi-parametrically.  The main shape for the thigh bone, for example, is actually just 4 vertices in a row forming a single line.  I then used the Skin modifier to give it depth and changed the size of the bone at each of those 4 vertices.  Almost the entire skeleton was formed this way, which allowed me a lot of flexibility while I got the pose into a shape that I liked and I figured out how long the limbs needed to be in relation to the everything else.  That said, there are a lot of details in there that I could not make parametrically; once I had the main shape in place, I used Sculpt mode to add those small details. For example, I had no idea how I could possibly make the skull via parameters.  So, I did some quick googling and came ...

Semi-Parametric Design in Blender, Part 3

Image
I've been writing about the process of making the Living Bones monster from Gloomhaven , in a series that I've been calling Semi-Parametric Design in Blender (here are links to Part 1 and Part 2 ).  At this point, I've made the whole model and am basically troubleshooting my design.  And wow, did I ever make myself a lot of trouble! I'm not too worried about those purple blobs, as they are just loose geometry.  In this case, that means that they're a separate mesh with no connecting points to the other meshes.  Fortunately, the current batch of slicers can deal with loose geometry really well and will just connect it to whatever other geometry it overlaps.  Those red points are actual problems though.  They are non-manifold areas, which basically means that the outer layer of my mesh is folded up on itself with all sorts of weird bits that are giving the computer problems. It turns out that I may have been expecting a bit too much from the Skin modif...

Semi-Parametric Design in Blender, Part 2

Image
Last night, I did some more work on my Living Bones model and I'm a lot happier with its new right pauldron: In addition to just looking cleaner than the last one , this new pauldron is much more in line with my semi-parametric design philosophy.  Check out the geometry on that bad boy: The straps were easy to make - I used the same technique that I did for the ribcage model, where I placed a loopcut cube and then adjusted the edges until the top face and the bottom face were in roughly the correct positions for the straps, then I deleted all of the other edges.  Next, I applied a Subdivision Surface modifier (turned up nice and high) to smooth out those lines, and then applied a Skin modifier to create the straps themselves (to get the second strap to work, I had to select one of its vertices and press the Mark Root  button under the Skin modifier).  Then, with all of the vertices selected, I futzed around with the Mean Radius X and Mean Radius Y values (i...