Posts

Showing posts from July, 2018

Semi-Parametric Design in Blender, Part 3

Image
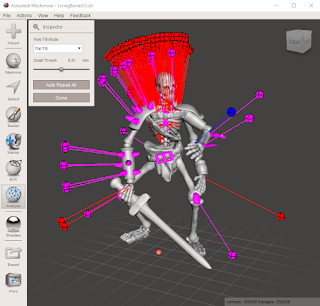
I've been writing about the process of making the Living Bones monster from Gloomhaven , in a series that I've been calling Semi-Parametric Design in Blender (here are links to Part 1 and Part 2 ).  At this point, I've made the whole model and am basically troubleshooting my design.  And wow, did I ever make myself a lot of trouble! I'm not too worried about those purple blobs, as they are just loose geometry.  In this case, that means that they're a separate mesh with no connecting points to the other meshes.  Fortunately, the current batch of slicers can deal with loose geometry really well and will just connect it to whatever other geometry it overlaps.  Those red points are actual problems though.  They are non-manifold areas, which basically means that the outer layer of my mesh is folded up on itself with all sorts of weird bits that are giving the computer problems. It turns out that I may have been expecting a bit too much from the Skin modifier when

Semi-Parametric Design in Blender, Part 2

Image
Last night, I did some more work on my Living Bones model and I'm a lot happier with its new right pauldron: In addition to just looking cleaner than the last one , this new pauldron is much more in line with my semi-parametric design philosophy.  Check out the geometry on that bad boy: The straps were easy to make - I used the same technique that I did for the ribcage model, where I placed a loopcut cube and then adjusted the edges until the top face and the bottom face were in roughly the correct positions for the straps, then I deleted all of the other edges.  Next, I applied a Subdivision Surface modifier (turned up nice and high) to smooth out those lines, and then applied a Skin modifier to create the straps themselves (to get the second strap to work, I had to select one of its vertices and press the Mark Root  button under the Skin modifier).  Then, with all of the vertices selected, I futzed around with the Mean Radius X and Mean Radius Y values (in the n  data p

Semi-Parametric Design in Blender

Image
I'm an IT geek by trade, so I love working with parametric design in Fusion 360.  Precisely dimensioning my shapes and letting the computer figure out all the tricky details is right up my alley.  That said, when I'm making a model for something organic, I can't quite express the shapes that I want in the details that Fusion 360 needs, so I have to fall back on an artistic tool, rather than an engineering tool. As I've been learning to 3D print and to design things to be printed, I've used 2 different artistic tools: Sculptris and Blender.  Sculptris is the free kid brother of ZBrush, which is a tool that serious artists use to sculpt incredible looking characters.  ZBrush is a little (ok, a lot!) out of my price range, but even Sculptris has been sophisticated enough to allow me to make a pretty cool Black Imp model  for Gloomhaven. Sculptris is a little too  artistic for me though, as it can be difficult to make large scale changes to things like limb position

Blender Tips Video

I just finished watching an awesome video about 14 tips for using Blender .  The very first tip is about using the Subdivide modifier, which can help round out details on a model really well.  He talks about how you can add loop cuts and slide them next to existing lines in order to make nice, sharp corners despite the Subdivide, and I thought to myself, "well, yeah, that's a pretty basic tip that almost all of the Blender videos that I watch use..." And then he said that that was often a bad idea because all of those extraneous loop cuts make your geometry harder to work with (which is something that I've absolutely run up against and struggled to overcome).  He proceeded to show a really cool way to selectively use the Bevel modifier to create the same effect, without adding any extra geometry during the building process.  That means that your model remains really simple and easy to manipulate, even as you're adding some incredible details via those modifiers!

Upgrading the Prusa MK3 Nozzle from 0.4 mm to 0.25 mm

Image
I recently upgraded my Prusa MK3's nozzle from the stock 0.4 mm nozzle to a smaller 0.25 mm nozzle to improve my miniature printing results.  Prusa has really good instructions for nozzle replacement , which I mostly followed.  After some consideration, I decided to only remove the fan mouthpiece, since my intent was to hold the heater block lower than its attached wires anyway (so as to avoid those wires).  It worked fine for me, but you should probably stick to the official process unless you feel comfortable with experimenting a bit and possibly replacing something if you break it on accident. I heated the nozzle to 215 degrees so that I could remove my filament, then brought it up to 255 degrees and went to work.  I took out my 17 mm spanner and a 7 mm socket wrench, then prepared for the job.  After bracing the heater block with my spanner, I used the socket wrench to slowly unscrew the nozzle (remember, lefty-loosey, righty-tighty, but you're working upside down).  Ther

Strong Tree Supports for Printing Minis

Image
I've been working on a character lately with a bunch of swords, like a whole lot.  This model has been especially challenging to print, because those swords stick off of the model at all sorts of odd angles, meaning that they need a lot of support material.  I prefer to use Meshmixer Tree Supports for my minis, as the individual trees can snake around complex geometry and they come off pretty easily and leave very little marking where they were connected.  That said, there are some challenges that I have to overcome when using those supports. 1: Supporting Supports Minis often need some fairly long supports, in order to print some weapon or head detail that is high above the printer bed.  Tree supports are often leaning at some precarious angle, and I've run into issues where the support will lift slightly as it cools, but due to its length and angle that imperceptible lift gets magnified and causes a nozzle collision. To work around this, I make support for my support. 

New Things: Monument and Armory for Scythe

Image
My 3D modelling has gotten ahead of my blog posting, so this one's going to be a two-fer!  I recently uploaded the last 2 buildings for Scythe : the Monument and the Armory . These two designs were made in opposite manners.  I built the Monument almost entirely in Fusion 360, whereas the Armory came out of Blender.  I probably should have made the Armory in Fusion 360 as well, since it's entirely a building with simple angles, but it just didn't work out that way while I was working on it.  After I finished modelling the monument, I had no idea how to even represent the armory, so I spent some time on Google and various forums and was using Blender to sketch out various shape ideas, and the castle shape just started working well, so I ran with it. Why use one versus the other?  Fusion 360 uses parametric design.  That is to say, you specify a bunch of parameters and it will interpret all of those parameters to make a shape.  For example, a simple set of parameters m

New Thing: Mine for Scythe

Image
I've been working on 3D models for all of the Scythe buildings and recently uploaded the Mine Entrance to Thingiverse.  This was a challenging model for me to make, which meant that it ended up being a lot of fun. The first issue that I had was in figuring out just how to represent a mine entrance on the 19 mm x 10 mm footprint that I had to work in (so that it would still fit in the cutout on the board).  I live in Northern California, so I've seen Gold Rush Era Mine Entrances all my life.  So, I figured that my task was to take that kind of "large timbers holding up a cross-piece" common image and reimagine it in terms of diesel-punk Eastern-Europe, all while fitting within that little footprint. I started by taking the default Blender cube, and scaling it so that it would be 19 x 10 units (deciding that each unit in Blender would be 1 mm IRL), so that I could get a look at my footprint.  Then, I figured that I was going to need a kind of rock surface on 3 fa

New Thing: Windmill for Scythe

Image
I recently finished printing upgrades for all of the overlay tiles in Gloomhaven, so I decided that it was time to take on another board game project.  A couple of years ago, I bought the Scythe component upgrade bundle from Meeplesource (which is arguably what set me down this whole path of 3D printing board game upgrades).  I love getting to play the game with the upgrade resource tokens and metal coins, but there's one additional set of components that I feel could still use some love: the buildings. The upgrade kit doesn't replace any of the wooden components that go on the player boards, which is mostly fine, as they are mostly simple shapes to represent abstract concepts.  Mostly.  Each player has 4 buildings that they can build: the Mill, the Mine, the Monument, and the Munitions Depot (big fan of alliteration).  The game comes with little wooden blocks that vaguely represent each of those buildings that sit in slots on the player boards until they are built, at which

Getting Started with Blender: Extrusion

Image
One of my friends was hugely helpful in getting me started with 3D printing, and the other day he asked me about model making.  I've got just enough experience in that area to be able to make some things, but not so much that I've forgotten how hard it all was when I got started!  So, I figured that I'd post some resources and techniques. First things first, if you want to learn how to use Blender, watch the Blender tutorial videos .  Those'll show you the basics and are a super important intro.  Besides the official videos, there's a bunch of great content on YouTube - I've specifically learned a ton by watching Miguel Zavala's videos .  They tend to be very long (like a couple hours), but he just films himself as he's making models and he generally talks about what he's doing as he goes.  I've picked up a lot of little techniques by watching how he does things - in fact, I want to write about one of those here! In Blender, as in life, Extru