Getting Started with Blender: Extrusion
One of my friends was hugely helpful in getting me started with 3D printing, and the other day he asked me about model making. I've got just enough experience in that area to be able to make some things, but not so much that I've forgotten how hard it all was when I got started! So, I figured that I'd post some resources and techniques.
First things first, if you want to learn how to use Blender, watch the Blender tutorial videos. Those'll show you the basics and are a super important intro. Besides the official videos, there's a bunch of great content on YouTube - I've specifically learned a ton by watching Miguel Zavala's videos. They tend to be very long (like a couple hours), but he just films himself as he's making models and he generally talks about what he's doing as he goes. I've picked up a lot of little techniques by watching how he does things - in fact, I want to write about one of those here!
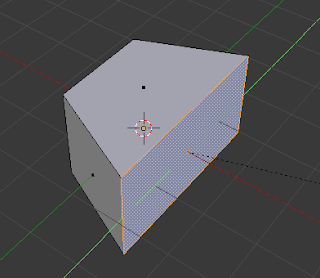
In Blender, as in life, Extrude is your friend. Or is that just me? Anyway, what even is Extrude? It's the ability to grow a lump of new stuff off of an existing thing (see what I mean about still remembering what it's like to be new to all of this!). Check out the Before and After:

See, some new stuff grew off of the existing thing! Why does that matter? Well, if I just grabbed that face (hotkey G) and dragged it out like that, this is what I'd get:

Which is cool, if it's what you want... but it's awfully difficult to make something cool when you're limited to essentially 9 squares on a side. Note that the extruded example actually created some new squares - there's a 10th square sticking out of the middle there, which means that I can do cool things with it. What kind of cool things? Well, this is how I made the leaves for my Gloomhaven Tree! I pretty much used 4 tools to make that leaf model: Extrude, Scale, Ring Cut, and Subdivide. Here's how I did it.
 First, I started with the normal cube that you always start with in Blender. I right clicked on it to select it, then I pressed Tab to go into Edit mode. Then I pressed Ctrl+Tab to pull up my selection mode menu and changed to Face mode and selected one of that guy's faces.
Then, I thought about what a leaf looks like. Maybe I was a bit late to get to that step, but I got there eventually. Since a leaf is narrow at one end, gets wider as it goes out, then narrows again to a point, I figured that I should make one end of my cube a bit wider than the other. To do that, I used the Scale tool.
With that face of the cube selected, I pressed s to open the Scale tool. By default, that tool will scale the whole face uniformly, meaning that it would get taller as it got wider (so that it would stay square). I only wanted my face to get wider (that's what I eat all those donuts, badum-tish!), so I pressed y and then dragged my mouse around a bit until that face seemed suitably wide.
What did I do there? I constrained my scaling to the Y Axis. Constrained scaling is super useful, and can be done in two ways. You can either limit the scaling to a single axis, like we did here, or you can prohibit it from affecting a single axis (so that it only affects the other two). That prohibitive constraint is done by holding down Shift while pressing the letter of the axis that you want Scale to stay the heck away from.
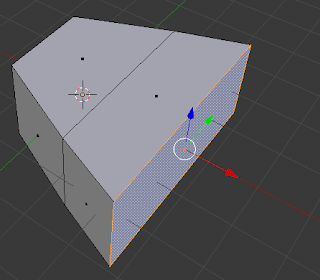 With my cromulently embiggened face, it was time to Extrude out the next section of the leaf. I pressed e and dragged my new stuff out to a distance that I figured looked good. Once it was there, I did another constrained scale to embiggen it even further! I'm sure that you see where this is going - keep repeating the cycle of extruding and scaling, making a vaguely leaf-like shape.
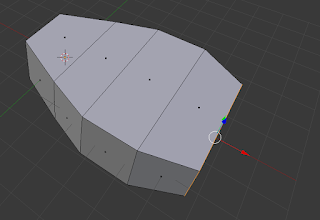
I don't know about you guys, but every leaf that I've ever seen has achieved some kind of maximum width, at which point it begins to narrow. So, here's where it gets tricky. Instead of Extruding and then Scaling, we're going to Extrude and then Scale.
Bam, mic-drop. I expect that, by now, you've realized that when you drag your mouse in towards the object, it scales inwards, and when you drag outwards, it gets bigger. So, drag that mouse inwards to make that face smaller!
 Do this a few more times, and eventually you'll finish your basic leaf! When making models, a good rule of thumb is to start out with the general form of the thing that you're trying to make, then add detail. Well, we've got the general form of our leaf now, so let's add some detail! We'll start with the central vein of the leaf.
Remember that 9-square problem from before, where we couldn't exactly do very much with the geometry that was available to us? Well, we're at that some point again, but this time we don't have a good face to extrude to make that central vein. This is where Ring Cut comes in to save the day.
Press Ctrl-R and move your mouse around your leaf. You'll notice that you've got a purple line that occasionally jumps around. It's always perpendicular to whichever edge your mouse has most recently crossed, and it shows you the ring cut that it wants to make. If you use your mouse wheel, you can even make additional cuts, but we're not going to do it that way.
 When the purple line is going up the length of the leaf, click your mouse once to accept that orientation for the Ring Cut. Now, you've got something weird, the purple line has turned orange and is following your mouse around. Ring Cuts slide, baby, and this is your chance to get that line exactly where you want it. Put it slightly off-center, right about where one side of a leaf's central vein should be. Now, do that whole Ring Cut thing again, to make a line to define the other side of that central vein.
 You've probably noticed a change at this point. Strange things are happening to your body, the little dots on your faces have mysteriously disappeared. It's like anti-puberty. Ring Cuts, by their very nature, are all about Edges, not about Faces. So, when you started playing with the Ring Cut, Blender quietly kicked you over into Edge mode. Now that we're done with those Ring Cuts though, we're ready to get back into Face mode and do some more extruding.
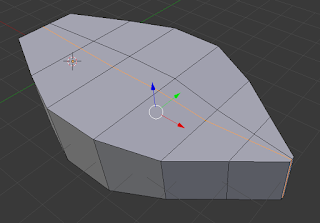
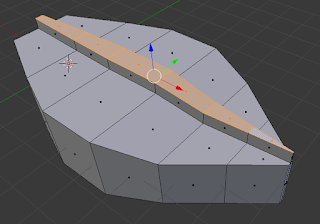
Once you're back in Face mode, you can select multiple faces at once (so that you can extrude them all at once) by holding down Shift and right clicking on each one of them. Or, if you're lazy (like me), you can select a face at one end of a line, then Ctrl-Click a face at the other end of the line, and Blender will automatically select all of the faces between them. You know, it's just like how Windows uses Shift-Click and Ctrl-Click, except the complete opposite. Now that you've got all of those faces selected, go ahead an extrude them a bit. That's right, extrude that vein. Extrude it with all... you've... got!
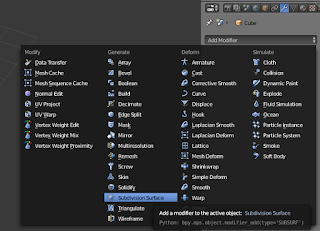 Now that everyone's vaguely uncomfortable and feels like they should take a shower, let's talk about Subdivision. We've got a decent (albeit blocky) looking leaf here. If we had infinite patience, we could make it look way better by using smaller extrudes, thus making the curve more organic looking. If, on the other hand, we want to use the tools that are at our disposal, we can instead use a Subdivision Surface Modifier. To do this, go to the far right of your screen (this is the only time that I'll ever advocate that someone go to the far-right), and click on the little wrench icon to pull up the modifiers panel. Press the Add Modifier button and select Subdivision Surface.
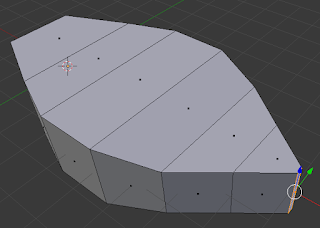
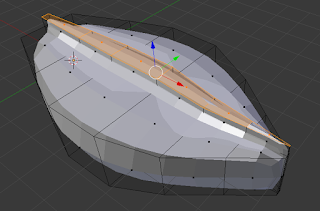 Once you add that modifier, things are going to look different. Your leaf is going to look a whole lot better, aside from a weird outline around it. That weird outline is the actual geometry that you've defined so far (notice the similarities between this image of the leaf and the previous one), whereas the solid rendered stuff is what that modifier is gonna do to your leaf when you press the Apply button (on the right). If you want it to look even smoother, you can increase Subdivisions in the View section. 1 or 2 subdivisions is all we really need here though, cause this is just one leaf that's going to be on a whole tree.
There's something to point out here - just because you've got this modifier enabled, that doesn't mean that it's applied... and it doesn't mean that you have to stop working. You can still extrude and scale faces, do ring cuts, whatever. You're still working with the geometry that's actually there, but the renderer will show you what it'll look like with your subdivision surface modifier applied.
You may have noticed that the leaf doesn't really have any sharp joints any more (for example, where we extruded the vein upwards). This is fine for a leaf, but sometimes we want a more abrupt joint. To do that, just make a new ring cut, and slide it on over right next to the joint that needs sharpening! We're not going to do that now, though, we're going to hit Apply. Because our leaf is done and I'm going to bed. Bye!
First things first, if you want to learn how to use Blender, watch the Blender tutorial videos. Those'll show you the basics and are a super important intro. Besides the official videos, there's a bunch of great content on YouTube - I've specifically learned a ton by watching Miguel Zavala's videos. They tend to be very long (like a couple hours), but he just films himself as he's making models and he generally talks about what he's doing as he goes. I've picked up a lot of little techniques by watching how he does things - in fact, I want to write about one of those here!
In Blender, as in life, Extrude is your friend. Or is that just me? Anyway, what even is Extrude? It's the ability to grow a lump of new stuff off of an existing thing (see what I mean about still remembering what it's like to be new to all of this!). Check out the Before and After:

See, some new stuff grew off of the existing thing! Why does that matter? Well, if I just grabbed that face (hotkey G) and dragged it out like that, this is what I'd get:

Which is cool, if it's what you want... but it's awfully difficult to make something cool when you're limited to essentially 9 squares on a side. Note that the extruded example actually created some new squares - there's a 10th square sticking out of the middle there, which means that I can do cool things with it. What kind of cool things? Well, this is how I made the leaves for my Gloomhaven Tree! I pretty much used 4 tools to make that leaf model: Extrude, Scale, Ring Cut, and Subdivide. Here's how I did it.

Then, I thought about what a leaf looks like. Maybe I was a bit late to get to that step, but I got there eventually. Since a leaf is narrow at one end, gets wider as it goes out, then narrows again to a point, I figured that I should make one end of my cube a bit wider than the other. To do that, I used the Scale tool.

With that face of the cube selected, I pressed s to open the Scale tool. By default, that tool will scale the whole face uniformly, meaning that it would get taller as it got wider (so that it would stay square). I only wanted my face to get wider (that's what I eat all those donuts, badum-tish!), so I pressed y and then dragged my mouse around a bit until that face seemed suitably wide.
What did I do there? I constrained my scaling to the Y Axis. Constrained scaling is super useful, and can be done in two ways. You can either limit the scaling to a single axis, like we did here, or you can prohibit it from affecting a single axis (so that it only affects the other two). That prohibitive constraint is done by holding down Shift while pressing the letter of the axis that you want Scale to stay the heck away from.
 With my cromulently embiggened face, it was time to Extrude out the next section of the leaf. I pressed e and dragged my new stuff out to a distance that I figured looked good. Once it was there, I did another constrained scale to embiggen it even further! I'm sure that you see where this is going - keep repeating the cycle of extruding and scaling, making a vaguely leaf-like shape.
I don't know about you guys, but every leaf that I've ever seen has achieved some kind of maximum width, at which point it begins to narrow. So, here's where it gets tricky. Instead of Extruding and then Scaling, we're going to Extrude and then Scale.
Bam, mic-drop. I expect that, by now, you've realized that when you drag your mouse in towards the object, it scales inwards, and when you drag outwards, it gets bigger. So, drag that mouse inwards to make that face smaller!
 Do this a few more times, and eventually you'll finish your basic leaf! When making models, a good rule of thumb is to start out with the general form of the thing that you're trying to make, then add detail. Well, we've got the general form of our leaf now, so let's add some detail! We'll start with the central vein of the leaf.
Remember that 9-square problem from before, where we couldn't exactly do very much with the geometry that was available to us? Well, we're at that some point again, but this time we don't have a good face to extrude to make that central vein. This is where Ring Cut comes in to save the day.
Press Ctrl-R and move your mouse around your leaf. You'll notice that you've got a purple line that occasionally jumps around. It's always perpendicular to whichever edge your mouse has most recently crossed, and it shows you the ring cut that it wants to make. If you use your mouse wheel, you can even make additional cuts, but we're not going to do it that way.
 When the purple line is going up the length of the leaf, click your mouse once to accept that orientation for the Ring Cut. Now, you've got something weird, the purple line has turned orange and is following your mouse around. Ring Cuts slide, baby, and this is your chance to get that line exactly where you want it. Put it slightly off-center, right about where one side of a leaf's central vein should be. Now, do that whole Ring Cut thing again, to make a line to define the other side of that central vein.
 You've probably noticed a change at this point. Strange things are happening to your body, the little dots on your faces have mysteriously disappeared. It's like anti-puberty. Ring Cuts, by their very nature, are all about Edges, not about Faces. So, when you started playing with the Ring Cut, Blender quietly kicked you over into Edge mode. Now that we're done with those Ring Cuts though, we're ready to get back into Face mode and do some more extruding.
Once you're back in Face mode, you can select multiple faces at once (so that you can extrude them all at once) by holding down Shift and right clicking on each one of them. Or, if you're lazy (like me), you can select a face at one end of a line, then Ctrl-Click a face at the other end of the line, and Blender will automatically select all of the faces between them. You know, it's just like how Windows uses Shift-Click and Ctrl-Click, except the complete opposite. Now that you've got all of those faces selected, go ahead an extrude them a bit. That's right, extrude that vein. Extrude it with all... you've... got!
 Now that everyone's vaguely uncomfortable and feels like they should take a shower, let's talk about Subdivision. We've got a decent (albeit blocky) looking leaf here. If we had infinite patience, we could make it look way better by using smaller extrudes, thus making the curve more organic looking. If, on the other hand, we want to use the tools that are at our disposal, we can instead use a Subdivision Surface Modifier. To do this, go to the far right of your screen (this is the only time that I'll ever advocate that someone go to the far-right), and click on the little wrench icon to pull up the modifiers panel. Press the Add Modifier button and select Subdivision Surface.
 Once you add that modifier, things are going to look different. Your leaf is going to look a whole lot better, aside from a weird outline around it. That weird outline is the actual geometry that you've defined so far (notice the similarities between this image of the leaf and the previous one), whereas the solid rendered stuff is what that modifier is gonna do to your leaf when you press the Apply button (on the right). If you want it to look even smoother, you can increase Subdivisions in the View section. 1 or 2 subdivisions is all we really need here though, cause this is just one leaf that's going to be on a whole tree.
There's something to point out here - just because you've got this modifier enabled, that doesn't mean that it's applied... and it doesn't mean that you have to stop working. You can still extrude and scale faces, do ring cuts, whatever. You're still working with the geometry that's actually there, but the renderer will show you what it'll look like with your subdivision surface modifier applied.
You may have noticed that the leaf doesn't really have any sharp joints any more (for example, where we extruded the vein upwards). This is fine for a leaf, but sometimes we want a more abrupt joint. To do that, just make a new ring cut, and slide it on over right next to the joint that needs sharpening! We're not going to do that now, though, we're going to hit Apply. Because our leaf is done and I'm going to bed. Bye!


Comments
Post a Comment