New Things: Monument and Armory for Scythe
My 3D modelling has gotten ahead of my blog posting, so this one's going to be a two-fer! I recently uploaded the last 2 buildings for Scythe: the Monument and the Armory.
These two designs were made in opposite manners. I built the Monument almost entirely in Fusion 360, whereas the Armory came out of Blender. I probably should have made the Armory in Fusion 360 as well, since it's entirely a building with simple angles, but it just didn't work out that way while I was working on it. After I finished modelling the monument, I had no idea how to even represent the armory, so I spent some time on Google and various forums and was using Blender to sketch out various shape ideas, and the castle shape just started working well, so I ran with it.
Why use one versus the other? Fusion 360 uses parametric design. That is to say, you specify a bunch of parameters and it will interpret all of those parameters to make a shape. For example, a simple set of parameters might be that there is a horizontal line that is 19 mm long, with its midpoint at the canvas' origin. A 10 mm vertical line connects to the end of that line. A horizontal line connects to the end of that line. Finally, another vertical line connects the two remaining loose ends.
 That is a list of parameters that absolutely defines a rectangle, and Fusion 360 is a tool that helps you to define all of those parameters to easily make various complex shapes. If you want to change your shape, you just change the appropriate parameters. So, it's easy to make a building like the monument out of a bunch of primitive shapes (it's basically a bunch of elongated cubes with occasional corners cut off via chamfer or filet operations). If the proportions aren't looking right, it's very simple to change individual parameters and therefore change the overall result. Things eventually get pretty crazy on the sketches (see that screenshot?), but the sketch usually starts out with just a few basic shapes.
Of course, drawing the 2D sketch is one thing, but you still need to make it 3D. I do that with a bunch of extrudes. I'll take a section (usually, several) of my sketch and then extrude it out some amount. Sometimes, I'll even take the same section and extrude it a few times, to create that shape at a few different places. Every extrude, whether it be to create a 3D shape or to remove material from an existing 3D shape, is stored in your timeline, and timelines can get complex.

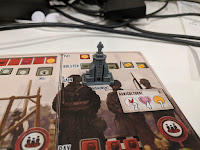
But, that's one of the major strengths of the tool! Every operation is saved, and if you ever want to go back and adjust something, you can modify that operation and everything is updated in real time! So, at the end of the day, I have a very precisely defined set of parameters and operations that exactly describe how to make that monument.
When I work with Blender, on the other hand, I'm a lot more fluid. I started out by making an 8 sided circle (or, as humans would call it, an octagon) and scaling it so that it was 14.5 mm across. Well, I really created one with a radius of 7.25 mm, but then realized that was a vertex to center radius, whereas the armory piece that I measured was flat to flat... so I just sort of scaled it up until it was about 14.5 mm. Then, I started roughing out some shapes on it. I stacked boxes up and cylinders, just trying to get an idea about how these shapes were working together at this scale.
At that point, I was working in full on "fail fast, fail forward" mode. That meant that I was doing quick implementations of ideas and then deciding if I liked them or if they even worked or not, and discarding those that failed while learning from those failures. For example, fairly early on I decided to just go ahead and print my octagon and make sure that I liked the fit in the board cutouts. I printed a 1 mm high octagon at .2 mm layers, so it was like a 3 minute print. And it sucked! The diagonals on the octagon were sufficiently short that the whole shape was able to rotate within the cutout.
So, I eyeballed it and figured that I should probably add another mm to my base size. If this had been in Fusion 360, I would have just modified the parameter for the base's length, but I didn't have that option in Blender. Instead, I knew that I had a (roughly) 14.5 mm shape that I needed to be (roughly) 15.5 mm. Algebra to the rescue! 15.5/14.5 = ~1.069, so I selected my shape, pressed s to scale it, pressed shift-z to disable z axis scaling (it was already 2 mm high and I wanted it to remain so), then typed in 1.069. I exported that STL, sliced it and printed it. I got lucky and the fit was great!
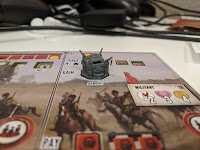
So, I started building my castle on top of my now-15.5 mm base. I experimented with how to represent a sliding metal door at the front of the castle, testing each version by slicing it and using Slic3r's preview function to see if the shapes that I was making could translate decently into gcode given my printer hardware. I'd focus on one small part of the castle at a time, testing each iteration to ensure that it was coming through correctly. I probably tested 10 different door designs until I found one that I was happy with, and I can't even remember how many versions of the crenelations I built! At one point, they went all the way around the tops of the towers, until I realized that left me with almost no room for the guns.

 So, I kept going through those rapid testing cycles until I had a model that I was happy with. When I actually printed the first model, I noticed a new problem - the corners of the roof had curled upwards during printing. Well, time to fail forward again, as I can fix that. I figured that this was a that printing directly on the bed would solve, so I made a new version of the model in Blender. This time, I removed the roof section that had curled and set it flat on the same plane as the rest of the armory. I used my standard trapezoidal post technique to make it easy to put the roof back in place during reassembly, and then printed it again.

Problem solved. Fail fast and fail forward. And there we have it, the last 2 buildings for my Scythe collection were completed... leaving me with the regular challenge of how am I going to paint these things!


These two designs were made in opposite manners. I built the Monument almost entirely in Fusion 360, whereas the Armory came out of Blender. I probably should have made the Armory in Fusion 360 as well, since it's entirely a building with simple angles, but it just didn't work out that way while I was working on it. After I finished modelling the monument, I had no idea how to even represent the armory, so I spent some time on Google and various forums and was using Blender to sketch out various shape ideas, and the castle shape just started working well, so I ran with it.
Why use one versus the other? Fusion 360 uses parametric design. That is to say, you specify a bunch of parameters and it will interpret all of those parameters to make a shape. For example, a simple set of parameters might be that there is a horizontal line that is 19 mm long, with its midpoint at the canvas' origin. A 10 mm vertical line connects to the end of that line. A horizontal line connects to the end of that line. Finally, another vertical line connects the two remaining loose ends.
 That is a list of parameters that absolutely defines a rectangle, and Fusion 360 is a tool that helps you to define all of those parameters to easily make various complex shapes. If you want to change your shape, you just change the appropriate parameters. So, it's easy to make a building like the monument out of a bunch of primitive shapes (it's basically a bunch of elongated cubes with occasional corners cut off via chamfer or filet operations). If the proportions aren't looking right, it's very simple to change individual parameters and therefore change the overall result. Things eventually get pretty crazy on the sketches (see that screenshot?), but the sketch usually starts out with just a few basic shapes.
Of course, drawing the 2D sketch is one thing, but you still need to make it 3D. I do that with a bunch of extrudes. I'll take a section (usually, several) of my sketch and then extrude it out some amount. Sometimes, I'll even take the same section and extrude it a few times, to create that shape at a few different places. Every extrude, whether it be to create a 3D shape or to remove material from an existing 3D shape, is stored in your timeline, and timelines can get complex.
But, that's one of the major strengths of the tool! Every operation is saved, and if you ever want to go back and adjust something, you can modify that operation and everything is updated in real time! So, at the end of the day, I have a very precisely defined set of parameters and operations that exactly describe how to make that monument.
When I work with Blender, on the other hand, I'm a lot more fluid. I started out by making an 8 sided circle (or, as humans would call it, an octagon) and scaling it so that it was 14.5 mm across. Well, I really created one with a radius of 7.25 mm, but then realized that was a vertex to center radius, whereas the armory piece that I measured was flat to flat... so I just sort of scaled it up until it was about 14.5 mm. Then, I started roughing out some shapes on it. I stacked boxes up and cylinders, just trying to get an idea about how these shapes were working together at this scale.
At that point, I was working in full on "fail fast, fail forward" mode. That meant that I was doing quick implementations of ideas and then deciding if I liked them or if they even worked or not, and discarding those that failed while learning from those failures. For example, fairly early on I decided to just go ahead and print my octagon and make sure that I liked the fit in the board cutouts. I printed a 1 mm high octagon at .2 mm layers, so it was like a 3 minute print. And it sucked! The diagonals on the octagon were sufficiently short that the whole shape was able to rotate within the cutout.
So, I eyeballed it and figured that I should probably add another mm to my base size. If this had been in Fusion 360, I would have just modified the parameter for the base's length, but I didn't have that option in Blender. Instead, I knew that I had a (roughly) 14.5 mm shape that I needed to be (roughly) 15.5 mm. Algebra to the rescue! 15.5/14.5 = ~1.069, so I selected my shape, pressed s to scale it, pressed shift-z to disable z axis scaling (it was already 2 mm high and I wanted it to remain so), then typed in 1.069. I exported that STL, sliced it and printed it. I got lucky and the fit was great!
So, I started building my castle on top of my now-15.5 mm base. I experimented with how to represent a sliding metal door at the front of the castle, testing each version by slicing it and using Slic3r's preview function to see if the shapes that I was making could translate decently into gcode given my printer hardware. I'd focus on one small part of the castle at a time, testing each iteration to ensure that it was coming through correctly. I probably tested 10 different door designs until I found one that I was happy with, and I can't even remember how many versions of the crenelations I built! At one point, they went all the way around the tops of the towers, until I realized that left me with almost no room for the guns.

 So, I kept going through those rapid testing cycles until I had a model that I was happy with. When I actually printed the first model, I noticed a new problem - the corners of the roof had curled upwards during printing. Well, time to fail forward again, as I can fix that. I figured that this was a that printing directly on the bed would solve, so I made a new version of the model in Blender. This time, I removed the roof section that had curled and set it flat on the same plane as the rest of the armory. I used my standard trapezoidal post technique to make it easy to put the roof back in place during reassembly, and then printed it again.
Problem solved. Fail fast and fail forward. And there we have it, the last 2 buildings for my Scythe collection were completed... leaving me with the regular challenge of how am I going to paint these things!


Comments
Post a Comment