Semi-Parametric Design in Blender, Part 3
I've been writing about the process of making the Living Bones monster from Gloomhaven, in a series that I've been calling Semi-Parametric Design in Blender (here are links to Part 1 and Part 2). At this point, I've made the whole model and am basically troubleshooting my design. And wow, did I ever make myself a lot of trouble!
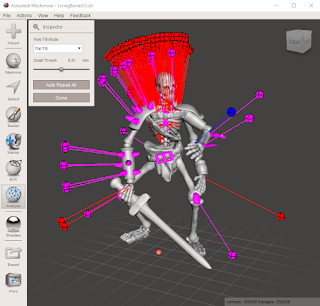
I'm not too worried about those purple blobs, as they are just loose geometry. In this case, that means that they're a separate mesh with no connecting points to the other meshes. Fortunately, the current batch of slicers can deal with loose geometry really well and will just connect it to whatever other geometry it overlaps. Those red points are actual problems though. They are non-manifold areas, which basically means that the outer layer of my mesh is folded up on itself with all sorts of weird bits that are giving the computer problems.
It turns out that I may have been expecting a bit too much from the Skin modifier when I designed the ribcage and hands (in that screenshot, I've already redone the feet entirely via sculpting, which is why they have no problems). Skin is still a great tool, but it's not super good at dealing with a bunch of forks in the path that you're skinning, especially when they're all bunched up together (like with a ribcage!).
Fortunately for me, because I'm doing this work in a parametric style, it's easy for me to go back and manipulate my model. Here's how it looks now, after tweaking the ribcage geometry a bit this morning:
 That's much better (I've still got to go through that same cleanup process for the hands)! So, how'd I do that? Well, it was actually pretty simple - I just removed all of the forks from my ribcage model that I possibly could. That means that I separated out the spine into its own mesh (I left the forks to form the vertebrae, but I tweaked the Skin settings until it generated nice, smooth geometry), and each pair of ribs (left/right pair) is its own independent loop now (I got rid of my Meld for the lower 3 pairs of ribs and just moved their vertices very near to each other inside the sternum).
As a reminder, here's what I originally made:
 The simplicity of the model is very attractive, but if it doesn't ultimately generate the desired result, it's not much good, now is it? Here's the updated version:
 You can see all of the new Root Vertices for the Skin modifier (the red dashed circles), since each rib loop is independent of the others. It's hard to see when you can't pan around in 3d, but the spine is also completely detached from the ribs now, which means that the Skin modifier no longer has to calculate how to generate a single continuous skin around all of that complexity. Finally, here's a screenshot of the ribcage with the modifiers turns back on:
 Not that different from the original, to be honest. But, that's sortof the point - I've changed this part of the model so that the visual end result is pretty much the same as before, but now it doesn't have any of that troublesome non-manifold geometry. To be technical, "troublesome" is an important qualifier in that statement, for this model is full of non-manifold geometry. Everywhere that ribs overlap, there is non-manifold geometry where bits of one rib are hidden inside of another... but because each individual pair of ribs is manifold, the slicer isn't going to have any problems dealing with the end result!

I'm not too worried about those purple blobs, as they are just loose geometry. In this case, that means that they're a separate mesh with no connecting points to the other meshes. Fortunately, the current batch of slicers can deal with loose geometry really well and will just connect it to whatever other geometry it overlaps. Those red points are actual problems though. They are non-manifold areas, which basically means that the outer layer of my mesh is folded up on itself with all sorts of weird bits that are giving the computer problems.
It turns out that I may have been expecting a bit too much from the Skin modifier when I designed the ribcage and hands (in that screenshot, I've already redone the feet entirely via sculpting, which is why they have no problems). Skin is still a great tool, but it's not super good at dealing with a bunch of forks in the path that you're skinning, especially when they're all bunched up together (like with a ribcage!).
Fortunately for me, because I'm doing this work in a parametric style, it's easy for me to go back and manipulate my model. Here's how it looks now, after tweaking the ribcage geometry a bit this morning:

As a reminder, here's what I originally made:


Comments
Post a Comment