Cleaning Up Strings on Minis
I've been printing a lot of minis lately, and although I've greatly reduced the stringing on my Prusa MK3, I haven't been able to eliminate it entirely. I kindof think that, depending on the nature of the object being printed, some amount of stringing is inevitable. So I've recently been focusing my efforts on how to gracefully clean up those strings that remain.
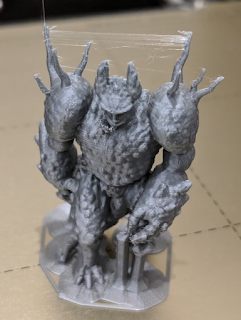 At this point, I'm only seeing very fine strings, and mostly between very thin parts. I printed a few copies of RobagoN's incredible Gloomhaven Earth Demon, which you can see has those big spikes jutting up off of the shoulders. Even with my printer optimizations, I had some stringing between those things (and a bit of loose material at his chin, which I just need to support better). As you can see, those are exceptionally fine strings (except for the one that goes straight up, where the nozzle lifted after completing the print), but those fine strings are actually difficult to clean up, in their own way.
I generally use 3 tools when cleaning up strings. For thicker strings, I like to use my wire cutters and my X-Acto knife. I more or less just use them like I would when removing support from the mini. That's kindof boring, so let's move on ;)
Many people suggest using a heat gun to melt those fine strings, so I went to my local hardware store and picked one up. I'm sorry to say that I didn't like the results. The "spread" from the heat gun was too imprecise - by the time it got hot enough to melt the little strings, it was also hot enough to soften the thin bits of my models. Things like swords or spikes or even the limbs on my Living Bones models ended up warping slightly. The models were still usable, but they did lose some quality from the experience.
After a few attempts with the heat gun, I went back to my mechanical removal techniques... but those don't work very well with exceptionally fine strings, like I saw on that Earth Demon. Those strings are so small that they just get pushed around, rather than cut, making clean mechanical removal really difficult. This was frustrating, and at one point, I thought to myself, "if only I had a lightsaber, I could cleanly remove these things..."
And then I realized that, for all intents and purposes, I do have a lightsaber. Ok, it's really a soldering iron, but close enough. I put a fine tip on my soldering iron and set it to its lowest temperature, which just happens to be 200 degrees celsius. At that temperature, it evaporates those fine wisps, but I can actually gently run it against the edge of the model without deforming it or damaging the surface. If I press it into the model, then it will obviously dig in (and leave terrible strings when I remove it!), but that's certainly not what I want to do here.
 So, for my past several prints, I've been using my soldering iron to go over and clean up the lingering strings, and it's worked great. Here's that same print, after using the iron. I just waved it through the strings, then gently "wiped" the inside of each spike with the edge of the iron's tip. This melted away the strings while having almost no impact on the model itself! I'm super happy with the result and will continue to use this tool to clean up those tough-to-remove strings. Also, as an added bonus, I only spent a minute or two to clean up all of those strings!


I have a creme brulee torch that I use for those fine strings because I like to burn them with fire. :)
ReplyDeleteLol, whatever it takes!
Delete