New Thing: Gloomhaven Forest Imp
I recently released my Gloomhaven Forest Imp model on Thingiverse, and wow, did I ever push the boundaries of my ability while making that one! I didn't really understand what I was getting myself into when I said that I'd take a stab at this model on the Gloomhaven Thingiverse group, but I'm pretty happy with the way it's turned out:

When I started the project, I was imagining that I'd use a mostly parameterized design process, like I did for my Living Bones model. Well, that process works really well for a monster with many distinct parts that have visible borders between them (aka: a skeleton), but not so well for a living creature that has smooth transitions between its joints (aka: anything else that I'm going to want to model). So, I had to rethink my approach.
I considered my givens: I don't have an artistic background, so need the ability to play with the model a bunch to get the basic human form in place. I need the ability to work on my model in modular bits, so that when I mess up one of them I can just delete it and try again. I need to do this without spending a ton of money on professional modelling software ;)
So, I did some more research and watched some more YouTube videos. Eventually, I learned that Blender (the free, open source modelling software that I used to make the Living Bones model), has a bunch of extra features that are disabled by default. One of them is a full human armature, already built with usable joints. Score!
 To turn on that feature, I just went to File -> User Preferences, then I went to the Add-ons tab and searched for rigify (which is the name of that add-on). Once I found it, I clicked the Rigging Rigify checkbox (and waited a little bit for it to load), and then went on my merry way. This add-on adds a couple of options under the Add -> Armature menu: Human (Meta-Rig) and Pitchipoy Human (Meta-Rig).
The normal Human armature has all of the details that I'd ever need for making a model for 3D printing, and then some. I generally do not need individual fingers, for example, but they're there! The Pitchipoy human is even more detailed, including bones for things like facial animation. So, I just used the normal human model and I ended up just ignoring a lot of the smaller bones.
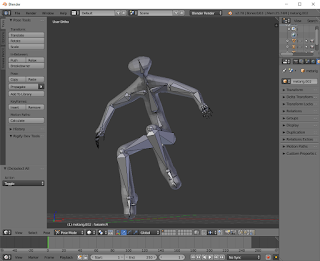
 The armature is a tool in Blender for posing a model, but it's not a model itself. So, the first thing that I did (after importing the armature), was to draw a model over it. I'm still just as bad/lazy at figure drawing as I was when I made the Living Bones, so I used that same technique of using single vertices with edges between them to draw a stick figure over the armature. I generally drew one line segment per bone in the armature, although I just drew a single segment out for the hands and feet (so no fingers, for example). Once my stick figure was drawn, I applied the Skin and the Subdivision Surface modifiers to it (once again, just like I wrote about on the Living Bones model) to make those lines into an actual 3D model. After this, I applied those modifiers so that there'd be some geometry for the armature to latch on to.
Once my (very, very basic) model was built, I then parented it to the armature. That process isn't super clearly documented, so what I did was to select my armature, then go into Pose mode. Then, I selected my body mesh and shift-clicked to select my armature again (since selecting the mesh kicks you out to Object mode), and pressed ctrl-p. Then, under Set Parent To I selected Armature Deform with Automatic Weights. Since my model lined up really well with the armature, the automatic weighting worked great for me.
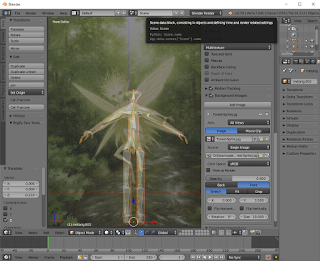 Next, it was time to pose the armature... but to do that, I had to know what I wanted the pose to look like! Fortunately, you can import a background image into Blender for situations exactly like this. So, I downloaded the Forest Imp artwork from Cephalofair, then went to the very bottom of the "N Panel" until I found the Background Images section. I enabled that, then browsed to my image and played around with the settings until I liked the way it looked. I ended up putting the image in front of my model with the opacity set down - that just worked better for me than setting it behind the model did. The background only shows up when your perspective is perfectly on an axis, so I used numpad 1 and numpad 3 to get that view.
Once my background image was in place, I selected my Armature again and went back into Pose mode so that I could begin moving it around. I variously rotated and grabbed the bones, moving them around until the pose was similar to the reference image. As the bones were moved, they moved the body mesh, and so I was able to eventually get things into the shape that I was looking for.
One thing that you might have noticed (and I forgot to mention/screenshot): I turned on the X-Ray setting for my armature so that I'd be able to see/manipulate the bones more easily. With the armature selected, on the far right side of the screen (the same panel where Modifiers are set up/enabled), one of the tabs has a bone icon. Buried down in there is a checkbox for X-Ray. If you enable that, it will cause the bones to always render, even when they're inside of a mesh, which makes it a lot easier to do your posing work.
After my basic pose and body geometry was in place, I added a Multiresolution modifier to the body and sculpted the Forest Spirit's details onto it (just like I did with the skull on the Living Bones). With her body completed, I added meshes for the wings (each one is just a flat plane with a few loop cuts that I've used the Subdivision Surface and Solidify modifiers on, then used other Skin'ed edges to make the veins), her armor, her hair, and her cape. The hair was an interesting process - I ended up using a particle system for it, but that's probably worth writing about in its own post. So, if you're interested, keep your eyes open and I'm sure that I'll get around to writing it in the not-too-distant future!

When I started the project, I was imagining that I'd use a mostly parameterized design process, like I did for my Living Bones model. Well, that process works really well for a monster with many distinct parts that have visible borders between them (aka: a skeleton), but not so well for a living creature that has smooth transitions between its joints (aka: anything else that I'm going to want to model). So, I had to rethink my approach.
I considered my givens: I don't have an artistic background, so need the ability to play with the model a bunch to get the basic human form in place. I need the ability to work on my model in modular bits, so that when I mess up one of them I can just delete it and try again. I need to do this without spending a ton of money on professional modelling software ;)
So, I did some more research and watched some more YouTube videos. Eventually, I learned that Blender (the free, open source modelling software that I used to make the Living Bones model), has a bunch of extra features that are disabled by default. One of them is a full human armature, already built with usable joints. Score!

The normal Human armature has all of the details that I'd ever need for making a model for 3D printing, and then some. I generally do not need individual fingers, for example, but they're there! The Pitchipoy human is even more detailed, including bones for things like facial animation. So, I just used the normal human model and I ended up just ignoring a lot of the smaller bones.

Once my (very, very basic) model was built, I then parented it to the armature. That process isn't super clearly documented, so what I did was to select my armature, then go into Pose mode. Then, I selected my body mesh and shift-clicked to select my armature again (since selecting the mesh kicks you out to Object mode), and pressed ctrl-p. Then, under Set Parent To I selected Armature Deform with Automatic Weights. Since my model lined up really well with the armature, the automatic weighting worked great for me.
 Next, it was time to pose the armature... but to do that, I had to know what I wanted the pose to look like! Fortunately, you can import a background image into Blender for situations exactly like this. So, I downloaded the Forest Imp artwork from Cephalofair, then went to the very bottom of the "N Panel" until I found the Background Images section. I enabled that, then browsed to my image and played around with the settings until I liked the way it looked. I ended up putting the image in front of my model with the opacity set down - that just worked better for me than setting it behind the model did. The background only shows up when your perspective is perfectly on an axis, so I used numpad 1 and numpad 3 to get that view.
Once my background image was in place, I selected my Armature again and went back into Pose mode so that I could begin moving it around. I variously rotated and grabbed the bones, moving them around until the pose was similar to the reference image. As the bones were moved, they moved the body mesh, and so I was able to eventually get things into the shape that I was looking for.
One thing that you might have noticed (and I forgot to mention/screenshot): I turned on the X-Ray setting for my armature so that I'd be able to see/manipulate the bones more easily. With the armature selected, on the far right side of the screen (the same panel where Modifiers are set up/enabled), one of the tabs has a bone icon. Buried down in there is a checkbox for X-Ray. If you enable that, it will cause the bones to always render, even when they're inside of a mesh, which makes it a lot easier to do your posing work.
After my basic pose and body geometry was in place, I added a Multiresolution modifier to the body and sculpted the Forest Spirit's details onto it (just like I did with the skull on the Living Bones). With her body completed, I added meshes for the wings (each one is just a flat plane with a few loop cuts that I've used the Subdivision Surface and Solidify modifiers on, then used other Skin'ed edges to make the veins), her armor, her hair, and her cape. The hair was an interesting process - I ended up using a particle system for it, but that's probably worth writing about in its own post. So, if you're interested, keep your eyes open and I'm sure that I'll get around to writing it in the not-too-distant future!


Comments
Post a Comment