Character Modelling Workflow for the Inox Shaman
I frequently mention that I'm not an artist, so I use a workflow where I model each body part individually and then basically shove them together to make a final model. I'm writing this as I'm starting a new model, so I made the very rough shapes for the major body parts and set them into position.
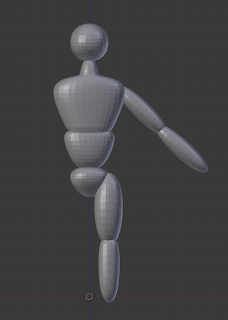 Once I saw what I'd done, I had to stop and laugh. Wow, am I ever not an artist - I think that my 7 year old draws more proportionate people than this! Each of those parts is a manipulated cube with a subdivision surface applied to it (the chest has a bit of extra extrusions to make the shoulders/neck). This is basically how I start all of my models, and it's really easy to fix it so that it conforms to biological standards.
In Blender, you can set a background image to use as a reference. On the n data panel, go down to Background Image and press Add Image. Then, hit Open and browse to the image that you want on your background. At that point, you may be good to go - the image will show up in the background and you can begin working on your model. Or, you may want to change around the way that the image is displayed, which is nice and easy, too.
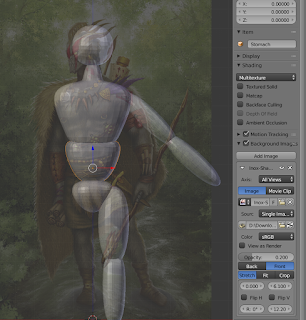 The first set of options that you have is Front or Back. As the names imply, those options will cause your background image to render either in front of or behind your model. I like to work with my image in front of my model, as I feel like it's easier to see what I'm working with that way. Once I've decided if I want my picture in front of or behind my model, I futz around with the image Opacity. If the image is in front, I set down the opacity value so that I can more easily see what I'm working with.
There are 4 more numbers below that - you should probably just play around with them to see what they do, since they're unlabeled. The top two adjust the image's offset, moving it left/right or up/down. Which is which? The Flip H and Flip V checkboxes are your cue - the one on the right is the vertical offset, whereas on the left is horizontal. The next two boxes adjust the rotation angle of the image and the size of the image. I like to scale and rotate my image first, then deal with my offset, but maybe my brain just works backwards.
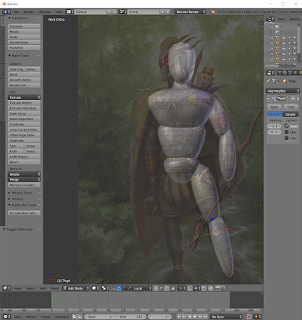 Once I've got my image in place, it's pretty easy to grab the faces of my subdivided geometry and get everything proportionate. Since I'm working with trivially simple geometry (the thigh, for example, is just an elongated cube with the subdivision surface modifier and a slightly smaller face on the bottom than on the top), I can adjust each body part's length by just grabbing a face and moving it up or down. All of the rotations (like angling the arms/legs) are done in Object mode, which means that I can use the Local axis to manipulate the geometry really easily while in Edit mode.
 After I have the basic body proportions straightened out, it's time to start roughing in more details to the individual body parts. If I'm feeling like doing a bunch of sculpting, I can go straight into Sculpt mode and start putting in the serious details... but I've been making remixes of several of Miguel Zavala's models recently, which has really driven home how much easier it is to sculpt details when you've got a great looking model to begin with! So, on the Shaman, my next step was to start adding ring cuts (by pressing ctrl-r) in Edit mode and make the geometry a little closer to what I want it to actually look like! After that, it'll be time to start adding detailed objects, like boots, his belts, etc. and even sculpting some details onto the basic geometry that I've got here!
 I didn't take nearly enough in-progress screenshots as I was adding body parts, but I continued adding basic versions of the shapes to figure out the basic body positioning and here's what I came up with.
You can see that I ended up splitting the head into a skull and a jaw, as I wanted to be able to potentially make a pose with an open mouth or with a closed mouth. I made a basic cape, as well as a boot, dagger, and horn. With the rough shapes in place, my next step will be to go into Sculpt mode and add details to the parts (like fixing the abs and adding musculature in general). I ended up not doing any sculpting on the horn, dagger, or boot (or many other clothing bits that I ended up putting onto the model), as those kinds of sharp angles are easiest to maintain through cube extrusion.
 Once the body parts had details, I spent some time working on my pose. I started with the neutral pose that we see in the official artwork, but then I decided that I wanted to get creative. Because each of the body parts are separate meshes, it was really easy to move them around and figure out a new pose.
I had to redo some of the sculpting work, but not much. I spent some time in front of a mirror, figuring out the pose that I wanted, and then I moved the body parts around to get it as close as I could to that pose. Since the rib-cage was a separate mesh from the abs, I had a lot of freedom with that pose (I study martial arts and have recently been really focusing on how my hips vs. my waist vs. my shoulders are oriented). After I had the pose worked out, I manipulated the cape, the kilt, and his pecs to better reflect the new pose that I'd made. I had to do some other slight cleanup for the necklaces and the hair, but it was a pretty fast process all things considered and I'm really happy with the results!

 Once I saw what I'd done, I had to stop and laugh. Wow, am I ever not an artist - I think that my 7 year old draws more proportionate people than this! Each of those parts is a manipulated cube with a subdivision surface applied to it (the chest has a bit of extra extrusions to make the shoulders/neck). This is basically how I start all of my models, and it's really easy to fix it so that it conforms to biological standards.
In Blender, you can set a background image to use as a reference. On the n data panel, go down to Background Image and press Add Image. Then, hit Open and browse to the image that you want on your background. At that point, you may be good to go - the image will show up in the background and you can begin working on your model. Or, you may want to change around the way that the image is displayed, which is nice and easy, too.
 The first set of options that you have is Front or Back. As the names imply, those options will cause your background image to render either in front of or behind your model. I like to work with my image in front of my model, as I feel like it's easier to see what I'm working with that way. Once I've decided if I want my picture in front of or behind my model, I futz around with the image Opacity. If the image is in front, I set down the opacity value so that I can more easily see what I'm working with.
There are 4 more numbers below that - you should probably just play around with them to see what they do, since they're unlabeled. The top two adjust the image's offset, moving it left/right or up/down. Which is which? The Flip H and Flip V checkboxes are your cue - the one on the right is the vertical offset, whereas on the left is horizontal. The next two boxes adjust the rotation angle of the image and the size of the image. I like to scale and rotate my image first, then deal with my offset, but maybe my brain just works backwards.
 Once I've got my image in place, it's pretty easy to grab the faces of my subdivided geometry and get everything proportionate. Since I'm working with trivially simple geometry (the thigh, for example, is just an elongated cube with the subdivision surface modifier and a slightly smaller face on the bottom than on the top), I can adjust each body part's length by just grabbing a face and moving it up or down. All of the rotations (like angling the arms/legs) are done in Object mode, which means that I can use the Local axis to manipulate the geometry really easily while in Edit mode.
 I didn't take nearly enough in-progress screenshots as I was adding body parts, but I continued adding basic versions of the shapes to figure out the basic body positioning and here's what I came up with.
You can see that I ended up splitting the head into a skull and a jaw, as I wanted to be able to potentially make a pose with an open mouth or with a closed mouth. I made a basic cape, as well as a boot, dagger, and horn. With the rough shapes in place, my next step will be to go into Sculpt mode and add details to the parts (like fixing the abs and adding musculature in general). I ended up not doing any sculpting on the horn, dagger, or boot (or many other clothing bits that I ended up putting onto the model), as those kinds of sharp angles are easiest to maintain through cube extrusion.
 Once the body parts had details, I spent some time working on my pose. I started with the neutral pose that we see in the official artwork, but then I decided that I wanted to get creative. Because each of the body parts are separate meshes, it was really easy to move them around and figure out a new pose.
I had to redo some of the sculpting work, but not much. I spent some time in front of a mirror, figuring out the pose that I wanted, and then I moved the body parts around to get it as close as I could to that pose. Since the rib-cage was a separate mesh from the abs, I had a lot of freedom with that pose (I study martial arts and have recently been really focusing on how my hips vs. my waist vs. my shoulders are oriented). After I had the pose worked out, I manipulated the cape, the kilt, and his pecs to better reflect the new pose that I'd made. I had to do some other slight cleanup for the necklaces and the hair, but it was a pretty fast process all things considered and I'm really happy with the results!

If you'd like to download this model for yourself, it's available on Thingivserse under the title Gloomhaven Monster: Inox Shaman. Have fun!


Comments
Post a Comment