Modelling a Hand in Blender for my Inox Models
Hands are tough. From a purely artistic perspective, hands are difficult because they have a lot of different bits that both need to be proportionate and can take a lot of unique positions. From a mechanical perspective, hands are difficult because they involve relatively small bits that require a finely tuned machine to print, or those bits stick out alone and are super fragile. I've tried a lot of different techniques for making hands for my models, but the Inox hands are some of the ones that I'm most happy with. They're also some of the easiest ones that I've ever made!
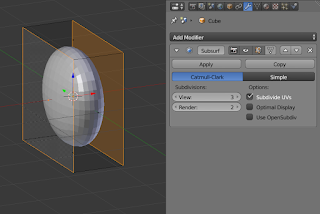 I started with a subdivided cube that I squished into a basic disk in edit mode. This would become the building block for the rest of the hand. I then pressed tab to drop back to object mode, then used shift-d to duplicate it. I rotated my duplicate 90 degrees along the vertical (z) axis by pressing r z 90 and then positioned it so that it could become a pinky finger to the original cube's palm.
 With my pinky finger in place, I went into edit mode again and made some slight changes. Since I wanted this to be a finger and knuckles make sharper bends (rather than the smooth curve that I had before), I selected some edges on my cube and adjusted the mean crease value in the n data panel. I liked the way that .1 looked.
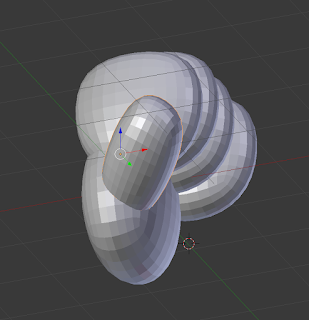 With my basic finger shape built, I used shift-d to duplicate it a few more times and positioned all of those fingers (and thumb) appropriately along the original palm cube. While I was doing this, I realized that my palm was too small, so I grabbed its faces and made it a bit longer on a couple of axes until it looked good in relation to the fingers that I had built. I also squashed down the thumb to make it more thumby. A nice thing about working with subdivided cubes like this is that it's really easy to adjust their proportions, which is good for people like me who have no idea how big various bits of the human body are in relation to each other!
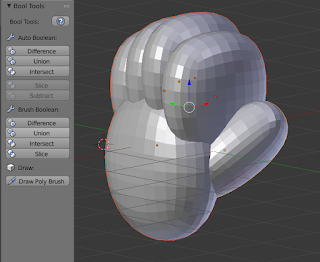 That got the rough hand geometry in place, so the next step was to start sculpting on some details. This step begins with applying the subdivision surface modifier and then involves applying a boolean union modifier to all of the parts to turn them into a single object. This step can be done easily as follows:
1) In Object mode, select all of the parts of the hand, then press alt-c and select mesh... (this applies any modifiers that are currently on those objects)
2) With all of the objects selected, go to the Bool Tools add-on and press the Union button and then the Apply button.
Do you not have Bool Tools? Go to File -> User Preferences and then go to the Add-ons tab. In the search bar, search for Bool Tool and then put a checkbox in the add-on that comes up. That'll add that Bool Tools section to your toolbox on the left.
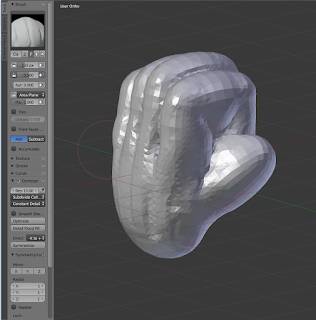 With all of those fingers and palm combined, the next step was to do some actual sculpting. So, I tabbed my way into Sculpt mode. Since the fist is going to be absolutely tiny on the final model, I didn't worry too much about sculpting fine details. Basically, I just wanted to smooth out the rough spots where the cubes had been jammed together and add a little bit of definition to the knuckle and finger areas.
So, I pressed ctrl-d and turned on dyntopo (I like a constant detail of 10 for this sort of thing), disabled symmetry, and then used the Clay Strips tool to draw some extra stuff onto that hand (bulges for the knuckles and tendons on the back of the hand). I held down shift occasionally to smooth things out, especially at the borders between the palm and the fingers. Finally, I used the Crease tool to fix the gaps between fingers (where I accidentally drew a bit too much clay strip) and to add in some definition at the top and bottom of the fist, where you'd expect to be able to see the pointer and pinky fingers curling.
And, that's it! Since the fist is such a tiny part of a model, you don't need to make incredible details (for 3D printing); they won't be visible in the final product, anyway. A decent looking fist is really versatile - just look at my Inox Shaman! One of those fists is all by itself and I shoved a staff through the other one. With the staff there, it no longer looks like a fist and instead looks like a hand clenched around an object - double duty! In fact, these fists are the exact same ones that I used on the Inox Archer, as well! In that case, one fist is holding the bow and the other is pulling back the arrow. It's a nice easy part of the model to make and it certainly gave me a lot of mileage!
 I started with a subdivided cube that I squished into a basic disk in edit mode. This would become the building block for the rest of the hand. I then pressed tab to drop back to object mode, then used shift-d to duplicate it. I rotated my duplicate 90 degrees along the vertical (z) axis by pressing r z 90 and then positioned it so that it could become a pinky finger to the original cube's palm.
 With my pinky finger in place, I went into edit mode again and made some slight changes. Since I wanted this to be a finger and knuckles make sharper bends (rather than the smooth curve that I had before), I selected some edges on my cube and adjusted the mean crease value in the n data panel. I liked the way that .1 looked.
 With my basic finger shape built, I used shift-d to duplicate it a few more times and positioned all of those fingers (and thumb) appropriately along the original palm cube. While I was doing this, I realized that my palm was too small, so I grabbed its faces and made it a bit longer on a couple of axes until it looked good in relation to the fingers that I had built. I also squashed down the thumb to make it more thumby. A nice thing about working with subdivided cubes like this is that it's really easy to adjust their proportions, which is good for people like me who have no idea how big various bits of the human body are in relation to each other!
 That got the rough hand geometry in place, so the next step was to start sculpting on some details. This step begins with applying the subdivision surface modifier and then involves applying a boolean union modifier to all of the parts to turn them into a single object. This step can be done easily as follows:
1) In Object mode, select all of the parts of the hand, then press alt-c and select mesh... (this applies any modifiers that are currently on those objects)
2) With all of the objects selected, go to the Bool Tools add-on and press the Union button and then the Apply button.
Do you not have Bool Tools? Go to File -> User Preferences and then go to the Add-ons tab. In the search bar, search for Bool Tool and then put a checkbox in the add-on that comes up. That'll add that Bool Tools section to your toolbox on the left.
 With all of those fingers and palm combined, the next step was to do some actual sculpting. So, I tabbed my way into Sculpt mode. Since the fist is going to be absolutely tiny on the final model, I didn't worry too much about sculpting fine details. Basically, I just wanted to smooth out the rough spots where the cubes had been jammed together and add a little bit of definition to the knuckle and finger areas.
 So, I pressed ctrl-d and turned on dyntopo (I like a constant detail of 10 for this sort of thing), disabled symmetry, and then used the Clay Strips tool to draw some extra stuff onto that hand (bulges for the knuckles and tendons on the back of the hand). I held down shift occasionally to smooth things out, especially at the borders between the palm and the fingers. Finally, I used the Crease tool to fix the gaps between fingers (where I accidentally drew a bit too much clay strip) and to add in some definition at the top and bottom of the fist, where you'd expect to be able to see the pointer and pinky fingers curling.
And, that's it! Since the fist is such a tiny part of a model, you don't need to make incredible details (for 3D printing); they won't be visible in the final product, anyway. A decent looking fist is really versatile - just look at my Inox Shaman! One of those fists is all by itself and I shoved a staff through the other one. With the staff there, it no longer looks like a fist and instead looks like a hand clenched around an object - double duty! In fact, these fists are the exact same ones that I used on the Inox Archer, as well! In that case, one fist is holding the bow and the other is pulling back the arrow. It's a nice easy part of the model to make and it certainly gave me a lot of mileage!


Comments
Post a Comment