New Thing: Earthen Grasp Model
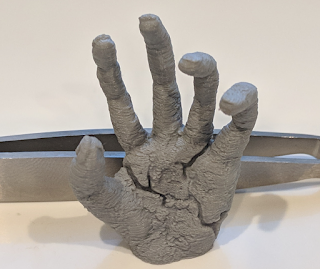
 I really enjoyed watching the video that I linked last week and wanted to try the texturing technique that Zach used to make the smaller scales on the dragon. I then saw a post on Reddit asking about a good model for the D&D spell, Earthen Grasp. I haven't had the chance to play D&D for many years and wasn't familiar with the spell, but it seemed like a giant stone hand would be an excellent opportunity for me to try out that texturing technique, so I decided to give it a go!
 First, I had to make a hand model. In the past, I've used some quick and dirty shortcuts to make hands. In that case, the whole hand was only going to be a few mm tall, so it really didn't need a ton of detail. In this case, the hand was going to be about 40 mm tall, so those tricks weren't going to fly. I decided to start with the fingers, using a refined version of the technique that I used on the Wind Demon hand. One of the challenges that I ran into with the Wind Demon hand was that the Skin modifier doesn't always generate good geometry when you have a bunch of intersecting edges, so in this case, I decided to make each finger its own mesh (within a single object).
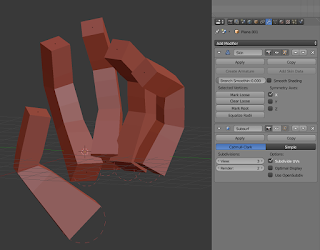
I started with a plane object in blender, then went into Edit mode and pressed Alt-M (with everything selected) and selected At Center to merge everything to a single point at the center. Then, I used Ctrl-Click to extrude additional connected points to make the major bones of the finger. With one finger defined, I copied it a few times to make the others and figured out the pose.
 My next step was to give the fingers some depth. To do this, I used the good old Skin modifier. You may have noticed those red dashed circles around the bottom vertex on each finger; those are from that modifier. To make it render correctly, I selected each of those vertices and then pressed the Mark Root button on the modifier. I then used Ctrl-A to scale the skin around those vertices, making the fingers wider all the way around, but especially at the bases where they'd connect to the palm. I then used a Subdivision Surface modifier to smooth things out before working on the palm.
 The palm was just a cube (with a Subdivision Surface), that I extruded and tweaked to make a basic palm shape. I just keep pulling edges/vertices around until I had a palm that looked more-or-less the way that my palm looked when I bent my hand into the shape that I was trying to model ;)
My next step was sculpting. I did this in a few passes, but the first thing that I did was to add details to the fingers. I used Dyntopo with the Crease brush, the Clay Strips brush, and the Inflate brush extensively, sculpting creases where the fingers bent and adding on fingernails. If I had it to do over again, I would make the fingernails as separate meshes rather than trying to sculpt them in, as it was fairly difficult to get them differentiated from the fingertips without adding an absurd number of triangles to those areas.
 After I had the details sculpted onto the fingers, my next step was to work on the palm. I began by selecting the fingers and using a Boolean Union modifier with the palm to join them together into a single mesh, then I went to work with the sculpting tools again. I once again used my own hand as a model (I guess it's a left hand because I control my house with my right!), trying to add the major shapes and details onto it. As I worked on more and more fine details though, I began to realize that I might be doing pointless work.
My next step was going to be to apply a stone texture to the hand. That step was going to take the surface geometry and push and pull it all over the place, so subtle things like creases in the palm and fingers might not even survive it. Rather than diving too deep into those details, I decided to move on to the stone texturing and see how that would work.
 Like Zach did in his video, I went into Sculpt mode and selected an additive brush (in this case, I used Clay Strips). In the Texture section, I pressed the New button to make a new sculpting texture. This isn't particularly intuitive, but the next step was to go to the Texture panel on the far right (one of the icons along with the Modifiers) and actually open my texture. Pixologic has published a big library of alphas, and I opened one of their rock textures for this model. I then went back to the left side of the screen and changed two settings.
Under Brush Mapping I selected Area Plane. This affects the way the texture image maps to the actual geometry. Under Stroke -> Stroke Method I selected Anchored. This allowed me to draw my texture in patches, the way that Zach did in his video. I liked doing it this way because it gave me a lot of control over how the texture was going to be applied and let me set up interesting looking crags and stuff on the hand.
After I stamped the hand with the rock texture, I got to wondering just how visible it would be on the final print. I went ahead and sliced the model, and I was worried about what I saw in the print preview. The rock texture was definitely there, but it was kindof 'meh'. I wanted it to have some more pronounced features, but they weren't really showing up.
 So, I decided to draw some cracks onto it manually. I pulled out the Crease tool, cranked up the Strength and selected a very sharp Curve. Then, I just went to work drawing some deep cracks into the hand. I found it helpful to go around the edges with the inverted crease (hold down Ctrl while drawing with the tool) to make them sharper, otherwise I felt like they looked more like gouges than cracks. Once I was happy with the cracked surface of my hand, I cut off the bottom with a Boolean modifier (so that there'd be a nice flat surface), then supported it and printed it!


Comments
Post a Comment