Blender Tip: Moving along the Local vs. Global Axes
When I'm roughing out the shape for a new model, I like to make separate meshes for each of the major body parts (so there's a forearm mesh that is separate from the upper-arm mesh which is separate from the chest which is separate from the abdomen...). That makes it really easy for me to move them around and get the pose that I want; it also makes it easy for me to sculpt on details, as I can focus on just getting one part to look good at a time.
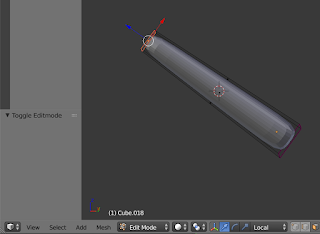 When I'm making body parts this way, each individual part is almost always an elongated cube with the Subdivision Surface modifier applied to it. I like to stretch them out along the Z axis, then rotate the thing in Object mode. That preserves the "z stretch" which makes it nice and easy for me to select an end face of my "cube" and drag it out further or move it in a bit. I've almost always done this by the handles that show up when you select a face, but I literally just learned that there's a more precise way!
When you select a face that you need to move, you can press g to grab it and move it. By default, it will be allowed to move freely. Given that I have a 2-dimensional representation of a 3-dimensional space (and that my mouse is a 2-dimensional interface tool), I often end up with stuff moving around crazily if I try to do much in a free move. Fortunately, you can constrain the movements to one of the 3 axes by pressing either x, y, or z after you've grabbed the thing or to avoid one of those axes by pressing shift and that axis. This constraint will apply based on the global axes though, which isn't always helpful when working with an oriented piece like in this example.
What I didn't know until today is that you can double-tap the axis. The first time you press z, it constrains to the global z axis. The second time you press z, it constrains to the z axis for whatever orientation you're in. So, if you're in local orientation, you get to scale on the local z axis. This is awesome because it means that you can do very precise operations based on those local axes! So, if I want to move that face out 5 mm on the local z axis, I can press g z z 5 to do that!
How'd I figure that out (I say as if this isn't a well documented, basic feature)? The program tells you in the bottom left, if you pay attention! Check it out:
 |
| One tap... |
 |
| Two taps! |


Comments
Post a Comment