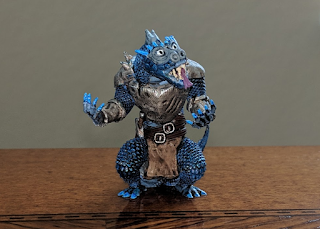
New Thing: Kobold
 I was really happy with how my drakes turned out, but as I looked at the Rending Drake, I couldn't help but think that it really needed some armor to complete its look. So, I decided to turn it into a kobold!
I figured that it would be fun for this guy to be sporting a bunch of scavenged equipment, so I designed some basic shapes and then went to town on them in sculpt mode to add cracks and scratches and other bits of wear and tear. That was mostly just sculpting trial-and-error though, so isn't really worth writing about. His belts, on the other hand, were actually pretty interesting!
When I was initially blocking out the shapes for this guy, I gave him a belt using the same technique that I've done before: just make a cube and apply a Subdivision Surface modifier to it to round it out, then put that cube around his midsection, adjust the faces so that it's the right size, and call it good. While that method works, it has a few drawbacks: it's not so easy to move bits around and surface details require a fairly manual process. If you know one thing about me, it should be that I don't really like manual processes, so I tried something different here!
 Instead of using a cube, I remade the belt with a pair of Bezier Circles. I set the first curve around the drake's waist, moving the control points around so that it would go between his back spikes and generally create a nice, organic belt shape.
I then turned the other Bezier Circle into a cross-section of my main circle. I moved the points around to flatten out its shape (making it more belt like), then I subdivided it (so that I'd have more control points) and moved them around to add some ridges, just to give it some texture. With that cross-section Bezier Circle build, I set it as the Bevel Object on my main circle. This extruded that cross-section along the full length of the belt... although its orientation was initially pretty crazy.
 Fortunately, I know how to set the Tilt value on the control points of a Bezier object (see my last post, about the drakes, for details)! I just tilted all of those points until my belt was lying mostly flat against the body, then went into the individual points and tweaked them until I liked the angle that each one was at (for example, the one against the spikes on the kobold's back is approaching horizontal, as I want it to look like it's laying against the spikes). With the belt in place, I played around with the bevel object circle object a bit, until I was happy with how it looked.
All told, this was a really easy way to make the belts for this character! What's more, because the belt is a defined object, it was really easy for me to tweak details after the fact, adjusting little things that I didn't like. In fact, when I decided that I wanted a second belt (to hold down the chest plate and just look cool), it was trivial for me to duplicate the original belt object and then just slide one of the control points up a few mm on the z axis. The bezier circle recalculated itself to have nice smooth curves, and it looked great!


Comments
Post a Comment