Using Blender to Cut and Combine Models
A fellow Gloomhaven fan on Reddit asked me for some help combining a couple of Thingiverse models, and after a bit of discussion, we decided that it would be best if I put together a tutorial so that he could make the changes himself! Also, this particular change will serve as a really good introduction to Blender, so I figured that it'd be a nice post to make in general (since Blender intros are helpful for a lot of people!).
So, what was our situation? Well, this fellow really liked the hitpoint dials on these Summon models and wanted to use them with all of the models in this collection. So, the overall goal is twofold: 1) Cut the HP Dial off of the bottom of the first model, and 2) Put the new models on top of it. I'm going to try and write this tutorial for a Blender newbie, so please pardon me if I'm covering all of the little steps in excessive detail. Also, please let me know if I failed to cover anything in sufficient detail, as I'm sure that I do some things without even thinking about it!
 The first thing to do (after launching Blender, naturally), is to remove all of the default objects from your scene. To do this, press A a couple of times to select all, then press X and then Enter to delete them.
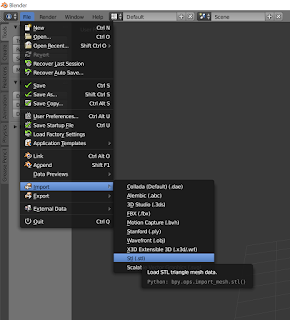
Next, we need to import the files that were downloaded. To do this, Go to File -> Import -> STL and browse to wherever you've extracted your download. I figured that the Living Bomb model would be easiest to work with, because it had that nice round connection between the model and the top of the dial, so that's the one that I'm using in this tutorial (although it technically doesn't matter for the method that I'm going to discuss here)! There are a bunch of different ways to do this, but I'm going to use the one that will work best for kit bashing (which is essentially what we're doing here!): Boolean Operations.
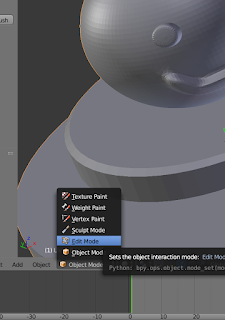 With that model imported, select it with a Right Click (unless you're using Blender 2.8, in which case the default select has changed to the much more reasonable Left Click). Working in Blender means getting comfortable with working in different modes when you need to do different things. There are three main modes that I use when modelling for 3D Printing: Object, Edit, and Sculpt. By default, you're in Object mode, which lets you move around individual objects. For our next step, we need to edit this model's geometry, from the appropriately named Edit mode. To do this, click on the little drop-down menu in the bottom left of the screen, and hit Edit Mode. I believe that the Tab key will do this by default, but I changed that binding ages ago and don't entirely remember ;)
Within Edit mode, things will look pretty different. There are 3 different ways that you can edit a model in Edit mode: by Face, by Vertex, or by Edge. Depending on which you have selected, you might get a slightly different look than what you see in these screenshots... but fortunately, for this kit bashing method, it doesn't matter which one you use!
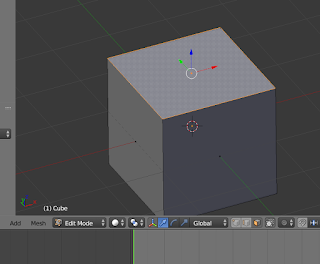
 Now that you're in Edit mode, you can hold down the middle-mouse button to pivot your view, and use the numpad keys to snap to various predefined perspectives. First, press A a couple of times until you've deselected the whole model (until it's no longer highlighted orange). Then, change your perspective as needed until you can see the top of the dial, and Right Click on a face/edge/vertex that is on it to select it.
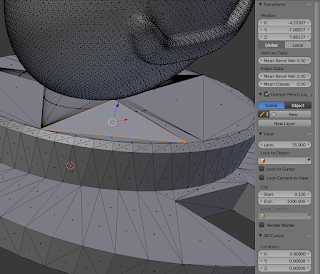
Next, press the N key to bring up the Data panel on the right of the main viewing panel (it's called that because it has all sorts of data about your selected object). If a panel just disappeared, that means that it was already there, so just press N again to bring it back ;) Now, we're interested in discovering the Z position of that bit of the model that we have selected, but we need to find it in relation to the Global axis. So, under those X/Y/Z numbers at the top of the Data panel, press the Global button (when it's dark, it's selected), then copy whatever number is next to Z: onto your clipboard (7.86137 in this case). In actuality, since this object is centered on the origin, there's no difference between your Local coordinates and the Global coordinates, but this procedure generally works better if you use the Global ones since you'll often be working on objects that are not sitting at the origin.
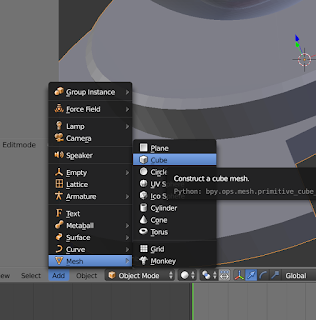
So, now that you know how high the top of that dial is, we need to make an object that covers up the dial, but doesn't cover up the bomb. So, change back to Object mode (via the selector on the bottom left) and go to Add -> Mesh -> Cube to add a basic cube object into the scene. You might not be able to see the cube, because the bomb guy is in the way. To fix this, press Numpad-/ (the slash on the numpad) and it will both focus you in on the cube and hide everything else.
 With your cube plainly visible, go back into Edit mode and deselect everything (by pressing A as required). Over to the right of the Object/Edit mode dropdown is a set of 3 icons with cubes (just to the right of the word Global in this screenshot). Those will let you toggle between Vertex, Edge, and Face select modes. Press the rightmost one (as seen in this screenshot) and then select the top face of the cube (ctrl-tab is a keyboard shortcut to toggle between these modes more quickly).
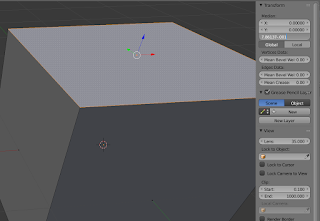 Now, look to the right, in the Data panel. The Z: value of that face is probably 1, which doesn't serve our purposes at all. We need it to be high enough to cover the dial... so you probably see where I'm going! Except for one thing. We're setting this up for a Boolean operation, and Booleans really don't like coplanar faces (two faces that are in the exact same plane). So, instead of just entering in 7.86137 (the height that we measured earlier, which should still be on your clipboard), we're going to enter a basic mathematical formula: 7.86137 - .001. That will make the top of our cube ever so slightly lower than the top of the dial (.001 mm lower, which your slicer will just ignore). With that formula in place, press Enter and watch your cube turn into a column!
 Now, press Numpad-/ to bring back everything and drop back to Object mode. You've still got your cube selected, and now the top of it is just below the top of the dial, so we just need to grow the outside edges. To do this, press S, Shift-Z, 20, Enter. That will Scale the selected object, along all axes except Z, by a factor of 20, which should be more than large enough to cover up the whole base. Fortunately, we don't need to be precise with these, as long as they're big enough to totally cover the dial up.
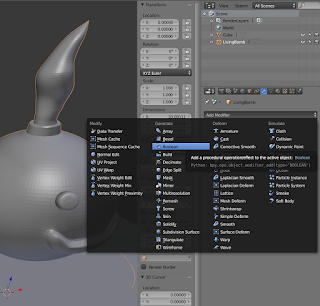 Alright, up until now, it's all been prep work... but here's the payoff: the Boolean operation! With the bomb selected (instead of the cube that we've been working on recently), click on the little Wrench Icon Tab on the far right, then press the Add Modifier button. In the Generate column, select the Boolean modifier (yes, there are a ton of modifiers in Blender and no, I don't know how to use most of them, sorry). Boolean operations have two settings that we usually care about, the Operation and the Object. In this case, we are going to use the Intersect operation, so you can leave that alone.
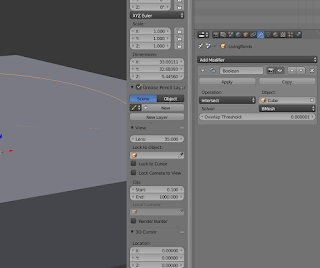 Under Object, you can either click on the little eyedropper and then click on the cube, or you can just click into the box and select the cube's name (which is easier in this case, but when you have a more complex scene with dozens or hundreds of objects, the eyedropper gets easier to use). Either way, once you select the cube, that bomb should just disappear, leaving us with our cube and a strange orange circle on the top face. That's a good thing! Our next step is to press the Apply button on that Boolean modifier to commit it. With that modifier committed, we can Right-Click to select the cube, then delete it with X, Enter... which reveals our perfect, isolated hitpoint dial, just as we'd wanted:

With the dial isolated, we can go to File -> Export -> STL and save it for future use... or just leave it here for the next step!
Now, I know that that seemed like a long process, and from a pure "number of steps required" perspective, it was. Many people would, while in edit mode, select a ring around the base of the bomb and then delete that geometry, and then delete the rest of the bomb, then repair the faces... but that process is prone to human error and, while it's easier to explain, it'll actually take a lot longer to do (after you get comfortable with how to use the boolean operations). Also, we're only half way through this process... and for our next step, we're going to need to do some more cutting, so let's do it the easy way!
We will use the exact same process that we used to isolate the bottom of the Hitpoint dial, except that this time, we're going to want the bit that sticks out the top of the cube (and we'll want the top of the cube to be slightly higher than the base, instead of slightly lower), so our Boolean operation will be a Difference instead of an Intersect and the top of our cube will be at + .001 instead of - .001. So, to do a quick overview of the steps that you'll need to do:


So, what was our situation? Well, this fellow really liked the hitpoint dials on these Summon models and wanted to use them with all of the models in this collection. So, the overall goal is twofold: 1) Cut the HP Dial off of the bottom of the first model, and 2) Put the new models on top of it. I'm going to try and write this tutorial for a Blender newbie, so please pardon me if I'm covering all of the little steps in excessive detail. Also, please let me know if I failed to cover anything in sufficient detail, as I'm sure that I do some things without even thinking about it!
1) Isolating the HP Dial
 The first thing to do (after launching Blender, naturally), is to remove all of the default objects from your scene. To do this, press A a couple of times to select all, then press X and then Enter to delete them.
Next, we need to import the files that were downloaded. To do this, Go to File -> Import -> STL and browse to wherever you've extracted your download. I figured that the Living Bomb model would be easiest to work with, because it had that nice round connection between the model and the top of the dial, so that's the one that I'm using in this tutorial (although it technically doesn't matter for the method that I'm going to discuss here)! There are a bunch of different ways to do this, but I'm going to use the one that will work best for kit bashing (which is essentially what we're doing here!): Boolean Operations.
 With that model imported, select it with a Right Click (unless you're using Blender 2.8, in which case the default select has changed to the much more reasonable Left Click). Working in Blender means getting comfortable with working in different modes when you need to do different things. There are three main modes that I use when modelling for 3D Printing: Object, Edit, and Sculpt. By default, you're in Object mode, which lets you move around individual objects. For our next step, we need to edit this model's geometry, from the appropriately named Edit mode. To do this, click on the little drop-down menu in the bottom left of the screen, and hit Edit Mode. I believe that the Tab key will do this by default, but I changed that binding ages ago and don't entirely remember ;)
Within Edit mode, things will look pretty different. There are 3 different ways that you can edit a model in Edit mode: by Face, by Vertex, or by Edge. Depending on which you have selected, you might get a slightly different look than what you see in these screenshots... but fortunately, for this kit bashing method, it doesn't matter which one you use!
 Now that you're in Edit mode, you can hold down the middle-mouse button to pivot your view, and use the numpad keys to snap to various predefined perspectives. First, press A a couple of times until you've deselected the whole model (until it's no longer highlighted orange). Then, change your perspective as needed until you can see the top of the dial, and Right Click on a face/edge/vertex that is on it to select it.
Next, press the N key to bring up the Data panel on the right of the main viewing panel (it's called that because it has all sorts of data about your selected object). If a panel just disappeared, that means that it was already there, so just press N again to bring it back ;) Now, we're interested in discovering the Z position of that bit of the model that we have selected, but we need to find it in relation to the Global axis. So, under those X/Y/Z numbers at the top of the Data panel, press the Global button (when it's dark, it's selected), then copy whatever number is next to Z: onto your clipboard (7.86137 in this case). In actuality, since this object is centered on the origin, there's no difference between your Local coordinates and the Global coordinates, but this procedure generally works better if you use the Global ones since you'll often be working on objects that are not sitting at the origin.

So, now that you know how high the top of that dial is, we need to make an object that covers up the dial, but doesn't cover up the bomb. So, change back to Object mode (via the selector on the bottom left) and go to Add -> Mesh -> Cube to add a basic cube object into the scene. You might not be able to see the cube, because the bomb guy is in the way. To fix this, press Numpad-/ (the slash on the numpad) and it will both focus you in on the cube and hide everything else.
 With your cube plainly visible, go back into Edit mode and deselect everything (by pressing A as required). Over to the right of the Object/Edit mode dropdown is a set of 3 icons with cubes (just to the right of the word Global in this screenshot). Those will let you toggle between Vertex, Edge, and Face select modes. Press the rightmost one (as seen in this screenshot) and then select the top face of the cube (ctrl-tab is a keyboard shortcut to toggle between these modes more quickly).
 Now, look to the right, in the Data panel. The Z: value of that face is probably 1, which doesn't serve our purposes at all. We need it to be high enough to cover the dial... so you probably see where I'm going! Except for one thing. We're setting this up for a Boolean operation, and Booleans really don't like coplanar faces (two faces that are in the exact same plane). So, instead of just entering in 7.86137 (the height that we measured earlier, which should still be on your clipboard), we're going to enter a basic mathematical formula: 7.86137 - .001. That will make the top of our cube ever so slightly lower than the top of the dial (.001 mm lower, which your slicer will just ignore). With that formula in place, press Enter and watch your cube turn into a column!
 Now, press Numpad-/ to bring back everything and drop back to Object mode. You've still got your cube selected, and now the top of it is just below the top of the dial, so we just need to grow the outside edges. To do this, press S, Shift-Z, 20, Enter. That will Scale the selected object, along all axes except Z, by a factor of 20, which should be more than large enough to cover up the whole base. Fortunately, we don't need to be precise with these, as long as they're big enough to totally cover the dial up.
 Alright, up until now, it's all been prep work... but here's the payoff: the Boolean operation! With the bomb selected (instead of the cube that we've been working on recently), click on the little Wrench Icon Tab on the far right, then press the Add Modifier button. In the Generate column, select the Boolean modifier (yes, there are a ton of modifiers in Blender and no, I don't know how to use most of them, sorry). Boolean operations have two settings that we usually care about, the Operation and the Object. In this case, we are going to use the Intersect operation, so you can leave that alone.
 Under Object, you can either click on the little eyedropper and then click on the cube, or you can just click into the box and select the cube's name (which is easier in this case, but when you have a more complex scene with dozens or hundreds of objects, the eyedropper gets easier to use). Either way, once you select the cube, that bomb should just disappear, leaving us with our cube and a strange orange circle on the top face. That's a good thing! Our next step is to press the Apply button on that Boolean modifier to commit it. With that modifier committed, we can Right-Click to select the cube, then delete it with X, Enter... which reveals our perfect, isolated hitpoint dial, just as we'd wanted:
With the dial isolated, we can go to File -> Export -> STL and save it for future use... or just leave it here for the next step!
Now, I know that that seemed like a long process, and from a pure "number of steps required" perspective, it was. Many people would, while in edit mode, select a ring around the base of the bomb and then delete that geometry, and then delete the rest of the bomb, then repair the faces... but that process is prone to human error and, while it's easier to explain, it'll actually take a lot longer to do (after you get comfortable with how to use the boolean operations). Also, we're only half way through this process... and for our next step, we're going to need to do some more cutting, so let's do it the easy way!
2) Put the New Model on the Dial
Now that we have the dial isolated, our next step is to put the actual model that we want on top of it. This step is going to leverage our Boolean skills as well. Start by importing the model that you want to put onto the dial. If it doesn't have a base on it, you're in luck... but you're probably going to want a based model eventually, so let's talk about how to remove the base!We will use the exact same process that we used to isolate the bottom of the Hitpoint dial, except that this time, we're going to want the bit that sticks out the top of the cube (and we'll want the top of the cube to be slightly higher than the base, instead of slightly lower), so our Boolean operation will be a Difference instead of an Intersect and the top of our cube will be at + .001 instead of - .001. So, to do a quick overview of the steps that you'll need to do:
- Figure out where the top of the model's base is by going into Edit mode and selecting something on the top of the base, then examining the Z: number from the Data panel.
- Add -> Mesh -> Cube to make a new cube, then Edit its top face to make it the right height. In this case, it'll be the number that you found in step 1 + .001.
- Scale your cube a bunch with a locked Z axis by pressing S, Shift-Z, 20, Enter. If 20 isn't big enough to cover the base of your model, make it 50, or 100! Go crazy, you've got all the pixels in the world at your disposal!
- With the model selected, go to the Wrench icon on the right (the Modifiers tab), then press Add Modifier -> Boolean to put a Boolean modifier onto your model.
- Change the Operation of the modifier to Difference and select your new cube as the Object. Then, press Apply and delete the cube.

That'll leave you with a model that has a perfectly flat bottom (which can be really nice for printing, in and of itself!) and a hitpoint dial with a perfectly flat top. At this point, you've got a few options for how to put the model onto the dial, but I think that the easiest is to just drag it down onto there. To do this, you can press G to grab it and move it freehand... or, if you're like me and always end up with things going crazily off to infinity when doing that, you can use those little axis arrows to move it. To do that, just Left Click on the blue arrow to slide the model up and down along the Z axis, and the red and green arrows for the X and Y axes.
Do this until your model is well positioned on the hitpoint dial, then go to File -> Export -> STL to export your newly combined model and base!

As an aside, many people will use a Boolean Union operation to permanently join the model to the base before printing it. Older slicers used to freak out if a model had overlapping meshes (which is what we just did by sliding the bat mesh down onto the dial mesh), but that hasn't really been an issue for a few years. As such, I prefer to skip that step, as skipping it makes the models much easier to work with in the future and keeps the model geometry a lot cleaner (booleans can make some weird triangles when you're jamming odd shapes together, like the bottom of a model and the top of a base).
Well, there you have it! I hope some people find this helpful!


Comments
Post a Comment