I made a
Giant Viper Gloomhaven monster, and it was really fun! This was a great chance to take the skills that I learned while making my
Living Bones model, add to them, and then apply them! But first, here's a picture of my version 1 print:
Here's the crazy thing about that model - it was really easy to make. Of course, I had no idea that it would be easy when I started, so the first thing that I did was a bunch of research about how to draw scales with Blender. It was a bit of a challenging search because the scale function is so important while making 3D models, but I eventually came across the idea to use the Array and Curve modifiers, then found a
great video about how to use them. Thank goodness that I found that video, because they are not easy to use because of how sensitive they are to each object's position relative to its origin. But, more on that later.
Once I knew that I was going to try and make this snake as parametricly as possible, it was time for me to make the most basic component: the scale. Singular. Just like I did while making the pauldrons on my Living Bones, I made a very simple plane object, then made the bare minimum number of changes to it to make it look like a scale. In this case, I added a loop cut, scaled one edge downward, and dragged a vertex outwards a bit. Then, I marked 2 edges with a full crease.
And here it is with the Subdivision Surface and Solidify modifiers applied (I made it very thick via Solidify, so that it would be easier to print):
It's a super basic scale, but that's ok, because I'm going to have like a million of them, and I don't want this model to be several gigabytes because I obsessed over the details of each scale. So, I applied those modifiers and moved forward.
Once I had my scale built, it was time to use my new toys: Array and Curve. Array will make a bunch of copies of a mesh, and Curve will put a mesh onto a curve. They are very powerful when used together, but also very finicky. The first thing that I did was to move my 3D cursor back to the origin, by pressing
Shift-S and selecting
Cursor to Center. Then, I pressed
Shift-A, went to
Curve and added a
Circle. I gave it a radius of 7, because that looked about right given the size of my scale. That gave me a nice circle around the origin; next I had to move the scale there, too.
So, I selected my scale and reset its origin by pressing
ctrl-shift-alt-c and selecting
Origin to Geometry. Then, I moved my scale to the scene's origin by pressing
shift-S and selecting
Selection to Cursor. That's the setup for success, when it comes to the Array and Curve modifiers - get everything on the origin. So, now it was time to use them.
I selected my scale, then applied the Array modifier to it. Under
Fit Type I selected
Fit Curve and then, for the
Curve, I selected the
Bezier Circle that I made earlier. This gave me a bit long line of scales:
Next, it was time to put that line of scales onto the circle. So, I added the
Curve modifier, then again selected my
Bezier Curve, but this time in the
Object field.
There's a ring of scales! Now, I just need a zillion more of them to make a snake! But first, notice that one spot is a little funky where there are two scales overlapping? To fix that, I applied my Array modifier and then changed over to
Edit mode so that I could scale down the scales along the X axis. I chose to scale them at .95, because I knew that I'd be making a gap later anyway.
Once I had one ring of scales built, I pressed
Shift-D to duplicate them, then
Z to move them upwards on the Z axis. Once the duplicate was at a good looking position, I pressed
R and then
Z to rotate them along the Z axis until I had a good looking scale overlap effect. With my two rows of scales made, I selected them both and pressed
Ctrl-J to join them into a single mesh, then I used
ctrl-shift-alt-C to move the origin to the geometry again, and finally pressed
shift-S to move my selected object back to the cursor/center.
Since snakes don't have uniform scales around their whole bodies, I figured that it would be good to put a smoother belly section in there. It would also be helpful for printing to have a totally solid tube inside the scales, so the belly geometry was a "two birds with one stone" situation. First, I went into
Edit mode and deleted a bunch of the scales. Next, from
Object mode, I pressed
Shift-A and added a Mesh Cylinder, which defaulted to a 7 unit radius because of the earlier circle.
Once that cylinder was in place, I went into
Edit mode for it and added a loop cut along the middle, then I selected the top and bottom faces and scaled them down (pro-tip: press
shift-z during the scale to not scale on the Z axis) until they were just barely overlapping with the scales. This left me with a bulging mid-section. Next, I extruded both of those faces outwards by some small amount (leaving enough scale above/below to overlap when this is array'ed), then set the
Mean Crease value to 1.0 for the new edges in the
n panel. With that in place, I added a
Subdivision Surface modifier to my new shape to round it out a bit.
Now I had a single "segment" of my snake, so I applied all of the modifiers and used
ctrl-J to join them as a single object, then moved on. To make the whole thing, all I'd have to do is repeat this section over and over again. To that end, I deleted the top and bottom faces from my "belly circle" (so that there wouldn't be a bunch of internal faces on the end result), then put my next curve in place.
I pressed
Shift-A and went to
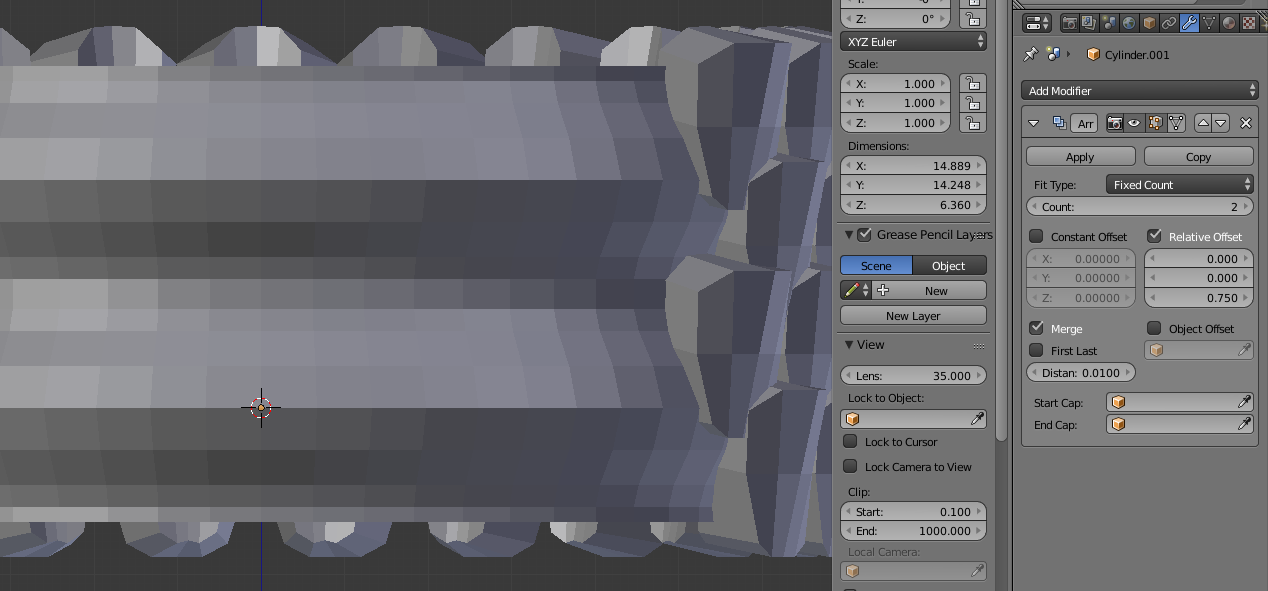
Curve -> Path to add a path object. Just like before where I put my single scale onto the bezier circle, this time I put my "snake cross-section" onto my newly created path. I added the Array modifier to my snake round, and set the
Fit Type to use that path so that it would create as many as needed to complete the path. Because I wanted it to create a single body, this time I had to get a bit creative with my Array modifier. To get them stacking on top of each other, I had to change the
Offset to a Z offset. Then, I just used trial and error to get them stacked up as near to perfectly as possible. Once they were in position, I enabled the
Merge option and adjusted the distance to 0.01. This means that any vertices that are closer than 0.01 units apart will be merged, creating a single, nice shape.
With my Array configured to dynamically make as many copies of this shape as I could want, it was time to put the shape onto the curve that I made. Just like before, I put the Curve modifier on my snake cake, then I selected my Nurbs Path as the
Object. To get the snake cake on the path correctly, I had to press the
Z button in the
Deformation Axis section of the Curve modifier.
At this point, my snake cake was on the path and it's set to automatically replicate as the path got longer, so it's time to make the snake! I found this super fun - I selected the Path object, entered
Edit mode, and went to town. As I dragged the path out, additional snake segments were dynamically added. As the points got dragged around, it dynamically adjusted the snake to curve as described. It's super cool. After some playing around, I ended up with a crazy writhing snake form, but it had two issues. Namely, it was just a scaled tube, it needed a head and a tail.
It was a little hard to work with too, give its generally weird shape. Modifiers to the rescue! Once I had the Path set up in the general shape that I wanted (which, due to the Array modifier meant that my snake body was now the appropriate length), I applied the Array modifier and turned off the Curve modifier (I pressed the little eye-icon on the modifier). This left me with a nice straight snake tube that I could manipulate as geometry.
So, I selected one end by turning on wireframe mode (press
Z), then box selecting (press
B) that section. I turned on proportional editing (press
O), then pressed
G to get an idea about how big my sphere of proportional influence would be. I used the mouse wheel until it looked like a good size, then pressed
Esc to cancel the grab. With my proportional editing set up, I pressed
S to begin scaling my geometry and I dragged it in nice and close to be the tail. I then repeated the process (although not so dramatically) on the other end to make the neck. Then, I turned back on my Curve modifier and had a good snakey body!
At that point, all that was left was to put a head on it! So, I broke down and sculpted one, just like I did with the skull on the Living Bones. Much as I don't like it, sometimes, sculpting is just the right tool for the job. And, that's how I made my Giant Viper model! I'm very happy with how it's turned out. Happy printing!


Very Very useful bit of a tutorial. I have a problem when I try to print files from blender that all my meshes are intersecting. Do I have to Boolean them all together or is there some easier way to make the files printable? Thank you for this, printing one now and plan on making my own variation shortly
ReplyDeleteI've never had issues printing files with a bunch of intersecting meshes. Which slicer do you use? I use Slic3r, which is actually super forgiving of messed up meshes. Like, at one point with this model, I wanted to make sure that the scales were big enough to be printed, so I exported my scale tube as an STL, imported it into Slic3r and then sliced it. I didn't realize that I forgot to close the ends of the tube, but Slic3r did so for me.
DeleteIt looks like different slicers handle intersecting shells differently. Angus published a video where he tested a big mess of intersecting shells on different slicers. Some of them worked fine and others had some pretty serious issues: https://www.youtube.com/watch?v=HhWnIzee3dU He had some tips to resolve those issues for some of them, so it might be worth checking out that video.
DeleteThanks for the response man! I appreciate it, I always had just used cura as my slicer and havent experimented too much with deeper settings. Checking out the video now, thanks again for the info
ReplyDelete