Making Bear Teeth!
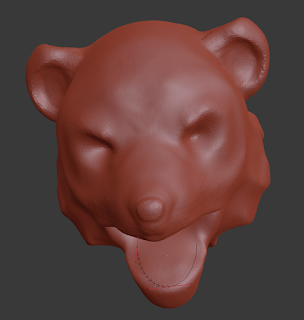
Those of you who follow my Patreon page know that I've been working on a Cave Bear model recently. It's still a work-in-progress, but I'm really happy with the method that I used to make the teeth and so I wanted to write about it!
In the past, I've made teeth the same way that I added spikes to the Living Bones model's pauldron. I made a single tooth, then turned on Snap during transform and moved it into place on the jaw, then I duplicated it and did it again. It worked, but it took a lot of work to get everything in place and aligned well. Not any more!
 This time, I decided to try something different. Instead of manually copying and then placing all of the teeth, I decided that I'd be efficient (aka, lazy). I decided that I'd use an array!
When I made the Giant Viper model, I used a nested array of scales to make it really easy to model and pose. Compared to that, an array of teeth is simple... why haven't I ever do that before? Well, the first thing that I needed was a path to put the teeth on. So, I hit shift-A and added a Bezier Curve to my workspace. I then put a Mirror modifier on it and moved the points around so that it would follow my bear's lower jaw (where I wanted the teeth to go).
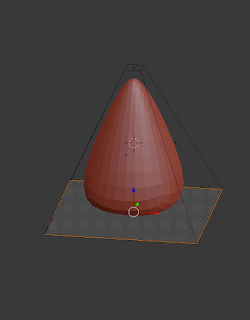 Next, I made a tooth. I just added a Cube, then put the Subdivide modifier on it to make it smooth. Next, I scaled the top and bottom of the cube until it was a good toothy shape, and I increased the Mean Crease value of the bottom edges a bit to pull the bottom of the tooth downwards a bit more aggressively (this doesn't really matter, because that's not going to be visible anyway...).
Nothing special, but I soon had a single tooth ready to go! Here's where I would typically go into the laborious copy-paste process, but instead I went back to the Modifiers section and went to town!
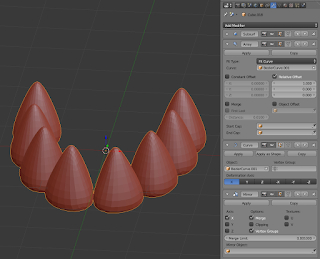 And things went crazy! Then, I remembered that this technique becomes unpredictable if the objects have any transforms on them, so I used Alt-R to clear any rotation on them, and used shift-S to move my Cursor to Center and then Selection to Cursor (to get everything back at the origin where I could easily work with it. With that in place, my Array and Curve modifiers were looking great... but I only had half of a mouth. That's because the Mirror modifier that I used on the Bezier curve is only for display purposes, so the second half of that curve didn't really exist. To solve that, I just put a Mirror modifier on my teeth as well, and problem solved!
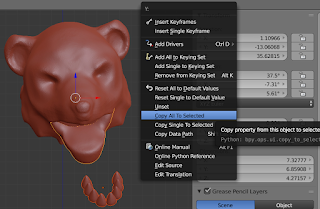 With my nice array of teeth built, I duplicated it and hit Alt-C to convert it To Mesh (so that it wouldn't get messed up if I moved it around and rotated it and stuff). Then, I selected the teeth and then the lower jaw, and Right-Clicked in the Rotation section of the N key Data Panel, and selected Copy all to selected. This copied the rotation properties of my jaw to my teeth, which meant that I only had to line them up now (good thing that I made the jaw object flat on the axis and then rotated the object during posting)!
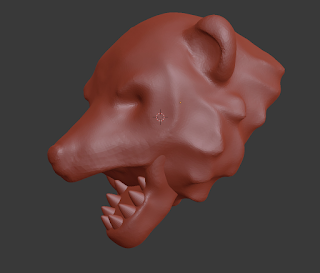 Lining the teeth up in the mouth was easily done, and left me with a nice, toothy maw!


Comments
Post a Comment