Changing Supports Designed in Meshmixer
I've written a lot about using Meshmixer to generate support trees for 3D printing. One of the folks over on my Patreon had a question that I hadn't really written about yet, so I figured that I should share what we came up with =)
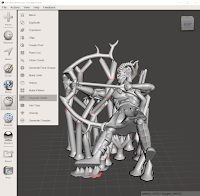
Meshmixer is a really cool piece of software that does a lot of great things. One thing that it's not really good at though, is changing a support tree design after it's been saved. This is understandable, as once a model has been exported with support trees on it, those trees aren't really distinguishable from the model itself; it's all just geometry. So, when I'm working on a model, I usually just keep Meshmixer open until I get a good support structure worked out. As long as it's still in the Analyze -> Overhangs mode, I can freely manipulate those support trees and do what needs doing!
But, what do you do if you have saved the supported STL but then need to come back to it a few weeks later and make some changes? Or if your computer crashes? Well, I don't know if there's a really good answer, but I do know one that will work.
 In Meshmixer, Import your supported model (just like you would an unsupported one). Then, go to Edit -> Separate Shells to split that model up into its component bits. You're probably going to have hundreds of shells, as each straight chunk of a support tree is actually a separate shell. That means that they don't actually share any vertices, even though they may have vertices that are in the same place.
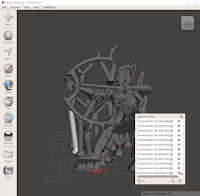 With the model broken out into its separate shells, you can start removing trees that you don't like. Remember that, although these are support trees, from Meshmixer's perspective they are just model geometry. So, instead of using the normal ctrl-click method of removing support trees, you should just left-click to select a bad one and then press delete. You can try and find the supports that you don't like in the Object Browser as another option, but given how many objects I tend to have, that doesn't work too well for me.
 So, we know how to delete problematic supports, but how do we draw new ones? If the model is directly on the printer bed (unlike the example in these screenshots), you can just select the model and go into Analyze -> Overhangs like normal and draw in some new supports. In this situation where the model is floating (and is itself composed of a bunch of separate shells), that doesn't work very well. As you can see in this screenshot, new supports get drawn to the bottom of the selected object, so you can get some crazy results.
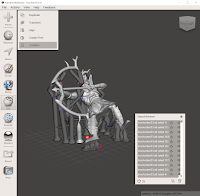 Instead, what I need to do here, is to undo my work from before! After removing any troublesome supports, I need to recombine the model back into a single object. To do this, I select all the pieces of the model and 1 support tree, then go to Edit -> Combine. I only select one support tree here to make it easier to connect new support trees to my model (instead of each other) later.
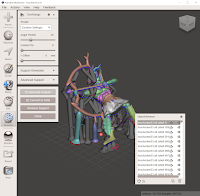
Now that the model is back to a single piece, you can select it and go to Analyze -> Overhangs to draw in some more supports. Because you've got all of that other support structure still sitting there, you're probably going to need to use shift-click to force Meshmixer to draw in supports even when they overlap geometry, but since you're modifying an existing support structure, hopefully you won't need to draw in too many new supports. So, be careful when you're drawing supports this way, otherwise you might create something that requires a lot of post-processing!
Meshmixer is a really cool piece of software that does a lot of great things. One thing that it's not really good at though, is changing a support tree design after it's been saved. This is understandable, as once a model has been exported with support trees on it, those trees aren't really distinguishable from the model itself; it's all just geometry. So, when I'm working on a model, I usually just keep Meshmixer open until I get a good support structure worked out. As long as it's still in the Analyze -> Overhangs mode, I can freely manipulate those support trees and do what needs doing!
But, what do you do if you have saved the supported STL but then need to come back to it a few weeks later and make some changes? Or if your computer crashes? Well, I don't know if there's a really good answer, but I do know one that will work.
 In Meshmixer, Import your supported model (just like you would an unsupported one). Then, go to Edit -> Separate Shells to split that model up into its component bits. You're probably going to have hundreds of shells, as each straight chunk of a support tree is actually a separate shell. That means that they don't actually share any vertices, even though they may have vertices that are in the same place.
 With the model broken out into its separate shells, you can start removing trees that you don't like. Remember that, although these are support trees, from Meshmixer's perspective they are just model geometry. So, instead of using the normal ctrl-click method of removing support trees, you should just left-click to select a bad one and then press delete. You can try and find the supports that you don't like in the Object Browser as another option, but given how many objects I tend to have, that doesn't work too well for me.
 So, we know how to delete problematic supports, but how do we draw new ones? If the model is directly on the printer bed (unlike the example in these screenshots), you can just select the model and go into Analyze -> Overhangs like normal and draw in some new supports. In this situation where the model is floating (and is itself composed of a bunch of separate shells), that doesn't work very well. As you can see in this screenshot, new supports get drawn to the bottom of the selected object, so you can get some crazy results.
 Instead, what I need to do here, is to undo my work from before! After removing any troublesome supports, I need to recombine the model back into a single object. To do this, I select all the pieces of the model and 1 support tree, then go to Edit -> Combine. I only select one support tree here to make it easier to connect new support trees to my model (instead of each other) later.
Now that the model is back to a single piece, you can select it and go to Analyze -> Overhangs to draw in some more supports. Because you've got all of that other support structure still sitting there, you're probably going to need to use shift-click to force Meshmixer to draw in supports even when they overlap geometry, but since you're modifying an existing support structure, hopefully you won't need to draw in too many new supports. So, be careful when you're drawing supports this way, otherwise you might create something that requires a lot of post-processing!


This is incredibly helpful. I've had such a tough time with this issue; thank you so much for coming up with these work arounds! (My Rending Drakes thank you as well. Without these work-arounds, they would bee footless.)
ReplyDelete