Posts

Showing posts with the label Supports

Support Head Diameter in PrusaSlicer

Image
Hi everyone, this is going to be a short and quick post.  As you've seen, I've been playing around with support trees in .3mf files.  Specifically, I've been using them as a solution to design a set of supports that will work for anything from SLA printers to FDM printers with a .4 mm nozzle, and I feel like I've made a lot of progress! I learned something new this morning though, which is important to be aware of when changing from FDM to SLA settings (or the other way).  While most details of the support tree settings (diameter, angle, etc.) are respected when you regenerate trees, the actual Support Head Diameter setting is not.  This setting is not changed because PrusaSlicer stores that value per support head, which gives you a ton of ability to fine-tune supports by shrinking or growing individual heads as needed... but it does make it a little more difficult to take a .3MF file that was designed with FDM support trees and change it over to work with SLA supp...

Tweaking Support Pads for FDM Printing

Image
When running an SLA print, the standard practice is to use a Pad, which is basically a few solid layers of very well cured resin, then have the model suspended above it on trees.  This solid pad helps ensure bed adhesion, and probably does some other important functions that I haven't even considered... but we don't necessarily need it if we're doing an FDM print.  In fact, if our model has a flat bottom, it can be really nice to have it directly on the print bed instead of floating above it! Fortunately, we can tweak the support pad in order to behave in exactly this way!  The first thing that you'll want to do is open PrusaSlicer (with an SLA printer selected), then go to Print Settings  tab and open the Pad  section.  Start out by enabling the Pad Around Object  option.  That will enable the basic "halo pad" but we're going to want to tweak a few of these other settings for our FDM printers.  The first one is the Pad Wall Thickness ....

Tweaking PrusaSlicer Support Tree Settings

Image
I've continued to play around with PrusaSlicer's support tree generation (for both MSLA and FDM prints ), and I'm starting to develop opinions about some of the settings.  So, I figured that I'd take a moment to write about the settings that I use to create trees that I like!  First, here's a screenshot of the trees that get generated with the default settings (after setting up my custom support points).  These are very robust trees, which is great for printing but less great for support removal.  When removing tree supports, I've found those diagonal bracings to be especially burdensome, as they make it much more difficult to "cut in to" the model to release the supports from it.  Fortunately, we can fix that by tweaking some settings, but you're going to need to go into Expert Mode  to get to them all.  So, in PrusaSlicer, go to Configuration -> Mode  and select Expert  to get them to show up. Firstly, we can tweak the Max pillar linki...

Using PrusaSlicer to Design Tree Supports for FDM Prints

Image
I've done a lot of work with tree supports in Meshmixer .  I don't want to denigrate the awesome utility that Meshmixer brings to the table, but it also hasn't been updated in two years.  Meanwhile, Prusa forked their version of Slic3r into PrusaSlicer and has added a bunch of support for MSLA printing... including tree supports!  And, they obviously paid a lot of attention to how tree supports are designed in tools like Meshmixer, because the PrusaSlicer interface neatly bypasses just about all of the pain points that I have when working with MM!  The one drawback is that the Tree Supports are only officially available for MSLA printers... but there's an easy way around that! In order to use PrusaSlicer to generate support trees, you need to change to one of their supported MSLA printers.  At that point, when you slice your model, it will automatically generate support trees that are tuned for that MSLA printer.  These automatically placed trees are a r...

Making Custom Brims for Difficult Parts

Image
I decided to print out a couple of  Stian Wahlvaag's Surprise Eggs  to put in my kids' Easter baskets this year.  I went with the excavator because A) it's got a lot of fun moving parts, and B) it's an excavator, and who doesn't love excavators? I got the eggs to print just fine on my first try, but the excavator itself gave me some troubles.  All of the mechanical bits worked great, but one part of the bumper kept failing.  That one spot had a very small footprint, so it kept getting knocked loose during the print.  It took me several attempts to get things worked out for a successful print, but it also gave me a chance to work on designing a custom brim to help print small footprint objects!  Here's a photo of the one that finally worked next to an older attempt (with a much smaller custom brim) that failed: So, here's how I made my custom brim.  First, I opened up Blender and imported the model.  Then, I pressed Numpad 5, Numpad 1 ...

Changing Supports Designed in Meshmixer

Image
I've written a lot about using Meshmixer to generate support trees for 3D printing.  One of the folks over on my Patreon had a question that I hadn't really written about yet, so I figured that I should share what we came up with =) Meshmixer is a really cool piece of software that does a lot of great things.  One thing that it's not really good at though, is changing a support tree design after it's been saved.  This is understandable, as once a model has been exported with support trees on it, those trees aren't really distinguishable from the model itself; it's all just geometry.  So, when I'm working on a model, I usually just keep Meshmixer open until I get a good support structure worked out.  As long as it's still in the Analyze -> Overhangs mode, I can freely manipulate those support trees and do what needs doing! But, what do you do if you have saved the supported STL but then need to come back to it a few weeks later and make some cha...

Troubleshooting Failed Support: Broken Supports

Image
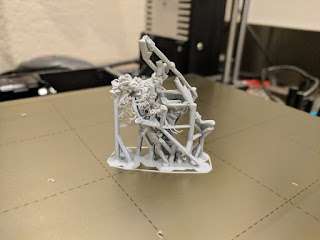
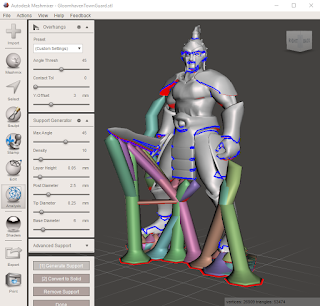
I've been printing copies of my Inox Shaman models recently, and after my latest print finished, I came home to a bit of a mess.  I've done a lot of work with 3D Printing supports , so I don't run into situations like this too often any more... but it obviously still happens sometimes!  When I saw this tangled spaghetti mess, I immediately set about trying to figure out what went wrong so that I could modify my support structure and get a better print next time. The first thing that I did was to compare what printed to what it was supposed  to look like.  Obviously, something failed to print here, but to understand and correct the failure, I had to figure out exactly what  part of the model failed to print.  So, I pulled up Meshmixer and took a look at the file that I sliced. Comparing the support design in Meshmixer to what ended up on my build plate made it fairly obvious which support branches had failed to print.  Of course, identifying what e...

Making Meshmixer Supports, Part 3

Image
So, about that whole trilogy thing... well, I guess it happened after all.  If you haven't read them, I already wrote about Meshmixer support design theory in part 1, and Meshmixer support implementation tricks in part 2... so you may want to read those before diving into this post ;) I've been working on more complex models and so I've had to learn how to make more complex supports.  I think that the sweet spot for the Post Diameter  setting is 2.5 mm.  That's thick enough that it's pretty stable and is less likely to warp during the print, but is still small enough that it's not wasting a ton of filament and can fit into small spaces.  That said, I've been finding reasons to deviate from that standard lately. Why would I use a smaller Post Diameter ?  It can fit in even more places!  Minis and game pieces often have some tight spots that need support, especially a highly textured model.  Support trees with thick posts are more stable, bu...

Making Meshmixer Supports, Part 2

Image
I hadn't really planned on making my Meshmixer supports post into a series, but I got a few really good questions about the technical process of drawing the actual supports, rather than the theory of how to design supports.  That post is already gargantuan, so I figured that it was time for a sequel!  I'm already off the rails, so who knows, maybe this will even become a trilogy (ok, probably not)! The act of drawing supports in Meshmixer is not super intuitive.  What is is, however, is consistent.  When you're drawing supports, you're drawing a 3D object using a 2D interface.  Meshmixer does its best to help you, but it can still be a bit tough.  There are a few ways to draw additional supports, and I use them all at various times while designing supports for a model! The easiest way to draw additional supports is to just click on a red highlighted part of the model and let Meshmixer try to determine a viable path for the support tree.  Often thi...

Getting Started with 3D Printed Minis, Part 5: Cutting and Supporting a Mini

Image
When I'm generating supports for a relatively simple shape, such as something like a shelf that juts out to the side, I'll use the default Slic3r support material  When making something complicated, like a miniature, those supports just don't quite cut it.  Literally, in this sense, as the times when I've used those supports, I've ended up with a solid block of material and I gave up part-way through the task of cutting my model out of it.  So, I guess that technically, I couldn't cut it... but the point stands. I like to use Meshmixer to generate support for my miniatures.  I like it so much, that I wrote a guide specifically about how to generate support material with Meshmixer , which covers many of the details that I'd originally planned on putting in this post! One thing that I didn't discuss there was cutting a model.  I usually prefer using support material to print the bits of my minis that could otherwise not be printed... but sometimes, I h...

Making Meshmixer Supports

Image
I've written tidbits of this information across a few other support-related posts, but I figured that I should put it all in one place.  I've been printing a lot of minis lately, which has meant that I've had to learn a lot about supports and 3D printing.  I use a Prusa MK3, so this post is focused on FDM supports.  I tried a lot of different support structures across several different programs and my favorite ones were tree supports in Meshmixer.  I know many others have had excellent results with other supports, but I've been happy with my results and so that's what I'm going to write about :P Generating tree supports via Meshmixer is a 2 phase process.  First, you've got to figure out your print's orientation, and second, you've got to figure out your actual supports.  For minis, that first step can be a difficult balancing act, as you probably don't want supports to connect to the most detailed parts of the mini (like its face).  You also h...