Making Armored Characters: Combining Sculpting and Cube Extrusion - Part 2
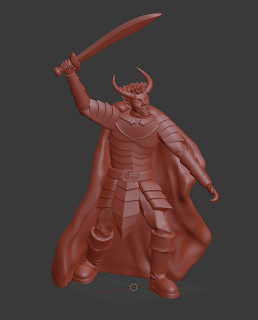
In my last post, I wrote about how I used cube extrusion to make a plate armor boot for one of my models. In this post, I'm going to write about how I use Sculpt Mode to make folds of cloth for a cape! Capes and big cloaks are common features for fantasy characters, and they're excellent features for 3D-Printable models, because they can be used as supports for printing other features higher up on the model! So, to that end, lets look at the most recent cape that I've made:

 I started the cape out with Cube Extrusion, the same way as I made the boot on my previous model. When working with a cape, I prefer to work with a Plane instead of a Cube, as it's easier to move the plane's geometry around. I start with my basic plane, then select an edge and extrude extra sections downwards from the back of his neck. Then, I extrude sections to the left and right to let the cape wrap around his body. I then go into Vertex select mode and move individual vertices around until the cape has a bit of flow to it.
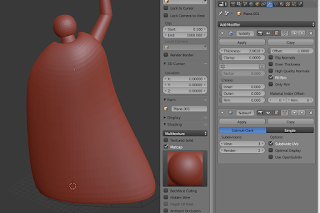
Once I've got the cape into more or less the right place, I apply the Solidify and Subdivision Surface modifiers to it, to smooth it out and give it some depth. With those modifiers in place, I'll resume tweaking things to get the cape into the major shape that I want. At this point, I'm basically still doing cube extrusion, like I do for armor.
Once I'm happy with the general shape of the cape, it's time to add details via Sculpt Mode. Because this is a destructive process (there's no going back to this simple plane manipulation), I always make a backup copy of my cape before proceeding. To do that, I press Shift-D, Escape to duplicate it in place, then I press m to move it to another layer. I tend to use the upper row of layers for finished products/workspace and the bottom row of layers for backups, so I throw it onto one of the bottom row layers.
 With my backup created, it's time to start sculpting. First, I need to commit all of these modifiers, so I press Alt-C and select Mesh. With those modifiers applied, I then use tab to enter Sculpt Mode. The first thing that I do his hit ctrl-d to enable Dyntopo (or you can just enable the checkbox). I like sculpting with the Constant Detail setting enabled, and when doing something like a cloak for a mini, a resolution of 6 is more than enough (I tend to sculpt at high resolutions, then Decimate my models before uploading them to Thingiverse).

There are a few sculpting tools that I use a lot when making capes: SculptDraw, Inflate/Deflate, Smooth, and Scrape. I usually start with the Draw tool, making lines from the top of the cloak towards the bottom. I'm trying to draw the "high points" of the cloak right now, those places where the fabric has pushed outwards towards my view. So, this is a chance to accentuate any parts of the model that are pressing against the cloak, like the shoulders or leg or arms. Then, I just sort of draw flowing lines down from those points towards the bottom of the cloak. Bigger, dramatic lines seem to work better, especially if this is going to printed as a relatively small 32 mm mini! When I'm drawing these lines, I'll often momentarily hold down Shift to switch over to the Smooth brush. I end up going back and forth between drawing and smoothing very frequently at this stage. While I typically use the default additive drawing, I do occasionally hold down ctrl to invert the brush and make those deeper creases in the cloth. Be very careful when doing this though, as it's super easy to make parts of the cloak so thin that a slicer will just abstract them away into a hole!
 I'll use the Scrape tool to flatten out parts of the fabric, to help bring out the sharper ridges on the folds a bit and to help smooth the transition where a fold is starting to form. Once again, I frequently hold down shift to get out the Smooth brush, as sometimes my scraping makes weird results that I don't like. I also pull back out the Draw brush sometimes, when I feel like I need some more outstanding geometry.
 After scraping some of the planes flat, I'll use the Inflate/Deflate tool to deepen the low spots and further pull up the high spots, adding some more folds and general "clothiness" to the cape. Deflate is especially useful here, for making the low spots lower, but once again, you've got to be careful to not make the cape too thin at any one spot. If you get thing spots, Inflating them is a pretty easy way to resolve them.
And that's the basics for how I sculpt a cape in Blender! After I have the cape sculpted, I'll see how it looks with my model and do more touchup work, to make sure that it's not overlapping strangely with the model. I also like to look up at the back of the model to ensure that the cape is overlapping with the models' back and waist, so that the printer won't have to make a void between them. Also, where possible, I like to have my capes press up against the backs of legs and of feet, as those changes can make a model much easier to print.
As a final "detailing" step, I will sometimes use the Grab tool (shortcut G) to make large changes to the cape's positioning. In this case of this cape, there's one section where his left arm is sortof pressing against the cape and one where the edge has flapped backwards. I made both of those by grabbing parts of the cape and moving them around, then I went back over those spots with the Draw/Inflate/Smooth/Scrape tools to make them look right.


 I started the cape out with Cube Extrusion, the same way as I made the boot on my previous model. When working with a cape, I prefer to work with a Plane instead of a Cube, as it's easier to move the plane's geometry around. I start with my basic plane, then select an edge and extrude extra sections downwards from the back of his neck. Then, I extrude sections to the left and right to let the cape wrap around his body. I then go into Vertex select mode and move individual vertices around until the cape has a bit of flow to it.
Once I've got the cape into more or less the right place, I apply the Solidify and Subdivision Surface modifiers to it, to smooth it out and give it some depth. With those modifiers in place, I'll resume tweaking things to get the cape into the major shape that I want. At this point, I'm basically still doing cube extrusion, like I do for armor.
Once I'm happy with the general shape of the cape, it's time to add details via Sculpt Mode. Because this is a destructive process (there's no going back to this simple plane manipulation), I always make a backup copy of my cape before proceeding. To do that, I press Shift-D, Escape to duplicate it in place, then I press m to move it to another layer. I tend to use the upper row of layers for finished products/workspace and the bottom row of layers for backups, so I throw it onto one of the bottom row layers.
 With my backup created, it's time to start sculpting. First, I need to commit all of these modifiers, so I press Alt-C and select Mesh. With those modifiers applied, I then use tab to enter Sculpt Mode. The first thing that I do his hit ctrl-d to enable Dyntopo (or you can just enable the checkbox). I like sculpting with the Constant Detail setting enabled, and when doing something like a cloak for a mini, a resolution of 6 is more than enough (I tend to sculpt at high resolutions, then Decimate my models before uploading them to Thingiverse).
There are a few sculpting tools that I use a lot when making capes: SculptDraw, Inflate/Deflate, Smooth, and Scrape. I usually start with the Draw tool, making lines from the top of the cloak towards the bottom. I'm trying to draw the "high points" of the cloak right now, those places where the fabric has pushed outwards towards my view. So, this is a chance to accentuate any parts of the model that are pressing against the cloak, like the shoulders or leg or arms. Then, I just sort of draw flowing lines down from those points towards the bottom of the cloak. Bigger, dramatic lines seem to work better, especially if this is going to printed as a relatively small 32 mm mini! When I'm drawing these lines, I'll often momentarily hold down Shift to switch over to the Smooth brush. I end up going back and forth between drawing and smoothing very frequently at this stage. While I typically use the default additive drawing, I do occasionally hold down ctrl to invert the brush and make those deeper creases in the cloth. Be very careful when doing this though, as it's super easy to make parts of the cloak so thin that a slicer will just abstract them away into a hole!
 I'll use the Scrape tool to flatten out parts of the fabric, to help bring out the sharper ridges on the folds a bit and to help smooth the transition where a fold is starting to form. Once again, I frequently hold down shift to get out the Smooth brush, as sometimes my scraping makes weird results that I don't like. I also pull back out the Draw brush sometimes, when I feel like I need some more outstanding geometry.
 After scraping some of the planes flat, I'll use the Inflate/Deflate tool to deepen the low spots and further pull up the high spots, adding some more folds and general "clothiness" to the cape. Deflate is especially useful here, for making the low spots lower, but once again, you've got to be careful to not make the cape too thin at any one spot. If you get thing spots, Inflating them is a pretty easy way to resolve them.
And that's the basics for how I sculpt a cape in Blender! After I have the cape sculpted, I'll see how it looks with my model and do more touchup work, to make sure that it's not overlapping strangely with the model. I also like to look up at the back of the model to ensure that the cape is overlapping with the models' back and waist, so that the printer won't have to make a void between them. Also, where possible, I like to have my capes press up against the backs of legs and of feet, as those changes can make a model much easier to print.
As a final "detailing" step, I will sometimes use the Grab tool (shortcut G) to make large changes to the cape's positioning. In this case of this cape, there's one section where his left arm is sortof pressing against the cape and one where the edge has flapped backwards. I made both of those by grabbing parts of the cape and moving them around, then I went back over those spots with the Draw/Inflate/Smooth/Scrape tools to make them look right.


Comments
Post a Comment