Making Meshmixer Supports, Part 2
I hadn't really planned on making my Meshmixer supports post into a series, but I got a few really good questions about the technical process of drawing the actual supports, rather than the theory of how to design supports. That post is already gargantuan, so I figured that it was time for a sequel! I'm already off the rails, so who knows, maybe this will even become a trilogy (ok, probably not)!
 The act of drawing supports in Meshmixer is not super intuitive. What is is, however, is consistent. When you're drawing supports, you're drawing a 3D object using a 2D interface. Meshmixer does its best to help you, but it can still be a bit tough. There are a few ways to draw additional supports, and I use them all at various times while designing supports for a model!
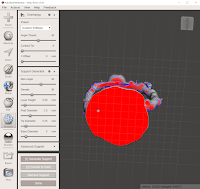
The easiest way to draw additional supports is to just click on a red highlighted part of the model and let Meshmixer try to determine a viable path for the support tree. Often this works just fine, but sometimes it will create a support that goes way off to the side at a crazy steep angle when you know that a better path is available. This can be a useful way to just see if there is a viable path for support, as frequently a support tree cannot be drawn because there's not enough room for the tip to connect to the desired point. Once I know that the tip can connect, I have some liberty with drawing it myself.
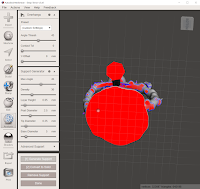
A more manual way to make additional support trees is to click-and-drag to draw the tree yourself. When making support trees this way, focus on two points: where you depress the mouse-button and where you release it. Nothing else matters. Meshmixer is going to attempt to draw a straight support tree between those two points. But, that gets us back into that whole 2D/3D thing, as Meshmixer needs to extrapolate a 3D point based on my 2D mouse cursor. How's it do it?
I think of it in terms of collisions. When I click my mouse, I'm not clicking on a point. Instead, I'm making a ray that is projecting perfectly in-line with my perspective. The actual point that gets used is whatever that ray collides with first.
When you depress the mouse button, the ray will only collide with your model's geometry or other supports. That means that you will always start a support tree from a point that needs the support. When you release the mouse button, that ray is a little less discerning in regards to what it will collide with.
When you release the mouse button, the point can snap to model geometry, other supports, or the printer bed itself (although it will preferentially choose one of those first two, if they're in line). That last one is probably the most important though, as the whole point of support is to ensure that there's a contiguous line from the model to the printer bed! In Meshmixer, that printer bed has a helpful grid on it - use that to your advantage! If you want to create a mostly vertical support beam, look at the grid that your mouse cursor is in and ensure that it's actually where you want it to be.
A trick that I like to use to make mostly vertical supports is to view my model from underneath when making the support. If you go to the View menu and disable Show Printer Bed, you'll be left with a transparent grid instead of an opaque sheet. Then, you can look up at your model and start drawing a support tree. Move your mouse the minimum distance required to get off of the model entirely, onto the "sky" and then release the mouse button. Because there's no geometry in the "ray" of the mouse pointer, Meshmixer will select the point on the printer bed under the mouse as the end of the support, which will be a nearly vertical column (depending on how much you moved your mouse).

When making tree supports, Meshmixer will attempt to route them around your model's geometry so that they don't stick to it and mess it up. If you need to override this behavior, you can make your supports by shift-click, which will instruct Meshmixer to just make the support as you've drawn it, regardless of geometry overlaps. I've seen a few situations where Meshmixer had a false positive, so I chose to force it to draw the support this way. I've also drawn a few supports this way, knowing full well that I'd have to cut them off some weird part of my model with my x-acto knife when the print was done.
If you've accidentally created a support that you don't need or want to get rid of one that Meshmixer generated for you, you can ctrl-click on it to remove it. Be careful with this one though, as it will delete all branches that depend on the segment that you are deleting, even if those branches would be otherwise supported by remaining supports.
 One last technique that I use a lot when designing supports is bridges. If I'm worried about a support tree's stability, I will often draw a bridge over to a nearby support tree, just to reinforce it. I also like to do this near the top of my trees, after they've fanned out for a long object like an arm or a sword. I'll often tie those branches together with a bridge across the middle, where the tree forked. My reasoning is that those branches are going to experience downward pressure during printing, so that bridge will transfer some of that stress over to the other side of the fork, meaning that the side that's being printed is less likely to snap off.
Well, I ended up continuing this even further with part 3, because I wanted to discuss how to change post diameters and tip lengths to allow supports to get into particularly tight spots. Also, who doesn't love a trilogy?
 The act of drawing supports in Meshmixer is not super intuitive. What is is, however, is consistent. When you're drawing supports, you're drawing a 3D object using a 2D interface. Meshmixer does its best to help you, but it can still be a bit tough. There are a few ways to draw additional supports, and I use them all at various times while designing supports for a model!
The easiest way to draw additional supports is to just click on a red highlighted part of the model and let Meshmixer try to determine a viable path for the support tree. Often this works just fine, but sometimes it will create a support that goes way off to the side at a crazy steep angle when you know that a better path is available. This can be a useful way to just see if there is a viable path for support, as frequently a support tree cannot be drawn because there's not enough room for the tip to connect to the desired point. Once I know that the tip can connect, I have some liberty with drawing it myself.
A more manual way to make additional support trees is to click-and-drag to draw the tree yourself. When making support trees this way, focus on two points: where you depress the mouse-button and where you release it. Nothing else matters. Meshmixer is going to attempt to draw a straight support tree between those two points. But, that gets us back into that whole 2D/3D thing, as Meshmixer needs to extrapolate a 3D point based on my 2D mouse cursor. How's it do it?
I think of it in terms of collisions. When I click my mouse, I'm not clicking on a point. Instead, I'm making a ray that is projecting perfectly in-line with my perspective. The actual point that gets used is whatever that ray collides with first.
When you depress the mouse button, the ray will only collide with your model's geometry or other supports. That means that you will always start a support tree from a point that needs the support. When you release the mouse button, that ray is a little less discerning in regards to what it will collide with.
When you release the mouse button, the point can snap to model geometry, other supports, or the printer bed itself (although it will preferentially choose one of those first two, if they're in line). That last one is probably the most important though, as the whole point of support is to ensure that there's a contiguous line from the model to the printer bed! In Meshmixer, that printer bed has a helpful grid on it - use that to your advantage! If you want to create a mostly vertical support beam, look at the grid that your mouse cursor is in and ensure that it's actually where you want it to be.
A trick that I like to use to make mostly vertical supports is to view my model from underneath when making the support. If you go to the View menu and disable Show Printer Bed, you'll be left with a transparent grid instead of an opaque sheet. Then, you can look up at your model and start drawing a support tree. Move your mouse the minimum distance required to get off of the model entirely, onto the "sky" and then release the mouse button. Because there's no geometry in the "ray" of the mouse pointer, Meshmixer will select the point on the printer bed under the mouse as the end of the support, which will be a nearly vertical column (depending on how much you moved your mouse).


When making tree supports, Meshmixer will attempt to route them around your model's geometry so that they don't stick to it and mess it up. If you need to override this behavior, you can make your supports by shift-click, which will instruct Meshmixer to just make the support as you've drawn it, regardless of geometry overlaps. I've seen a few situations where Meshmixer had a false positive, so I chose to force it to draw the support this way. I've also drawn a few supports this way, knowing full well that I'd have to cut them off some weird part of my model with my x-acto knife when the print was done.
If you've accidentally created a support that you don't need or want to get rid of one that Meshmixer generated for you, you can ctrl-click on it to remove it. Be careful with this one though, as it will delete all branches that depend on the segment that you are deleting, even if those branches would be otherwise supported by remaining supports.
 One last technique that I use a lot when designing supports is bridges. If I'm worried about a support tree's stability, I will often draw a bridge over to a nearby support tree, just to reinforce it. I also like to do this near the top of my trees, after they've fanned out for a long object like an arm or a sword. I'll often tie those branches together with a bridge across the middle, where the tree forked. My reasoning is that those branches are going to experience downward pressure during printing, so that bridge will transfer some of that stress over to the other side of the fork, meaning that the side that's being printed is less likely to snap off.
Well, I ended up continuing this even further with part 3, because I wanted to discuss how to change post diameters and tip lengths to allow supports to get into particularly tight spots. Also, who doesn't love a trilogy?


Comments
Post a Comment