Posts

Showing posts with the label New Thing

New Thing: Drakes!

Image
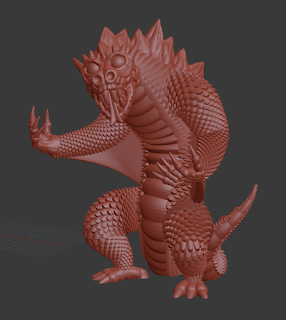
I released a pair of new things recently, a Spitting Drake and a Rending Drake !  You may recognize the basic technique that I used to create these guys from my Giant Viper post, and that's because I used the same basic technique here as I did there!  I've decided to write about it though, because I've learned a lot about how to use Blender since I made the Giant Viper, and so my workflow has become more elegant (which allowed me to make more complex models and preserve a lot of flexibility, allowing me to change the model around to go from the Spitting Drake to the Rending Drake). I started this process in pretty much the same way as before - I designed a single scale.  Just like before, I made a very basic scale shape and used a subdivision surface modifier to smooth it out a bit, but since I knew that I'd end up with a lot  of these scales (and that each one was going to be fairly small), I didn't make them too smooth.  That done, I put an Array  mod...
Character Modelling Workflow for the Inox Shaman

Image
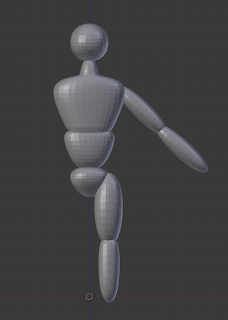
I frequently mention that I'm not an artist, so I use a workflow where I model each body part individually and then basically shove them together to make a final model.  I'm writing this as I'm starting a new model, so I made the very rough shapes for the major body parts and set them into position. Once I saw what I'd done, I had to stop and laugh.  Wow, am I ever not an artist - I think that my 7 year old draws more proportionate people than this!  Each of those parts is a manipulated cube with a subdivision surface applied to it (the chest has a bit of extra extrusions to make the shoulders/neck).  This is basically how I start all of my models, and it's really easy to fix it so that it conforms to biological standards. In Blender, you can set a background image to use as a reference.  On the n  data panel, go down to Background Image  and press Add Image .  Then, hit Open  and browse to the image that you want on your background....

New Thing: Gloomhaven Vermling Shaman

Image
With the Vermling Scout built, the natural next step was obviously the Vermling Shaman !  I was able to reuse a lot of the parts of the Scout, which was really nice.  I decided to give the Shaman a more upright pose, so I moved his parts around and built a new torso (to be his ratty tunic, rather than the furry one that the Scout wears).  After that, I built a quick staff and then went to work on the feathered cape.  That's what I want to focus on, today. I tried a bunch of different methods for creating that cape, but in the end I settled on using Blender's Particle System.  That meant that I basically modelled two things: a single feather and a smooth cape.  Then, I told Blender to make an absurd number of feathers and to lay them out on that cape.  There we go, post finished, nice and easy! ;) After I made a quick feather and cape, I selected my cape object and then went to the Particles  tab.  On there, I pressed the + button  to...

New Thing: Gloomhaven Vermling Scout

Image
I've published my Vermling Scout model for Gloomhaven !  This is another model that I made following Zacharias Reinhardt's methods , which I really enjoyed using.  To make the model, I started with some basic subdivided cubes and stretched them out so that they would be the right size and very general shapes for the major parts of the body: head, torso, hips, 3 parts of the arm, and 4 parts of the leg (since the Vermling has a reverse articulated leg, otherwise it would be 3 parts as well). With those basic body parts in place, I then made some basic props as well: a cloak with a cowl and the two daggers.  Then, I started adding details to the pieces.  I played around with some basic poses, trying to get a feel for the overall shape of the model and, once that was in place, I began the process of sculpting. Sculpting the Vermling was generally done by using the Crease  tool to make lots of fur.  I turned up the strength of the tool, and used ctrl  ...

New Thing: Numbered Bases for Gloomhaven, Part 2

Image
As promised, here's the continuation of my post about how to make numbered 25 mm bases for tabletop RPGs !  In the first post, I wrote about how to make the top half of the base; this post will focus on making the bottom half and on making the joint that allows them to easily snap together!  As I begin this post and think about re-creating the original design, I've been struck with an idea: I bet I could improve it too, and that's exactly what I'll do. To begin this process, I decided that I want to duplicate the top half.  While in Object  mode, I selected it and pressed  shift-d  and then pressed  esc  to leave the duplicate exactly in place.  Next, I pressed numpad-/  to focus on only my duplicate, which basically hid every other object from the view until I press it again. Next, my goal was to invert the shape while keeping the inner faces the same size (so that they'd look nice when the top and bottom halves are pressed togethe...

New Thing: Scythe Victory Token and Upgraded Power Token

Image
After I finished my  Popularity Token  for Scythe, I decided that I should move on to the Victory Token to round out the collection.  I knew that I wanted a 3D tapered star, which put me into the same situation as I was in with the 3D rounded heart - it would be both difficult to print and impossible to set up nicely on the board.  So, it seemed only reasonable that I should use the same solution! So, I grabbed the ribbon from the Popularity Token and then set out to make the star.  The star was actually super easy to make - I just hit shift-a  and selected Mesh -> Circle  and then gave the circle 10 sides.  With that circle in place, I went into Edit  mode and selected every-other vertex, then pressed s  and scaled them down.  That pulled them inwards, leaving me with a great looking star outline.  Next, it was time to add the 3D elements. I selected the whole thing and pressed f  to make a face.  Then,...

New Thing: Numbered Bases for Gloomhaven, Part 1

Image
Ok, this isn't really a new  thing, but I haven't written about it before, so I guess it qualifies as new for blogging purposes!  I've been getting a lot of positive feedback about my 25 mm numbered bases recently, so I figured that I should write about how to make them!  I don't yet have a use case for larger or smaller bases, but I'm sure that there are people out there who do... so here's a guide for how to make such a thing if it's needed! The original version of these is a Frankenstein monster that started in Fusion 360 and eventually migrated to Blender.  I've learned a lot  about how to use Blender since then, so I'm going to make a new version entirely in Blender and can document the process here.  If all goes according to plan, it should be pretty easy to scale up or down arbitrarily to make different base sizes, or use different numbers or amounts of number stands... well, let's get to it! The first thing to do is to hit shift-a  to...