Use Print Preview to Look for Problems
About a year ago, I wrote about how important it is to use your slicer's print preview function to look at your print before sending it to the printer. Well, I've learned a lot about 3D printing since then, so I figured that it was time to write a newer post and go into some greater detail about what exactly I'm looking for when I'm going through the print preview.
The most important thing to look at is the model's footprint and it's where I always start. A successful print depends on the model not moving relative to the printer bed. Keeping the model in place requires a strong connection to the printer bed, which means that you need a good footprint.
Always look at the first layer of your prints, even if the object is really simple and doesn't look like it'll need support. In addition to looking for any weird bits sticking out the bottom of the model (which is what that last link was about), it's important to think about how strong that connection to your build plate is going to be. When printing a base-less 32mm human mini, I've found that the size of a normal boot doesn't quite have enough surface area to remain attached while printing a whole leg. Conversely, if a cape (or something else that's also grounded) touches the leg around the mid-calf level, it'll probably be fine.
So, I look at my first layer to make sure that the model's footprint is large enough to stick to the build plate. How large does it need to be? Well, that's highly dependent on your setup, including everything from how clean your build plate is to which slicer you use (for example, Cura likes to wipe the nozzle on moves to reduce stringing, which applies some small lateral force to the model). At a certain level, you just need to get a feel for how much of a footprint your setup requires, but there is a rule of thumb: larger is better.
So, what do you do if your model has a really small footprint? I use 2 different techniques in this situation, depending on the model. I will either add a brim to my print, or I will float the whole model on supports (and sometimes, I'll even combine the two!). Adding a brim is easy; just enable that feature in your slicer and you're good to go. I usually use a fairly small brim (like 2 mm), but use whatever size you need to get a working footprint! I generally do not like brims, just because they're not always easy to cleanly remove from the finished model, but I've certainly used my fair share of them!
When I talk about floating a model on supports, I generally mean setting a Y Offset in Meshmixer (or your support designing software of choice) so that the whole model is suspended on supports. When I've got the whole model up on supports, it doesn't matter how small the model's feet are, as the footprint on my printer bed will actually be the size of my support's base instead, and that's easy to make arbitrarily large!
So, the model's footprint is really important for a successful print, but it's not the only thing that I look at when I do my print preview! The next thing that I do is slowly raise the layer on the preview (effectively walking through the whole build process), looking for problems. At this stage, problems usually come in two varieties: floating parts of the model, or steep overhangs.
 Floating model parts are easy to identify. Any part of the model that's just hanging there in mid air isn't going to print successfully. When I have spots like this, that tells me that I'm either going to need to add supports, cut the model into smaller parts, or find a new print orientation.

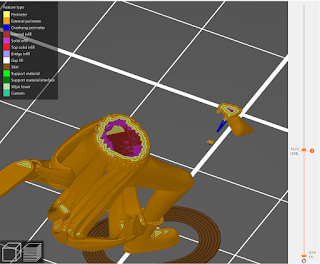
Steep overhangs can be a little more difficult to identify, but as you drag the layer selection upwards, they show themselves as sections that rapidly grow outwards. Those two screenshots above show a one layer difference. On the right side, you can see the beginning of what will be a hand clutching an axe. In the second screenshot, you can see where the forearm begins forming, with that big spike suddenly appearing, pointing at the rest of the model. Even if we had supports in here for the base of that axe, that forearm would run into some problems while printing (unless it had a few more supports under it!).
 |
| Not much of a footprint there... |
 |
| That's better! See the slight contact at the heel? |
So, I look at my first layer to make sure that the model's footprint is large enough to stick to the build plate. How large does it need to be? Well, that's highly dependent on your setup, including everything from how clean your build plate is to which slicer you use (for example, Cura likes to wipe the nozzle on moves to reduce stringing, which applies some small lateral force to the model). At a certain level, you just need to get a feel for how much of a footprint your setup requires, but there is a rule of thumb: larger is better.
So, what do you do if your model has a really small footprint? I use 2 different techniques in this situation, depending on the model. I will either add a brim to my print, or I will float the whole model on supports (and sometimes, I'll even combine the two!). Adding a brim is easy; just enable that feature in your slicer and you're good to go. I usually use a fairly small brim (like 2 mm), but use whatever size you need to get a working footprint! I generally do not like brims, just because they're not always easy to cleanly remove from the finished model, but I've certainly used my fair share of them!
When I talk about floating a model on supports, I generally mean setting a Y Offset in Meshmixer (or your support designing software of choice) so that the whole model is suspended on supports. When I've got the whole model up on supports, it doesn't matter how small the model's feet are, as the footprint on my printer bed will actually be the size of my support's base instead, and that's easy to make arbitrarily large!
So, the model's footprint is really important for a successful print, but it's not the only thing that I look at when I do my print preview! The next thing that I do is slowly raise the layer on the preview (effectively walking through the whole build process), looking for problems. At this stage, problems usually come in two varieties: floating parts of the model, or steep overhangs.


Steep overhangs can be a little more difficult to identify, but as you drag the layer selection upwards, they show themselves as sections that rapidly grow outwards. Those two screenshots above show a one layer difference. On the right side, you can see the beginning of what will be a hand clutching an axe. In the second screenshot, you can see where the forearm begins forming, with that big spike suddenly appearing, pointing at the rest of the model. Even if we had supports in here for the base of that axe, that forearm would run into some problems while printing (unless it had a few more supports under it!).


Comments
Post a Comment