Getting Started with 3D Printed Minis, Part 6: Slicing a Mini
There are many different slicing programs out there, but my printer came with Slic3r Prusa Edition, so that's the one that I learned to use. When printing a mini, the rule of thumb is "low and slow". You want the lowest layer height and nozzle size that you can reliably manage and to print it as slowly as you can tolerate ;)
In my case, I've had pretty good results with .05 mm layers and a .25 mm nozzle, printing no faster than 25 mm/sec. That's a pretty conservative speed, so I could probably get away with faster movements for much of the print on my models... but minis tend to have a lot of really tricky parts, like overhangs, thin sections, and bridges, that benefit from slower print speeds.
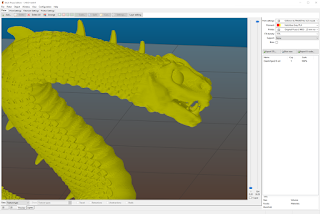
Why do you want lower layer heights? Two reasons: they have less visible layer lines and they show more details on the model. As you can see from the below Slic3r previews, the smaller layers are able to represent much more subtle details along the Z axis. For some models that you may want to print, especially something boxy like a miniature storage solution, Z axis detail doesn't really matter that much. Minis are not like that. Minis tend to have incredible detail along every axis, so they really benefit from lower layer heights. These screenshots show Slic3r's print preview of a .05 mm print versus a .15 mm print of my Giant Viper model. I don't think that I even need to explain which picture is which, the differences are so profound!

In addition to the greater details that can be represented through lower layer heights, they will help to obscure layer lines. Remember, FDM printers can't print layers with perfectly flat edges; there's always some amount of bulge due to the surface tension of the molten plastic. The larger the bulge, the move visible the layer line. In general, thicker layers have larger bulges. Here's a drawing that I made to illustrate the point:

The "layers" on the right are scaled down versions of their counterparts on the left, then I grabbed the vertices and dragged them out to make the layers roughly the same overall length. I did this to keep the bulge to layer height ratio proportionate. This diagram represents the difference between a .2 mm layer and a .05 mm layer (since I scaled the smaller layer at 25%). Pay attention to the dashed vertical lines, which show the difference between the peaks and valleys created by the bulges. The smaller difference on the smaller layer height means that those layers will be both harder to see and easier to fill during the painting/finishing phase of the mini.
Because minis tend to have many complex parts which require a lot of support (as we saw in my post about using Meshmixer to make Tree Supports for a mini), bed adhesion and stability are always concerns. When you've got a mini with nothing but two small feet touching the printer bed, you need to do something to improve that mini's bed adhesion! Hopefully, you floated that mini on your support trees... but there's something else that you can do in your slicer to help the situation: use a brim.
 I'm generally not a fan of using brims that connect directly to my mini (although I love using them when floating a mini to give more stability to the supports), but I have certainly come across models where I had to use them. Take a look at this photo of my print of RobagoN's Earth Demon model. I cut the base off of the model before printing, which caused a structural problem. It's difficult to see in that photo, but the model is mid-stride with only the ball and toes of its left foot touching the ground. The shin then moves forward some distance before the thigh begins to print and connects to the rest of the model.
I tried printing one of these guys with a support trees but no brim. 90% of the model turned out great... except that the back foot lost adhesion before the print got far enough for it to connect with the rest of the model. That left me with a sad, one-legged earth demon :( On prints where I used a brim, that extra material gave the back leg plenty of grip to the printer bed, and so it came out just fine =) It did require some extra work during the cleanup phase though, as I had to cut away the extra brim material.
In addition to layer visibility and bed adhesion, the slicing process gives you one final chance to check your supports for problems. I always tell myself that I can just eyeball a model and figure out where it's going to need support. As I've gotten more experienced, that's even been true sometimes... but I still fail to identify problem bits sometimes, too! During slicing, you can examine your model on a layer-by-layer basis, which is an excellent way to pick out problematic parts before they actually fail on the printer bed.
I've written about it before and I'm sure that I'll do so again: always preview your print. This goes double for minis. Because most minis are so complex, you should always go through your slicer's print preview with an eye towards unsupported overhangs or material that's going to be printed in thin air.

As you surely noticed, this screenshot's showing a big problem. There's no way the printer could print that part without some kind of support (or a 6 axis printer!). After generating Meshmixer Supports, I like to slice my model and then go through the print preview to look for any bits that I may have missed.
Besides looking for blatant failures (like in this screenshot), I also look for sections where a small point suddenly grows significantly larger on the next layer, as that's a potential failure point unless it quickly merges into some other better supported body. Similarly, if I've got a single support tree that needs to support a large chunk of the model, that's another potential problem point. A prime example of this would be a single support tree that connects to a fist, which then builds up through the entire arm before finally joining to the body at the shoulder. In that scenario, that single support tree (which, remember, is designed to break off easily!) will need to support the mass of the entire arm by itself. It's almost certainly going to fail. I would expect the fist to print fine, but then for it to snap off of the support tree at some point between the wrist and the elbow. This is your chance to identify those problems and resolve them before they happen!
In addition to inspecting my model for support problems, I also like to take a peek at the first layer, just to make sure that it looks like I expect it to. I'm mostly looking for the size of the job's footprint (too small = failure) and I'm making sure that nothing is connected that shouldn't be. While making supports, it's easy to accidentally connect the base of a support tree to the model's foot. While this isn't a disaster, it does make the clean up process more difficult. So, I avoid making those connections when I can.
After I've reviewed the print preview, I save my gcode and send it off to the printer! Then, it's a matter of waiting before the final phase: cleanup and painting!
Articles in this series (to be updated with links as the posts are written):
Getting Started with 3D Printed Minis, Part 1: Modeling Software
Getting Started with 3D Printed Minis, Part 2: Printing Software
Getting Started with 3D Printed Minis, Part 3: Downloading Models
Getting Started with 3D Printed Minis, Part 4: Cutting Basics
Getting Started with 3D Printed Minis, Part 5: Cutting and Supporting a Mini
Getting Started with 3D Printed Minis, Part 6: Slicing a Mini
Getting Started with 3D Printed Minis, Part 7: Finishing and Painting a 3D Print
In my case, I've had pretty good results with .05 mm layers and a .25 mm nozzle, printing no faster than 25 mm/sec. That's a pretty conservative speed, so I could probably get away with faster movements for much of the print on my models... but minis tend to have a lot of really tricky parts, like overhangs, thin sections, and bridges, that benefit from slower print speeds.
Why do you want lower layer heights? Two reasons: they have less visible layer lines and they show more details on the model. As you can see from the below Slic3r previews, the smaller layers are able to represent much more subtle details along the Z axis. For some models that you may want to print, especially something boxy like a miniature storage solution, Z axis detail doesn't really matter that much. Minis are not like that. Minis tend to have incredible detail along every axis, so they really benefit from lower layer heights. These screenshots show Slic3r's print preview of a .05 mm print versus a .15 mm print of my Giant Viper model. I don't think that I even need to explain which picture is which, the differences are so profound!


In addition to the greater details that can be represented through lower layer heights, they will help to obscure layer lines. Remember, FDM printers can't print layers with perfectly flat edges; there's always some amount of bulge due to the surface tension of the molten plastic. The larger the bulge, the move visible the layer line. In general, thicker layers have larger bulges. Here's a drawing that I made to illustrate the point:

The "layers" on the right are scaled down versions of their counterparts on the left, then I grabbed the vertices and dragged them out to make the layers roughly the same overall length. I did this to keep the bulge to layer height ratio proportionate. This diagram represents the difference between a .2 mm layer and a .05 mm layer (since I scaled the smaller layer at 25%). Pay attention to the dashed vertical lines, which show the difference between the peaks and valleys created by the bulges. The smaller difference on the smaller layer height means that those layers will be both harder to see and easier to fill during the painting/finishing phase of the mini.
Because minis tend to have many complex parts which require a lot of support (as we saw in my post about using Meshmixer to make Tree Supports for a mini), bed adhesion and stability are always concerns. When you've got a mini with nothing but two small feet touching the printer bed, you need to do something to improve that mini's bed adhesion! Hopefully, you floated that mini on your support trees... but there's something else that you can do in your slicer to help the situation: use a brim.
 I'm generally not a fan of using brims that connect directly to my mini (although I love using them when floating a mini to give more stability to the supports), but I have certainly come across models where I had to use them. Take a look at this photo of my print of RobagoN's Earth Demon model. I cut the base off of the model before printing, which caused a structural problem. It's difficult to see in that photo, but the model is mid-stride with only the ball and toes of its left foot touching the ground. The shin then moves forward some distance before the thigh begins to print and connects to the rest of the model.
I tried printing one of these guys with a support trees but no brim. 90% of the model turned out great... except that the back foot lost adhesion before the print got far enough for it to connect with the rest of the model. That left me with a sad, one-legged earth demon :( On prints where I used a brim, that extra material gave the back leg plenty of grip to the printer bed, and so it came out just fine =) It did require some extra work during the cleanup phase though, as I had to cut away the extra brim material.
In addition to layer visibility and bed adhesion, the slicing process gives you one final chance to check your supports for problems. I always tell myself that I can just eyeball a model and figure out where it's going to need support. As I've gotten more experienced, that's even been true sometimes... but I still fail to identify problem bits sometimes, too! During slicing, you can examine your model on a layer-by-layer basis, which is an excellent way to pick out problematic parts before they actually fail on the printer bed.
I've written about it before and I'm sure that I'll do so again: always preview your print. This goes double for minis. Because most minis are so complex, you should always go through your slicer's print preview with an eye towards unsupported overhangs or material that's going to be printed in thin air.

As you surely noticed, this screenshot's showing a big problem. There's no way the printer could print that part without some kind of support (or a 6 axis printer!). After generating Meshmixer Supports, I like to slice my model and then go through the print preview to look for any bits that I may have missed.
Besides looking for blatant failures (like in this screenshot), I also look for sections where a small point suddenly grows significantly larger on the next layer, as that's a potential failure point unless it quickly merges into some other better supported body. Similarly, if I've got a single support tree that needs to support a large chunk of the model, that's another potential problem point. A prime example of this would be a single support tree that connects to a fist, which then builds up through the entire arm before finally joining to the body at the shoulder. In that scenario, that single support tree (which, remember, is designed to break off easily!) will need to support the mass of the entire arm by itself. It's almost certainly going to fail. I would expect the fist to print fine, but then for it to snap off of the support tree at some point between the wrist and the elbow. This is your chance to identify those problems and resolve them before they happen!
In addition to inspecting my model for support problems, I also like to take a peek at the first layer, just to make sure that it looks like I expect it to. I'm mostly looking for the size of the job's footprint (too small = failure) and I'm making sure that nothing is connected that shouldn't be. While making supports, it's easy to accidentally connect the base of a support tree to the model's foot. While this isn't a disaster, it does make the clean up process more difficult. So, I avoid making those connections when I can.
After I've reviewed the print preview, I save my gcode and send it off to the printer! Then, it's a matter of waiting before the final phase: cleanup and painting!
Articles in this series (to be updated with links as the posts are written):
Getting Started with 3D Printed Minis, Part 1: Modeling Software
Getting Started with 3D Printed Minis, Part 2: Printing Software
Getting Started with 3D Printed Minis, Part 3: Downloading Models
Getting Started with 3D Printed Minis, Part 4: Cutting Basics
Getting Started with 3D Printed Minis, Part 5: Cutting and Supporting a Mini
Getting Started with 3D Printed Minis, Part 6: Slicing a Mini
Getting Started with 3D Printed Minis, Part 7: Finishing and Painting a 3D Print


Comments
Post a Comment