Posts

Showing posts from October, 2018

Troubleshooting Failed Support: Broken Supports
Image
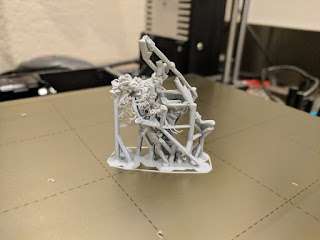
I've been printing copies of my Inox Shaman models recently, and after my latest print finished, I came home to a bit of a mess.  I've done a lot of work with 3D Printing supports , so I don't run into situations like this too often any more... but it obviously still happens sometimes!  When I saw this tangled spaghetti mess, I immediately set about trying to figure out what went wrong so that I could modify my support structure and get a better print next time. The first thing that I did was to compare what printed to what it was supposed  to look like.  Obviously, something failed to print here, but to understand and correct the failure, I had to figure out exactly what  part of the model failed to print.  So, I pulled up Meshmixer and took a look at the file that I sliced. Comparing the support design in Meshmixer to what ended up on my build plate made it fairly obvious which support branches had failed to print.  Of course, identifying what exactly failed didn'

New Thing: Gloomhaven Vermling Scout

Image
I've published my Vermling Scout model for Gloomhaven !  This is another model that I made following Zacharias Reinhardt's methods , which I really enjoyed using.  To make the model, I started with some basic subdivided cubes and stretched them out so that they would be the right size and very general shapes for the major parts of the body: head, torso, hips, 3 parts of the arm, and 4 parts of the leg (since the Vermling has a reverse articulated leg, otherwise it would be 3 parts as well). With those basic body parts in place, I then made some basic props as well: a cloak with a cowl and the two daggers.  Then, I started adding details to the pieces.  I played around with some basic poses, trying to get a feel for the overall shape of the model and, once that was in place, I began the process of sculpting. Sculpting the Vermling was generally done by using the Crease  tool to make lots of fur.  I turned up the strength of the tool, and used ctrl  to invert it to draw out a

Suspected Prusa MK3 Bed Leveling Issue

Image
I've been printing a lot of minis lately, so I decided that I needed to print another mini storage tray to help me cart them around.  I've already printed 3 of the things, so I loaded it up in Slic3r and generated some fresh gcode (just to ensure that I had the latest settings), then started the print and went back to modelling, occasionally glancing at the printer to make sure that it hadn't caught fire or something ;) Partway through the first layer, I noticed that something wasn't quite right.  The MK3 has an auto-bed leveling feature and it's worked great for me, so I haven't paid too much attention to the various Reddit threads that discussed the importance of bed leveling... but I have read them.  And, judging by the inconsistent thickness of that first layer, I figured that I had somehow come across a bed leveling issue.  Well it turned out to be a little yes but mostly no. If you're not familiar with the model that I'm trying to print, those

New Thing: Numbered Bases for Gloomhaven, Part 2

Image
As promised, here's the continuation of my post about how to make numbered 25 mm bases for tabletop RPGs !  In the first post, I wrote about how to make the top half of the base; this post will focus on making the bottom half and on making the joint that allows them to easily snap together!  As I begin this post and think about re-creating the original design, I've been struck with an idea: I bet I could improve it too, and that's exactly what I'll do. To begin this process, I decided that I want to duplicate the top half.  While in Object  mode, I selected it and pressed  shift-d  and then pressed  esc  to leave the duplicate exactly in place.  Next, I pressed numpad-/  to focus on only my duplicate, which basically hid every other object from the view until I press it again. Next, my goal was to invert the shape while keeping the inner faces the same size (so that they'd look nice when the top and bottom halves are pressed together).  To do that, I went into

Making Meshmixer Supports, Part 3

Image
So, about that whole trilogy thing... well, I guess it happened after all.  If you haven't read them, I already wrote about Meshmixer support design theory in part 1, and Meshmixer support implementation tricks in part 2... so you may want to read those before diving into this post ;) I've been working on more complex models and so I've had to learn how to make more complex supports.  I think that the sweet spot for the Post Diameter  setting is 2.5 mm.  That's thick enough that it's pretty stable and is less likely to warp during the print, but is still small enough that it's not wasting a ton of filament and can fit into small spaces.  That said, I've been finding reasons to deviate from that standard lately. Why would I use a smaller Post Diameter ?  It can fit in even more places!  Minis and game pieces often have some tight spots that need support, especially a highly textured model.  Support trees with thick posts are more stable, but thinner p

New Thing: Scythe Victory Token and Upgraded Power Token

Image
After I finished my  Popularity Token  for Scythe, I decided that I should move on to the Victory Token to round out the collection.  I knew that I wanted a 3D tapered star, which put me into the same situation as I was in with the 3D rounded heart - it would be both difficult to print and impossible to set up nicely on the board.  So, it seemed only reasonable that I should use the same solution! So, I grabbed the ribbon from the Popularity Token and then set out to make the star.  The star was actually super easy to make - I just hit shift-a  and selected Mesh -> Circle  and then gave the circle 10 sides.  With that circle in place, I went into Edit  mode and selected every-other vertex, then pressed s  and scaled them down.  That pulled them inwards, leaving me with a great looking star outline.  Next, it was time to add the 3D elements. I selected the whole thing and pressed f  to make a face.  Then, I pressed k  to use the Knife tool and I drew lines across the star,

New Thing: Numbered Bases for Gloomhaven, Part 1

Image
Ok, this isn't really a new  thing, but I haven't written about it before, so I guess it qualifies as new for blogging purposes!  I've been getting a lot of positive feedback about my 25 mm numbered bases recently, so I figured that I should write about how to make them!  I don't yet have a use case for larger or smaller bases, but I'm sure that there are people out there who do... so here's a guide for how to make such a thing if it's needed! The original version of these is a Frankenstein monster that started in Fusion 360 and eventually migrated to Blender.  I've learned a lot  about how to use Blender since then, so I'm going to make a new version entirely in Blender and can document the process here.  If all goes according to plan, it should be pretty easy to scale up or down arbitrarily to make different base sizes, or use different numbers or amounts of number stands... well, let's get to it! The first thing to do is to hit shift-a  to