Posts

Showing posts with the label Gloomhaven

New Thing: Gloomhaven Vermling Shaman

Image
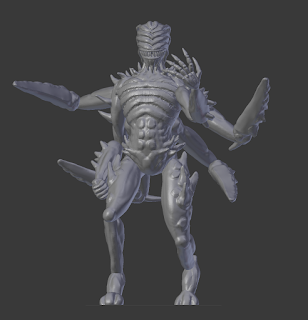
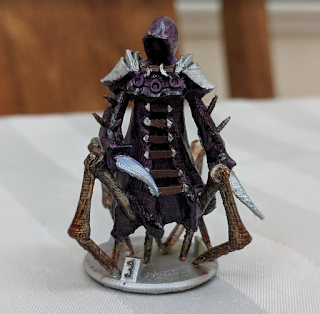
With the Vermling Scout built, the natural next step was obviously the Vermling Shaman !  I was able to reuse a lot of the parts of the Scout, which was really nice.  I decided to give the Shaman a more upright pose, so I moved his parts around and built a new torso (to be his ratty tunic, rather than the furry one that the Scout wears).  After that, I built a quick staff and then went to work on the feathered cape.  That's what I want to focus on, today. I tried a bunch of different methods for creating that cape, but in the end I settled on using Blender's Particle System.  That meant that I basically modelled two things: a single feather and a smooth cape.  Then, I told Blender to make an absurd number of feathers and to lay them out on that cape.  There we go, post finished, nice and easy! ;) After I made a quick feather and cape, I selected my cape object and then went to the Particles  tab.  On there, I pressed the + button  to...

New Thing: Gloomhaven Vermling Scout

Image
I've published my Vermling Scout model for Gloomhaven !  This is another model that I made following Zacharias Reinhardt's methods , which I really enjoyed using.  To make the model, I started with some basic subdivided cubes and stretched them out so that they would be the right size and very general shapes for the major parts of the body: head, torso, hips, 3 parts of the arm, and 4 parts of the leg (since the Vermling has a reverse articulated leg, otherwise it would be 3 parts as well). With those basic body parts in place, I then made some basic props as well: a cloak with a cowl and the two daggers.  Then, I started adding details to the pieces.  I played around with some basic poses, trying to get a feel for the overall shape of the model and, once that was in place, I began the process of sculpting. Sculpting the Vermling was generally done by using the Crease  tool to make lots of fur.  I turned up the strength of the tool, and used ctrl  ...

New Thing: Numbered Bases for Gloomhaven, Part 2

Image
As promised, here's the continuation of my post about how to make numbered 25 mm bases for tabletop RPGs !  In the first post, I wrote about how to make the top half of the base; this post will focus on making the bottom half and on making the joint that allows them to easily snap together!  As I begin this post and think about re-creating the original design, I've been struck with an idea: I bet I could improve it too, and that's exactly what I'll do. To begin this process, I decided that I want to duplicate the top half.  While in Object  mode, I selected it and pressed  shift-d  and then pressed  esc  to leave the duplicate exactly in place.  Next, I pressed numpad-/  to focus on only my duplicate, which basically hid every other object from the view until I press it again. Next, my goal was to invert the shape while keeping the inner faces the same size (so that they'd look nice when the top and bottom halves are pressed togethe...

New Thing: Gloomhaven Night Demon

Image
I really enjoyed the sculpting work that I did on the  Flame Demon , so I decided to dive in even deeper with some more of Zacharias Reinhardt's techniques and try my hand at the Night Demon .  In this case, I specifically wanted to use his Improved Asymmetrical Sculpting technique .  As I watched that video, I was immediately reminded of the process that I used to make the Living Bones model , where each part of the model was its own object and so could be individually posed.  I found that model of posing very intuitive (and forgiving of mistakes or late-game idea changes!), so was eager to try it out! Just as he does in his videos, I started with a cube that has a Subdivision Surface  modifier on it to make it roundish.  I then extruded faces to make the very general shape, doing a very rough version of the extrusion-shaping that Miguel Zavala  has perfected.  Since I knew that I would be doing sculpting work, I didn't worry about adding in d...

New Thing: Gloomhaven Flame Demon

Image
I've seen so many cool   models  on Thingiverse lately, with incredible details sculpted onto them, so I decided that I need to learn to sculpt.  Fortunately, Zacharias Reinhardt has published some incredible videos about sculpting in Blender , which have been hugely helpful to me.  I can't overstate how much help those videos have been.  I've had several face-palm moments when I saw him doing something simply and elegantly that I had wasted hours fighting with. I had previously identified MZ's Bone Devil model as a good proxy for the Gloomhaven Flame Demon .  The Flame Demon doesn't have that cool tail, or many of the other cool distinguishing features of the Bone Devil, but I really liked the core build of the character.  After deciding that I needed to learn to sculpt, it seemed like I had come across a natural match.  I had removed all of the cool features from the Bone Devil, so this was an opportunity for me to sculpt cool Flame Demon fe...

New Thing: Harrower Infester for Gloomhaven!

Image
I've made a new thing - a Harrower Infester model for Gloomhaven !  I think that this is my best creation, yet!  I feel like I'm really homing in on a balance between parametric design and sculpting that's working well for me.  When I made this model, I used the "extruded cube" method to make the shape of the main robe, with completely separate extruded cubes for the arms.  I then made the cowel, pauldrons, knives, legs, spikes, and all of the little details as separate meshes, which I arranged on the main robe.  When I didn't like where something was or how it looked, I moved that something around to get it into a better place.  To that end, I want to talk specifically about the insect legs that I made for this guy. Those legs are remarkably parametric.  I went over the robe pretty heavily with Blender's sculpting tools, in order to add the folds and creases in the fabric... but those legs are pure parameterized geometry!  Here's a screenshot o...

New Things: City Archer, City Guard, and Hound!

Image
I've uploaded three new Gloomhaven remix models recently: the City Archer , the City Guard , and the Hound !  The word of the day was definitely armature , because I didn't make any of those models myself.  All I did was make some slight model changes and, in the case of the Hound and the Archer, change their poses.  I love how thoroughly the 3D printing community has embraced the Creative Commons! So, here's some notes about armatures.  I started the same way as I did for the Forest Imp 's armature, except that I'm now using Blender 2.79 and Rigify 0.5 so the options have slightly changed (to the benefit of those wolves, above!).  Also, this time I was laying out my Armature over an existing model, instead of drawing a model over an existing Armature!  For the Archer, I added a basic human armature and scaled it up to fit MZ4250's model, then used Edit mode to line the armature up with the existing model.  To do that, I just grabbed each individual...

New Thing: Deep Terror for Gloomhaven

Image
I made a Deep Terror model for Gloomhaven !  This model was also pretty fun to make, as I used the same techniques as I did when making my Living Bones model, and so it was all very dynamic to get the pose and general form down.  Like the individual bones in the Living Bones model, I made a bunch of lines by making a plane and deleting 2 of the vertices from it.  Then, I selected one of the remaining vertices and used ctrl-click  to extrude another vertex, and another, and another until the general form of each tentacle was in place. Of course, that left me with really boxy tentacles, but the Subdivision Surface and Skin modifiers were able to round them out nicely.  I then turned on proportional edit (by pressing o ), ensured that it was set to manipulate points by connected , then selected one end of each tentacle and used ctrl-a  to adjust its thickness.  Because proportional edit was enabled, it also adjusted the thickness of the other connected...

New Thing: Gloomhaven Forest Imp

Image
I recently released my Gloomhaven Forest Imp model on Thingiverse, and wow, did I ever push the boundaries of my ability while making that one!  I didn't really understand what I was getting myself into when I said that I'd take a stab at this model on the Gloomhaven Thingiverse group, but I'm pretty happy with the way it's turned out: When I started the project, I was imagining that I'd use a mostly parameterized design process, like I did for my Living Bones model .  Well, that process works really well for a monster with many distinct parts that have visible borders between them (aka: a skeleton), but not so well for a living creature that has smooth transitions between its joints (aka: anything else that I'm going to want to model).  So, I had to rethink my approach. I considered my givens: I don't have an artistic background, so need the ability to play with the model a bunch to get the basic human form in place.  I need the ability to work on my...

New Thing: Giant Viper

Image
I made a Giant Viper Gloomhaven monster , and it was really fun!  This was a great chance to take the skills that I learned while making my Living Bones model , add to them, and then apply them!  But first, here's a picture of my version 1 print: Here's the crazy thing about that model - it was really easy to make.  Of course, I had no idea that it would be easy when I started, so the first thing that I did was a bunch of research about how to draw scales with Blender.  It was a bit of a challenging search because the scale function is so important while making 3D models, but I eventually came across the idea to use the Array and Curve modifiers, then found a great video about how to use them.  Thank goodness that I found that video, because they are not easy to use because of how sensitive they are to each object's position relative to its origin.  But, more on that later. Once I knew that I was going to try and make this snake as parametricly as p...