New Thing: Wind Demon for Gloomhaven, Part 2
In Part 1 of this New Thing post, I wrote about how I made the whirlwind for my Gloomhaven Wind Demon model. This time, I want to write about how I made that creepy demon hand.
 And it really didn't work very well. As I saw while working on the Living Bones model, the Skin modifier really doesn't like it when you have a bunch of complex intersections... and the bones of a hand are nothing if not complex. It was causing all sorts of weird non-manifold geometry, which I knew was going to be problematic later on. So, I thought about how to fix it. In the end, the solution was staggeringly simple. If the problem was that I had too many finger bones, etc. joining to the wrist, just don't join them.


I used the same basic technique that I wrote about for the Forest Imp model, but I think that I improved it a lot here. Like with the imp, the first thing that I did was to add the basic armature so that I could build my model over it. In this case, I only wanted an arm and hand, so I just deleted the rest of the armature until those were the only bones that I had left. Then, I added a mesh and drew edges over each bone, so that I could apply the Skin and Subdivision Surface modifiers to give me some basic geometry again.
 And it really didn't work very well. As I saw while working on the Living Bones model, the Skin modifier really doesn't like it when you have a bunch of complex intersections... and the bones of a hand are nothing if not complex. It was causing all sorts of weird non-manifold geometry, which I knew was going to be problematic later on. So, I thought about how to fix it. In the end, the solution was staggeringly simple. If the problem was that I had too many finger bones, etc. joining to the wrist, just don't join them.
So, I selected the vertex at the wrist, pressed v to split it away from the big cluster, and then placed it very near to the wrist. At this point, the Skin modifier no longer knew what to do with that disconnected geometry, but that's easy to fix. With that vertex selected, I pressed the Mark Root button (under the modifier), which gave Skin what it needed to draw the skin around that new geometry.

I repeated that process for each finger, until they were all disconnected from the wrist. It still looks sloppy in the screenshot, but it's much more technically sound. Instead of having a single shape with the kind of geometric folds that can summon a Lovecraftian horror, I had 6 distinct simple tubes that happened to have some overlaps.

At this point, I futzed around with the node proportions (via ctrl-a while selecting a vertex) until the arm was a little better looking, then applied those Skin modifiers and parented the arm to the armature. I also split up the arm into its component parts at some point, but I honestly don't remember when I did that (in Edit mode, I selected everything, then pressed p and selected by loose parts to turn each shell into its own object). Once the arm was parented to the armature, I spent some time playing around with the pose until I had the hand manipulated into a cool grasping evil monster sort of shape.

Posing it with each finger as its own enclosed shell was really advantageous. When posing models, geometry at the joint tends to get funky, and not in a James Brown sort of way. Because those complex joints weren't joined together in this case, the posing just changed which parts were overlapping with which other parts, and so the geometry never really got distorted by the posing.
With the posing complete, I applied the pose to all of the separate arm objects by selecting them all and pressing alt-c, then selecting convert to Mesh from... That's functionally a shortcut to apply a bunch of modifiers to a bunch of objects all at once. Now, it was time for the magic... and by magic, I mean a boolean operation.
I selected the arm, then put a Boolean Union modifier onto it, selecting the thumb section. I then applied that modifier and deleted the now-unnecessary disembodied thumb section, and moved on to the next finger. And the next, until all of the fingers had been boolean unioned to the wrist.

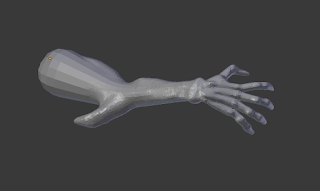
When it was done, I had a single hand mesh with no distorted or non-manifold geometry, which was a perfect canvas for sculpting. I selected my mesh, went into Sculpt mode, and enabled Dyntopo. I ignored the warning about Blender not preserving vertex data (I'm done with the thickness data that we assigned back when we were using the Skin modifier) and went to town on it, making it into the creepy demon arm that I ended up using on the Wind Demon!


Comments
Post a Comment